More languages
More actions
No edit summary |
No edit summary |
||
| (61 intermediate revisions by 4 users not shown) | |||
| Line 1: | Line 1: | ||
[[zh:3.5inch_HDMI_Display-B]] | |||
== <font color="blue">Product Video</font> == | == <font color="blue">Product Video</font> == | ||
{{#ev:youtube|gv_qCIYgbFQ}} | {{#ev:youtube|gv_qCIYgbFQ}} | ||
*[http://www.lcdwiki.com/Video_Presentation Related Video] | *[http://www.lcdwiki.com/Video_Presentation Related Video] | ||
==<font color="blue">Pictures</font>== | ==<font color="blue">Pictures</font>== | ||
[[File:MPI3508- | [[File:MPI3508-100.jpg|300px]] | ||
[[File:MPI3508- | [[File:3.5-MPI3508-2pin.jpg|300px]] | ||
[[File:3508-20210302.jpg|300px]] | |||
== <font color="blue">Description</font>== | == <font color="blue">Description</font>== | ||
| Line 36: | Line 29: | ||
* Power Dissipation: 0.20A*5V (Brightness @100%) | * Power Dissipation: 0.20A*5V (Brightness @100%) | ||
::::::0.15A*5V (Backlight close) | ::::::0.15A*5V (Backlight close) | ||
* | * Product Size: 85.5*60.6(mm) | ||
* Rough Weight ( | * Package Size: 143*134*51 (mm) | ||
* Rough Weight(Package containing): 142(g) | |||
== <font color="blue">Hardware Description</font> == | == <font color="blue">Hardware Description</font> == | ||
| Line 52: | Line 46: | ||
== <font color="blue">How to use with Raspbian/Ubuntu Mate/ Kali/ Retropie System</font> == | == <font color="blue">How to use with Raspbian/Ubuntu Mate/ Kali/ Retropie System</font> == | ||
<big>'''Method 1: quick install (raspberry pi needs Internet connection)'''</big> | <big>'''Method 1: quick install (raspberry pi needs Internet connection)'''</big> | ||
| Line 60: | Line 54: | ||
# Install the system according to the official tutorial steps. | # Install the system according to the official tutorial steps. | ||
* ''' | * '''Step 2: insert the SD card into the raspberry pie and connect the hardware as shown in the picture:''' | ||
[[File:MPI3508-001.jpg|300px]] [[File:MPI3508-66.jpg|300px]] | |||
* '''Step 3,Install LCD driver'''<br /> | |||
1) log in the raspberry pie system with Putty connection to the user command line (initial username: PI password :raspberry) | 1) log in the raspberry pie system with Putty connection to the user command line (initial username: PI password :raspberry) | ||
2) execute the following command (Mouse Right-click can paste the code in Putty): | 2) execute the following command (Mouse Right-click can paste the code in Putty): | ||
{{code|1= | {{code|1= | ||
sudo rm -rf LCD-show | |||
git clone https://github.com/goodtft/LCD-show.git | git clone https://github.com/goodtft/LCD-show.git | ||
chmod -R 755 LCD-show | chmod -R 755 LCD-show | ||
| Line 71: | Line 70: | ||
*After executing the above command, the system will restart automatically, and display and touch will be OK. | *After executing the above command, the system will restart automatically, and display and touch will be OK. | ||
'''<big>Method 2: offline installation</big>''' <br /> | '''<big>Method 2: offline installation</big>''' <br /> | ||
* ''' Step 1: install the official image of Raspbian/Ubuntu''' | * ''' Step 1: install the official image of Raspbian/Ubuntu''' | ||
| Line 103: | Line 96: | ||
}} | }} | ||
* '''Step 3: insert the SD card into the raspberry pie and connect the hardware | * '''Step 3: insert the SD card into the raspberry pie and connect the hardware ''' | ||
* '''Step 4: power the raspberry, connect the mouse keyboard, and open the terminal terminal terminal on the raspberry pie:''' | * '''Step 4: power the raspberry, connect the mouse keyboard, and open the terminal terminal terminal on the raspberry pie:''' | ||
| Line 127: | Line 118: | ||
:If there are several monitors, please unplug other monitor connectors first, and use LCD as the only monitor for testing. | :If there are several monitors, please unplug other monitor connectors first, and use LCD as the only monitor for testing. | ||
:Note: touch function can only be used for raspberry pi. | :Note: touch function can only be used for raspberry pi. | ||
{{rotate}} | |||
==<font color="blue"> Resource</font>== | ==<font color="blue"> Resource</font>== | ||
| Line 136: | Line 126: | ||
# [http://www.lcdwiki.com/res/PublicFile/How_to_install_the_LCD_driver_V1.2.pdf How_to_install_the_LCD_driver_V1.2] | # [http://www.lcdwiki.com/res/PublicFile/How_to_install_the_LCD_driver_V1.2.pdf How_to_install_the_LCD_driver_V1.2] | ||
# [http://www.lcdwiki.com/res/PublicFile/How_to_install_matchbox-keyboard(En).pdf How_to_install_matchbox-keyboard] | # [http://www.lcdwiki.com/res/PublicFile/How_to_install_matchbox-keyboard(En).pdf How_to_install_matchbox-keyboard] | ||
# [http://www.lcdwiki.com/ | # [http://www.lcdwiki.com/How_to_rotate_the_display_direction How_to_rotate_the_display_direction] | ||
# [http://www.lcdwiki.com/res/PublicFile/How_to_use_Raspberry_Pi(Download,Format,Burn,SSH,PuTTy)-V1.0.pdf How_to_use_Raspberry_Pi(Download,Format,Burn,SSH,PuTTy)-V1.0.pdf] | # [http://www.lcdwiki.com/res/PublicFile/How_to_use_Raspberry_Pi(Download,Format,Burn,SSH,PuTTy)-V1.0.pdf How_to_use_Raspberry_Pi(Download,Format,Burn,SSH,PuTTy)-V1.0.pdf] | ||
# [http://www.lcdwiki.com/res/Show_Direction_and_Touch/How_to_change_display_direction-GPIO-Resistive_Touch-V1.2.pdf How_to_change_display_direction-GPIO-Resistive_Touch-V1.2] | # [http://www.lcdwiki.com/res/Show_Direction_and_Touch/How_to_change_display_direction-GPIO-Resistive_Touch-V1.2.pdf How_to_change_display_direction-GPIO-Resistive_Touch-V1.2] | ||
| Line 152: | Line 142: | ||
:Please Try our Configned images for tested. | :Please Try our Configned images for tested. | ||
:Just need download and write the image into the TF card. DO NOT need any driver installation steps. | :Just need download and write the image into the TF card. DO NOT need any driver installation steps. | ||
{| class="wikitable" border="1" style="width: | {| class="wikitable" border="1" style="width: 99%; margin-left:1.5%;background-color: white;" | ||
!Image Name | !Image Name | ||
!Version | !Version | ||
| Line 160: | Line 150: | ||
|- | |- | ||
| rowspan="2" |Raspbian | | rowspan="2" |Raspbian | ||
| rowspan="2" | | | rowspan="2" |2023-02-21 | ||
| rowspan="2" |PI3B+/ | | rowspan="2" |PI3B+/PI3/PI2/ | ||
PI1/ZERO/ZERO W | |||
| rowspan="2" |user:pi | | rowspan="2" |user:pi | ||
password:raspberry | password:raspberry | ||
|[[File:Baiduyun.jpg|24px]]BaiduYun: | |[[File:Baiduyun.jpg|24px]]BaiduYun: | ||
|[https://pan.baidu.com/s/ | |[https://pan.baidu.com/s/1kCHjjasd7hR-rkqear6cQQ MPI3508-3.5inch-2023-02-21-raspios-bullseye-armhf.7z] 提取码:g8cb | ||
|- | |- | ||
|[[File:Mega-1.jpg|24px]]Mega: | |[[File:Mega-1.jpg|24px]]Mega: | ||
|[https://mega.nz/# | |[https://mega.nz/folder/d7gWnaKb#a0OoVcChgOSb-EwNoqJSaQ MPI3508-3.5inch-480x320-2022-04-04-raspios-bullseye-armhf.7z] | ||
|- | |- | ||
| rowspan="2" |Ubuntu | | rowspan="2" |Raspbian | ||
| rowspan="2" | | | rowspan="2" |2024-11-19 | ||
| rowspan="2" |PI3,PI2 | | rowspan="2" |PI4 | ||
| rowspan="2" |user:pi | |||
password:raspberry | |||
|[[File:Baiduyun.jpg|24px]]BaiduYun: | |||
|[https://pan.baidu.com/s/1BebUWPG6bcHXJ8nEl3OYgg MPI3508-3.5inch-2024-11-19-raspios-bookworm-armhf(Pi4-Pi5)] 提取码:v0xz | |||
|- | |||
|[[File:Mega-1.jpg|24px]]Mega: | |||
|[https://mega.nz/folder/x7o0mSiD#o27Z_UdiJRmQnJrHok3YJg MPI3508-3.5inch-600x400-2022-04-04-raspios-bullseye-armhf.7z] | |||
|- | |||
| rowspan="2" |Ubuntu MATE | |||
| rowspan="2" |22.04 | |||
| rowspan="2" |PI4B,PI3B+,PI3,PI2 | |||
| rowspan="2" |user:pi | | rowspan="2" |user:pi | ||
password:raspberry | password:raspberry | ||
|[[File:Baiduyun.jpg|24px]]BaiduYun: | |[[File:Baiduyun.jpg|24px]]BaiduYun: | ||
|[https://pan.baidu.com/s/ | |[https://pan.baidu.com/s/1KXrZyxM54vD7KjxIYjREmg MPI3508-3.5inch-ubuntu-mate-22.04-desktop-armhf+raspi.7z] 提取码:v90c | ||
|- | |- | ||
|[[File:Mega-1.jpg|24px]]Mega: | |[[File:Mega-1.jpg|24px]]Mega: | ||
|[https://mega.nz/# | |[https://mega.nz/folder/k7AhXA6a#7kILQlMnZd9IJwGkFhgXkA MPI3508-3.5inch-ubuntu-mate-22.04-desktop-armhf+raspi.7z] | ||
|- | |- | ||
| rowspan="2" |Kali | | rowspan="2" |Kali Linux RaspberryPi 2, 3 and 4 | ||
| rowspan="2" | | | rowspan="2" |2024.3 | ||
| rowspan="2" |PI3B+,PI3,PI2 | | rowspan="2" |PI4B,PI3B+,PI3,PI2 | ||
| rowspan="2" |user: | | rowspan="2" |user:kali | ||
password: | password:kali | ||
|[[File:Baiduyun.jpg|24px]]BaiduYun: | |[[File:Baiduyun.jpg|24px]]BaiduYun: | ||
|[https://pan.baidu.com/s/ | |[https://pan.baidu.com/s/1IO3GbIQsJr0p2iZqyy8g7Q MPI3508-3.5inch-kali-linux-2024.3] 提取码:h50m | ||
|- | |- | ||
|[[File:Mega-1.jpg|24px]]Mega: | |[[File:Mega-1.jpg|24px]]Mega: | ||
|[https://mega.nz/# | |[https://mega.nz/folder/wioFiJ4S#eWGJKt6PMiHI6JsLewMI2A MPI3508-3.5inch-kali-linux-2022.1] | ||
|} | |} | ||
* '''Software''' | * '''Software''' | ||
| Line 201: | Line 202: | ||
[[#top|BACK TO TOP]] | [[#top|BACK TO TOP]] | ||
[[category:Raspberry Pi LCD]] | |||
[[category:HDMI Interface]] | |||
Latest revision as of 16:31, 26 November 2024
Product Video
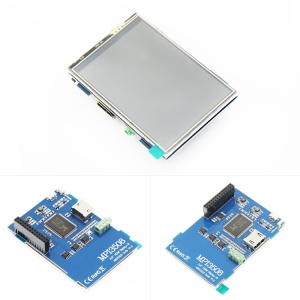
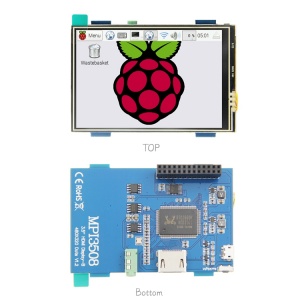
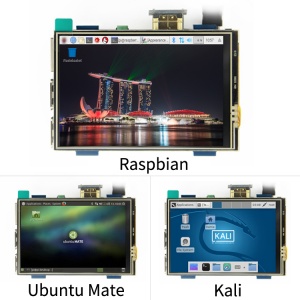
Pictures
Description
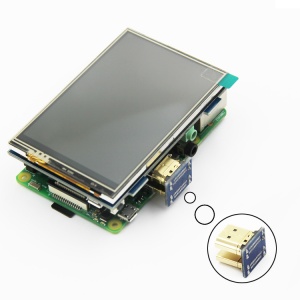
- 3.5inch standard display, support HDMI input, refresh rate above 60FPS
- Physical resolution 480x320, configurable software resolution up to 1920x1080
- It is compatible with mainstream mini PC such as Raspberry Pi, BB Black, Banana Pi
- It can also be used as a general-purpose HDMI display, connecting computers, TV boxes, Microsoft Xbox360, SONY PS4, Nintendo Switch and so on
- Used as a Raspberry Pi display that supports Raspbian, Ubuntu, Kodi, Win10 IOT, single-touch, free drive
- Work as a PC monitor, support Win7, Win8, Win10 system (No touch Function)
- Support HDMI audio output,Backlight brightness can be adjusted
- CE, RoHS certification
Parameters
- Size: 3.5(inch)
- SKU: MPI3508
- Physical Resolution: 480×320(dots)
- Software adjustable resolution: 480×320~1920×1080(dots)
- Touch: Resistance Touch
- Power Dissipation: 0.20A*5V (Brightness @100%)
- 0.15A*5V (Backlight close)
- Product Size: 85.5*60.6(mm)
- Package Size: 143*134*51 (mm)
- Rough Weight(Package containing): 142(g)
Hardware Description
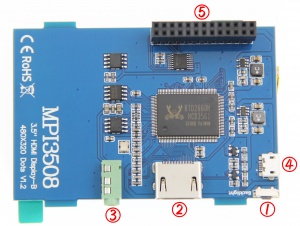
①Backlight button: backlight brightness adjustment button, short press backlight changes by 10%, long press 3 seconds to close backlight
②HDMI interface: HDMI signal input interface
③Amplifier interface: HDMI audio output interface
④USB power supply interface: provide power for ordinary display (5V 1A)
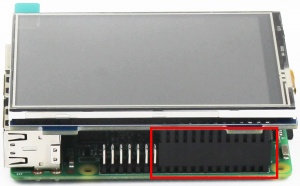
⑤Transaction raspberry pie 26PIN base: gets power and return touch from this area when used as a raspberry pie monitor
How to use with Raspbian/Ubuntu Mate/ Kali/ Retropie System
Method 1: quick install (raspberry pi needs Internet connection)
- Step 1, Install Raspbian official image
- Download the latest image from the official download.
- Install the system according to the official tutorial steps.
- Step 2: insert the SD card into the raspberry pie and connect the hardware as shown in the picture:
- Step 3,Install LCD driver
1) log in the raspberry pie system with Putty connection to the user command line (initial username: PI password :raspberry) 2) execute the following command (Mouse Right-click can paste the code in Putty):
sudo rm -rf LCD-show
git clone https://github.com/goodtft/LCD-show.git
chmod -R 755 LCD-show
cd LCD-show/
sudo ./MPI3508-show
- After executing the above command, the system will restart automatically, and display and touch will be OK.
Method 2: offline installation
- Step 1: install the official image of Raspbian/Ubuntu
- 1)Download the latest Raspbian or Ubuntu image from the official website https://www.raspberrypi.org/downloads/
- 2)Format the TF card with SDFormatter,
- 3)Use Win32DiskImager to burn the official image to the TF card.
- Step 2, modify the "config.txt"
- After the step 1 completion of burning in the CD Driver in the folder "show-LCD.tar.gz" copy to TF-card root directory,
- Open the config.txt file in TF-card root directory and add the following code to the end of the file. Save and colse TF card:
hdmi_force_hotplug=1
config_hdmi_boost=7
hdmi_drive=2
hdmi_force_hotplug=1
hdmi_group=2
hdmi_mode=87
hdmi_cvt 480 320 60 6 0 0 0
- Step 3: insert the SD card into the raspberry pie and connect the hardware
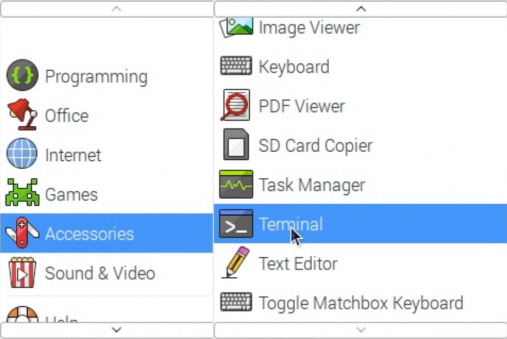
- Step 4: power the raspberry, connect the mouse keyboard, and open the terminal terminal terminal on the raspberry pie:
- Step 5. Enter the following instructions in the terminal terminal:
cd /boot
cp LCD-show.tar.gz ~
cd ~
sudo tar zxvf LCD-show.tar.gz
cd LCD-show/
sudo ./MPI3508-show
How to use as PC monitor
- Connect the computer HDMI output signal to the LCD HDMI interface by using the HDMI cable
- Connect the LCD's USB Power interface to the USB port of the device
- If there are several monitors, please unplug other monitor connectors first, and use LCD as the only monitor for testing.
- Note: touch function can only be used for raspberry pi.
How to rotate the display direction
This method only applies to the Raspberry Pi series of display screens, other display screens do not apply.
- Method 1,If the driver is not installed, execute the following command (Raspberry Pi needs to connected to the Internet):
sudo rm -rf LCD-show
git clone https://github.com/goodtft/LCD-show.git
chmod -R 755 LCD-show
cd LCD-show/
sudo ./XXX-show 90
After execution, the driver will be installed. The system will automatically restart, and the display screen will rotate 90 degrees to display and touch normally.
( ' XXX-show ' can be changed to the corresponding driver, and ' 90 ' can be changed to 0, 90, 180 and 270, respectively representing rotation angles of 0 degrees, 90 degrees, 180 degrees, 270 degrees)
- Method 2,If the driver is already installed, execute the following command:
cd LCD-show/
sudo ./rotate.sh 90
After execution, the system will automatically restart, and the display screen will rotate 90 degrees to display and touch normally.
( ' 90 ' can be changed to 0, 90, 180 and 270, respectively representing rotation angles of 0 degrees, 90 degrees, 180 degrees, 270 degrees)
If the rotate.sh prompt cannot be found, use Method 1 to install the latest drivers
Resource
- Document
- How_to_install_the_LCD_driver_V1.2
- How_to_install_matchbox-keyboard
- How_to_rotate_the_display_direction
- How_to_use_Raspberry_Pi(Download,Format,Burn,SSH,PuTTy)-V1.0.pdf
- How_to_change_display_direction-GPIO-Resistive_Touch-V1.2
- MPI3508-Quick-Start-V1.3
- MPI3508-3.5inch_HDMI_Display_B_User_Manual-V1.1
- Product size
- Driver download
- download:LCD-show.tar.gz
- Images download
- If you have difficulty installing the driver, or if you still can't use the display properly after installing the driver,
- Please Try our Configned images for tested.
- Just need download and write the image into the TF card. DO NOT need any driver installation steps.
| Image Name | Version | Support | Password | Download | |
|---|---|---|---|---|---|
| Raspbian | 2023-02-21 | PI3B+/PI3/PI2/
PI1/ZERO/ZERO W |
user:pi
password:raspberry |
MPI3508-3.5inch-2023-02-21-raspios-bullseye-armhf.7z 提取码:g8cb | |
| MPI3508-3.5inch-480x320-2022-04-04-raspios-bullseye-armhf.7z | |||||
| Raspbian | 2024-11-19 | PI4 | user:pi
password:raspberry |
MPI3508-3.5inch-2024-11-19-raspios-bookworm-armhf(Pi4-Pi5) 提取码:v0xz | |
| MPI3508-3.5inch-600x400-2022-04-04-raspios-bullseye-armhf.7z | |||||
| Ubuntu MATE | 22.04 | PI4B,PI3B+,PI3,PI2 | user:pi
password:raspberry |
MPI3508-3.5inch-ubuntu-mate-22.04-desktop-armhf+raspi.7z 提取码:v90c | |
| MPI3508-3.5inch-ubuntu-mate-22.04-desktop-armhf+raspi.7z | |||||
| Kali Linux RaspberryPi 2, 3 and 4 | 2024.3 | PI4B,PI3B+,PI3,PI2 | user:kali
password:kali |
MPI3508-3.5inch-kali-linux-2024.3 提取码:h50m | |
| MPI3508-3.5inch-kali-linux-2022.1 | |||||
- Software

