More actions
No edit summary |
No edit summary |
||
| (7 intermediate revisions by 2 users not shown) | |||
| Line 2: | Line 2: | ||
|cn=http://www.lcdwiki.com/zh/%E5%A6%82%E4%BD%95%E5%AE%89%E8%A3%85%E8%99%9A%E6%8B%9F%E9%94%AE%E7%9B%98(CN) | |cn=http://www.lcdwiki.com/zh/%E5%A6%82%E4%BD%95%E5%AE%89%E8%A3%85%E8%99%9A%E6%8B%9F%E9%94%AE%E7%9B%98(CN) | ||
|en=http://www.lcdwiki.com/How_to_install_Soft_Keyboard }} | |en=http://www.lcdwiki.com/How_to_install_Soft_Keyboard }} | ||
This installation tutorial uses " | <br/> | ||
earlier image, then the | == <font color="blue">'''How to install Soft Keyboard'''</font> == | ||
virtual-keyboard official installation tutorial for specification. | This installation tutorial uses "2020-08-20-raspios-buster-armhf" version for testing. <br/>If use earlier image, then the step6 and step7 maybe different, please refer to the virtual-keyboard official installation tutorial for specification. | ||
Official reference address http://ozzmaker.com/virtual-keyboard-for-the-raspberry-pi/ | Official reference address http://ozzmaker.com/virtual-keyboard-for-the-raspberry-pi/ | ||
'''1. Install the necessary files''' | '''1. Install the necessary files''' | ||
{{code|1= | |||
sudo apt-get update | sudo apt-get update | ||
sudo apt-get install libfakekey-dev libpng-dev libxft-dev autoconf libtool | sudo apt-get install libfakekey-dev libpng-dev libxft-dev autoconf libtool | ||
}} | |||
'''2.Install the matchbox-keyboard''' | '''2.Install the matchbox-keyboard''' | ||
{{code|1= | |||
git clone https://github.com/mwilliams03/matchbox-keyboard.git | git clone https://github.com/mwilliams03/matchbox-keyboard.git | ||
cd matchbox-keyboard | cd matchbox-keyboard | ||
./autogen.sh | ./autogen.sh | ||
}} (Note: "./ autogen.sh" execution takes a few minutes, and would show as follows after running correctly; if it doesn’t show as follows, then need to check to see if there are error Popup Window prompt) | |||
[[File:Soft_Keyboard-01.png]] | [[File:Soft_Keyboard-01.png]] | ||
| Line 50: | Line 51: | ||
{{code|1= | {{code|1= | ||
sudo chmod +x /usr/bin/toggle-matchbox-keyboard.sh }} | sudo chmod +x /usr/bin/toggle-matchbox-keyboard.sh }} | ||
'''5. Add script above to Start menu''' | '''5. Add script above to Start menu''' | ||
{{code|1= | |||
sudo nano /usr/share/applications/toggle-matchbox-keyboard.desktop | sudo nano /usr/share/applications/toggle-matchbox-keyboard.desktop | ||
}} | |||
Paste the following content, press Ctrl + X and Y, to save then exit | Paste the following content, press Ctrl + X and Y, to save then exit | ||
{{code|1= | {{code|1= | ||
| Line 64: | Line 67: | ||
Categories=Panel;Utility;MB | Categories=Panel;Utility;MB | ||
X-MB-INPUT-MECHANSIM=True }} | X-MB-INPUT-MECHANSIM=True }} | ||
''' | |||
'''6. Restart the system''' | |||
{{code|1=sudo reboot }} | {{code|1=sudo reboot }} | ||
'''7. Add virtual keyboard to taskbar ''' | |||
<br><br> | |||
Right click on the taskbar <br><br> | |||
[[File:虚拟键盘-1.png|750px]] <br> <br> | |||
[[File:虚拟键盘-2.png|750px]] <br> <br> | |||
[[File:虚拟键盘-3.png|750px]] <br> <br> | |||
[[File:虚拟键盘-4.png|750px]] <br> <br> | |||
P.S. Log into via SSH to see how to change the size of the virtual keyboard | P.S. Log into via SSH to see how to change the size of the virtual keyboard | ||
{{code|1=DISPLAY=:0.0 matchbox-keyboard -s 50 extended | {{code|1=DISPLAY=:0.0 matchbox-keyboard -s 50 extended | ||
DISPLAY=:0.0 matchbox-keyboard -s 100 extended | DISPLAY=:0.0 matchbox-keyboard -s 100 extended | ||
}} | }} | ||
Latest revision as of 19:17, 8 December 2020
How to install Soft Keyboard
This installation tutorial uses "2020-08-20-raspios-buster-armhf" version for testing.
If use earlier image, then the step6 and step7 maybe different, please refer to the virtual-keyboard official installation tutorial for specification.
Official reference address http://ozzmaker.com/virtual-keyboard-for-the-raspberry-pi/
1. Install the necessary files
sudo apt-get update
sudo apt-get install libfakekey-dev libpng-dev libxft-dev autoconf libtool
2.Install the matchbox-keyboard
git clone https://github.com/mwilliams03/matchbox-keyboard.git
cd matchbox-keyboard
./autogen.sh
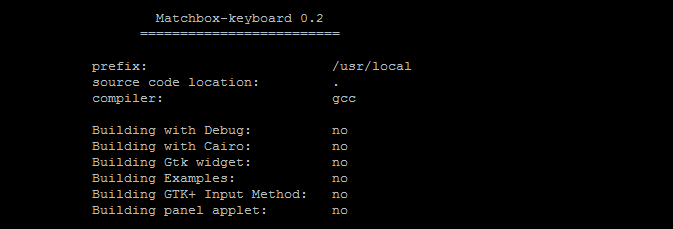
(Note: "./ autogen.sh" execution takes a few minutes, and would show as follows after running correctly; if it doesn’t show as follows, then need to check to see if there are error Popup Window prompt)
Continue:
sudo make
sudo make install
3. Install the shared data library for matchbox-keyboard
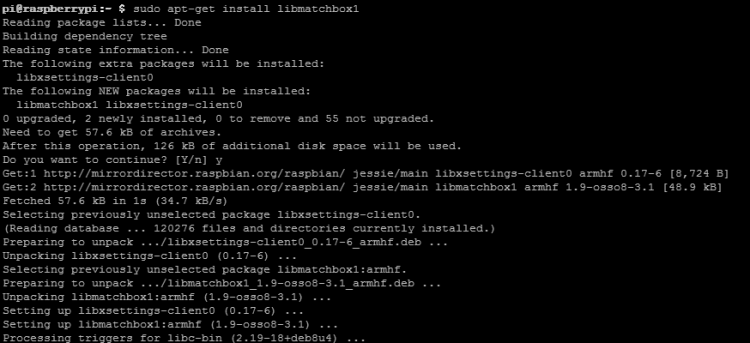
sudo apt-get install libmatchbox1
As following:
4. Create a virtual keyboard startup script
sudo nano /usr/bin/toggle-matchbox-keyboard.sh
Paste the following, press Ctrl + X and Y, to save then exit
#!/bin/bash
#This script toggle the virtual keyboard
PID=`pidof matchbox-keyboard`
if [ ! -e $PID ]; then
killall matchbox-keyboard
else
matchbox-keyboard -s 50 extended&
fi
Add executable permission for the script above
sudo chmod +x /usr/bin/toggle-matchbox-keyboard.sh
5. Add script above to Start menu
sudo nano /usr/share/applications/toggle-matchbox-keyboard.desktop
Paste the following content, press Ctrl + X and Y, to save then exit
[Desktop Entry]
Name=Toggle Matchbox Keyboard
Comment=Toggle Matchbox Keyboard
Exec=toggle-matchbox-keyboard.sh
Type=Application
Icon=matchbox-keyboard.png
Categories=Panel;Utility;MB
X-MB-INPUT-MECHANSIM=True
6. Restart the system
sudo reboot
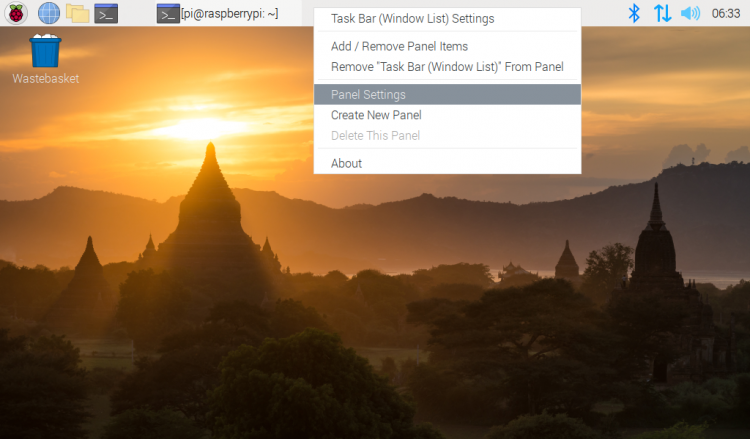
7. Add virtual keyboard to taskbar
Right click on the taskbar
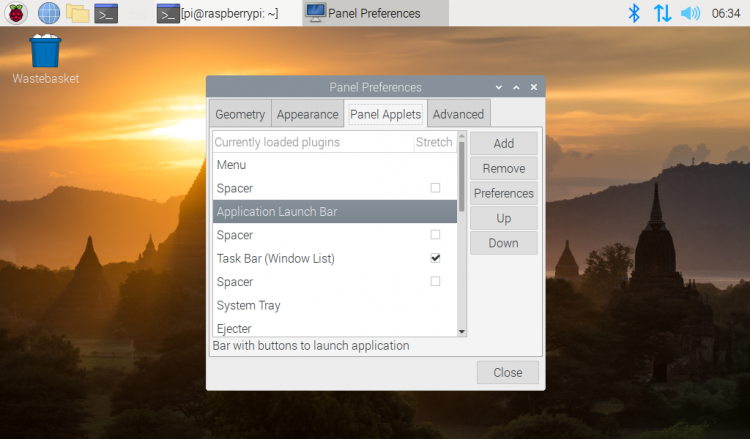
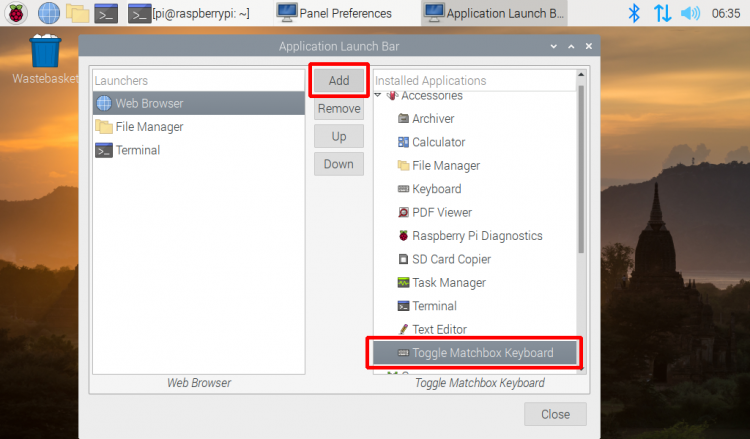
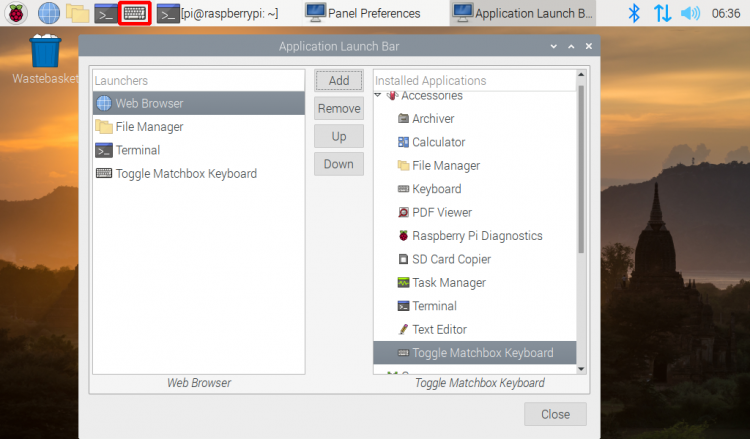
P.S. Log into via SSH to see how to change the size of the virtual keyboard
DISPLAY=:0.0 matchbox-keyboard -s 50 extended
DISPLAY=:0.0 matchbox-keyboard -s 100 extended

