More actions
No edit summary |
|||
| (33 intermediate revisions by the same user not shown) | |||
| Line 7: | Line 7: | ||
[[File:7-S-10-2.jpg|300px]] | [[File:7-S-10-2.jpg|300px]] | ||
==<font color="blue"> | ==<font color="blue"> Product Feature </font> == | ||
''' | *'''IPS full Angle display''' | ||
#The viewing Angle is large | |||
#true color | |||
#Dynamic picture quality is excellent | |||
#Energy saving and environmental protection | |||
*'''1024X600 hd vision''' | |||
#Resolution for hd 1024X600 dot matrix | |||
#It is more delicate than 800X480 ordinary screen | |||
*'''Tempered glass touch panel''' | |||
#Hardness up to 6H, more durable and more scratch resistant | |||
*'''Built-in sound system''' | |||
#Built - in power amplifier circuit | |||
#Built-in stereo dual speaker system, in the display while dancing with the music | |||
*'''Front key dimming + breathing lamp''' | |||
#The front panel has a set of hidden touch buttons to support one-button adjustment of backlight brightness | |||
#The front panel is equipped with a breathing lamp to indicate the working status | |||
*'''Used as a mini PC monitor''' | |||
#Support raspberry pie, Banana Pi, BB Black and other mainstream development board | |||
#Support Raspbian, Kali Linux, ubuntu and other mainstream systems, single touch plug and play without driver. | |||
*'''Used as a computer display''' | |||
#Support win10/win8/win7 system, support five-point touch plug and play driver | |||
==<font color="blue"> Working with Raspberry Pi </font> == | |||
1. Download the latest Raspbian image from the official directory and follow the official tutorial steps to install the system. | |||
2. Open the config.txt file in the root directory of Micro SD card and add the following code at the end of the file, save and exit the Micro SD card: | |||
{{code|1= | {{code|1= | ||
hdmi_force_edid_audio=1 | hdmi_force_edid_audio=1 | ||
| Line 19: | Line 42: | ||
hdmi_mode=87 | hdmi_mode=87 | ||
hdmi_drive=2 | hdmi_drive=2 | ||
display_rotate=0 | display_rotate=0 | ||
hdmi_cvt 1024 600 60 6 0 0 0 | hdmi_cvt 1024 600 60 6 0 0 0 | ||
}} | }} | ||
3.Insert Micro SD card, connect the 7inch HDMI Display (S) to Raspberry Pi , connect the power to boot. | |||
==<font color="blue"> Work as HDMI touch monitor</font> == | |||
This product can be used as the HDMI touch monitor of Windows computer, only need to connect HDMI interface and TOUCH interface, can normally display and support up to five points touch. | |||
==<font color="blue"> | ==<font color="blue"> Product Feature</font> == | ||
* Comprehensive shell care | |||
* This product has '''stereo speakers''' and '''3.5mm headphone jack''', support HDMI audio input, Headset audio output. | |||
* Equipped with buttons to control the System Settings Menu, the functions are as follows: | |||
[[File:7-S-26.jpg|500px]] | |||
{| class="wikitable" | {| class="wikitable" | ||
| | |'''KEY''' | ||
| | |'''DESCRIPTION''' | ||
|- | |- | ||
| | |'''BREATHING LIGHT''' | ||
| | |Short press once, the backlight brightness increases by 10%, after reaching 100%, it will start to cycle from 10%; | ||
Long press 3 seconds, backlight off; | |||
Short press again, Restore the brightness before. | |||
|- | |- | ||
| | |'''POWER''' | ||
| | |When there is HDMI signal, press the button, the system starts up, and the breathing lamp turns blue and slowly flashes. | ||
Press again, the system shuts down, the breathing light turns red and slowly flashes. | |||
|- | |- | ||
| | |'''MENU/RETURN''' | ||
| | |'''Open'''/'''Close''' the System Settings Menu; '''Return''' | ||
|- | |- | ||
| | |'''CONFIRM/MUTE''' | ||
| | |Shortcut keys, '''Mute'''; | ||
In the System Settings Menu, '''Confirm''' | |||
|- | |- | ||
| | |'''UP/''' '''BRIGHTNESS INCREASED''' | ||
| | |Shortcut key, '''backlight brightness increase'''; | ||
In the System Settings Menu, '''Up''' | |||
|- | |- | ||
| | |'''DOWN/''' '''BRIGHTNESS DECREASE''' | ||
| | |Shortcut key, '''backlight brightness reduction'''; | ||
In the System Settings Menu, '''Down''' | |||
|- | |- | ||
| | |'''LEFT/''' '''VOLUME REDUCTION''' | ||
| | |Shortcut key, '''Volume reduction'''; | ||
In the System Settings Menu, '''Left''' | |||
|- | |- | ||
| | |'''RIGHT/''' '''VOLUME INCREASE''' | ||
| | |Shortcut key, '''Volume increase'''; | ||
In the System Settings Menu, '''Right''' | |||
|} | |} | ||
<font color="red"> | <font color="red"> | ||
* | * Without HDMI signal, you won't be able to use the System Settings Menu and volume related shortcuts. | ||
* | * When using the speaker external release function, you need to connect to the '''POWER''' interface with an external power supply. Otherwise, the display flicker, sound distortion and even shutdown may occur due to insufficient POWER supply.</font> | ||
==<font color="blue">Resource</font>== | |||
*'''Document''' | |||
# [http://www.lcdwiki.com/res/MPI7008/7inch-HDMI-Display-(S)-快速入门.pdf 7inch-HDMI-Display-(S)-Quick-Start.pdf] | |||
# [http://www.lcdwiki.com/res/MPI7008/7inch-HDMI-Display-(S)-User-Manual.pdf 7inch-HDMI-Display-(S)-User-Manual.pdf] | |||
#[http://www.lcdwiki.com/res/MPI5001/EN/How_to_install_the_LCD_driver_V1.2.pdf How_to_install_the_LCD_driver_V1.2] | |||
#[http://www.lcdwiki.com/res/MPI5001/EN/How_to_install_matchbox-keyboard(En).pdf How_to_install_matchbox-keyboard] | |||
#[http://www.lcdwiki.com/res/PublicFile/How_to_use_Raspberry_Pi(Download,Format,Burn,SSH,PuTTy)-V1.0.pdf How_to_use_Raspberry_Pi(Download,Format,Burn,SSH,PuTTy)-V1.0.pdf] | |||
*'''Driver download''' | |||
#Local download: [http://www.lcdwiki.com/res/RaspDriver/LCD-show.tar.gz LCD-show.tar.gz] | |||
*'''Images Download''' | |||
:If you have difficulty installing the driver, or if you still can't use the display properly after installing the driver, | |||
:Please Try our Configned images for tested. | |||
:Just need download and write the image into the TF card. DO NOT need any driver installation steps. | |||
{| class="wikitable" border="1" style="width: 100%; margin-left:1.5%;background-color: white;" | |||
!Image Name | |||
!Version | |||
!Support | |||
!Default Password | |||
!colspan="2" |Download | |||
|- | |||
| rowspan="2" |Raspbian | |||
| rowspan="2" |2020-12-02 | |||
| rowspan="2" |PI4/PI3B+/PI3/ PI2/ZERO/ZERO W | |||
| rowspan="2" |user:pi | |||
password:raspberry | |||
|[[File:Baiduyun.jpg|24px]]BaiduYun: | |||
|[https://pan.baidu.com/s/1iOSVyoKOvS2dROZtwq6ktg MPI7006-MPI7008-7inch-H-S-2020-12-02-raspios-buster-armhf.7z] Fetch Code:6fun | |||
|- | |||
|[[File:Mega-1.jpg|24px]]Mega: | |||
|[https://mega.nz/folder/2DxGzISQ#pNQm03-8fG3E3MpYQ_5qBQ MPI7006-MPI7008-7inch-H-S-2020-12-02-raspios-buster-armhf.7z] | |||
|- | |||
| rowspan="2" |Ubuntu MATE-32bit | |||
| rowspan="2" |20.10 | |||
| rowspan="2" |PI4,PI3,PI2 | |||
| rowspan="2" |user:pi | |||
password:raspberry | |||
|[[File:Baiduyun.jpg|24px]]BaiduYun: | |||
|[https://pan.baidu.com/s/1J3lYp0QXzKVmPB2qlk8vtw MPI7006-MPI7008-7inch-H-S-ubuntu-mate-20.10-desktop-armhf+raspi7z]Fetch Code:159d | |||
|- | |||
|[[File:Mega-1.jpg|24px]]Mega: | |||
|[https://mega.nz/folder/OB8GgLwY#bjKtZu6w_iyL1LMN1JgZVw MPI7006-MPI7008-7inch-H-S-ubuntu-mate-20.10-desktop-armhf+raspi] | |||
|- | |||
| rowspan="2" |Kali Linux RaspberryPi 2, 3 and 4 | |||
| rowspan="2" |2020.4 | |||
| rowspan="2" |PI4B,PI3B+,PI3,PI2 | |||
| rowspan="2" |user: kali | |||
password: kali | |||
|[[File:Baiduyun.jpg|24px]]BaiduYun: | |||
|[https://pan.baidu.com/s/1TPcUqPUaJUK-Oo-b2HdvqQ MPI7008-MPI7006-7inch-S-H-kali-linux-2020.4-rpi4-nexmon.7z] Fetch Code:y3t5 | |||
|- | |||
|[[File:Mega-1.jpg|24px]]Mega: | |||
|[https://mega.nz/folder/mYMgiR6R#oBmzb1HvY5IpnK-f4YWtiA MPI7008-MPI7006-7inch-S-H-kali-linux-2020.4-rpi4-nexmon.7z] | |||
|} | |||
*[http://www.lcdwiki.com/MD5 MD5 of Image] | |||
*'''Software''' | |||
# [http://www.lcdwiki.com/res/software/Panasonic_SDFormatter.zip Panasonic SDFormatter] | |||
# [http://www.lcdwiki.com/res/software/Win32DiskImager.zip Win32DiskImager] | |||
# [http://www.lcdwiki.com/res/software/putty.zip PuTTY] | |||
[[#top|BACK TO TOP]] | |||
Latest revision as of 10:51, 12 December 2020
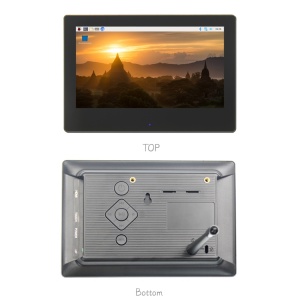
Product Pictures
Product Feature
- IPS full Angle display
- The viewing Angle is large
- true color
- Dynamic picture quality is excellent
- Energy saving and environmental protection
- 1024X600 hd vision
- Resolution for hd 1024X600 dot matrix
- It is more delicate than 800X480 ordinary screen
- Tempered glass touch panel
- Hardness up to 6H, more durable and more scratch resistant
- Built-in sound system
- Built - in power amplifier circuit
- Built-in stereo dual speaker system, in the display while dancing with the music
- Front key dimming + breathing lamp
- The front panel has a set of hidden touch buttons to support one-button adjustment of backlight brightness
- The front panel is equipped with a breathing lamp to indicate the working status
- Used as a mini PC monitor
- Support raspberry pie, Banana Pi, BB Black and other mainstream development board
- Support Raspbian, Kali Linux, ubuntu and other mainstream systems, single touch plug and play without driver.
- Used as a computer display
- Support win10/win8/win7 system, support five-point touch plug and play driver
Working with Raspberry Pi
1. Download the latest Raspbian image from the official directory and follow the official tutorial steps to install the system.
2. Open the config.txt file in the root directory of Micro SD card and add the following code at the end of the file, save and exit the Micro SD card:
hdmi_force_edid_audio=1
max_usb_current=1
hdmi_force_hotplug=1
config_hdmi_boost=7
hdmi_group=2
hdmi_mode=87
hdmi_drive=2
display_rotate=0
hdmi_cvt 1024 600 60 6 0 0 0
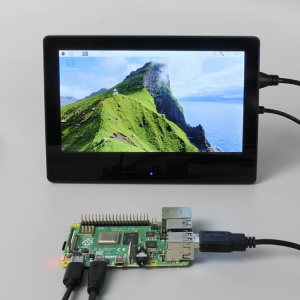
3.Insert Micro SD card, connect the 7inch HDMI Display (S) to Raspberry Pi , connect the power to boot.
Work as HDMI touch monitor
This product can be used as the HDMI touch monitor of Windows computer, only need to connect HDMI interface and TOUCH interface, can normally display and support up to five points touch.
Product Feature
- Comprehensive shell care
- This product has stereo speakers and 3.5mm headphone jack, support HDMI audio input, Headset audio output.
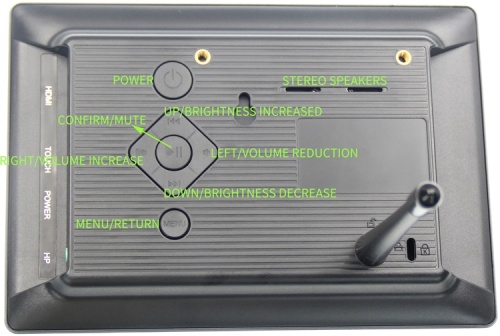
- Equipped with buttons to control the System Settings Menu, the functions are as follows:
| KEY | DESCRIPTION |
| BREATHING LIGHT | Short press once, the backlight brightness increases by 10%, after reaching 100%, it will start to cycle from 10%;
Long press 3 seconds, backlight off; Short press again, Restore the brightness before. |
| POWER | When there is HDMI signal, press the button, the system starts up, and the breathing lamp turns blue and slowly flashes.
Press again, the system shuts down, the breathing light turns red and slowly flashes. |
| MENU/RETURN | Open/Close the System Settings Menu; Return |
| CONFIRM/MUTE | Shortcut keys, Mute;
In the System Settings Menu, Confirm |
| UP/ BRIGHTNESS INCREASED | Shortcut key, backlight brightness increase;
In the System Settings Menu, Up |
| DOWN/ BRIGHTNESS DECREASE | Shortcut key, backlight brightness reduction;
In the System Settings Menu, Down |
| LEFT/ VOLUME REDUCTION | Shortcut key, Volume reduction;
In the System Settings Menu, Left |
| RIGHT/ VOLUME INCREASE | Shortcut key, Volume increase;
In the System Settings Menu, Right |
- Without HDMI signal, you won't be able to use the System Settings Menu and volume related shortcuts.
- When using the speaker external release function, you need to connect to the POWER interface with an external power supply. Otherwise, the display flicker, sound distortion and even shutdown may occur due to insufficient POWER supply.
Resource
- Document
- 7inch-HDMI-Display-(S)-Quick-Start.pdf
- 7inch-HDMI-Display-(S)-User-Manual.pdf
- How_to_install_the_LCD_driver_V1.2
- How_to_install_matchbox-keyboard
- How_to_use_Raspberry_Pi(Download,Format,Burn,SSH,PuTTy)-V1.0.pdf
- Driver download
- Local download: LCD-show.tar.gz
- Images Download
- If you have difficulty installing the driver, or if you still can't use the display properly after installing the driver,
- Please Try our Configned images for tested.
- Just need download and write the image into the TF card. DO NOT need any driver installation steps.
| Image Name | Version | Support | Default Password | Download | |
|---|---|---|---|---|---|
| Raspbian | 2020-12-02 | PI4/PI3B+/PI3/ PI2/ZERO/ZERO W | user:pi
password:raspberry |
MPI7006-MPI7008-7inch-H-S-2020-12-02-raspios-buster-armhf.7z Fetch Code:6fun | |
| MPI7006-MPI7008-7inch-H-S-2020-12-02-raspios-buster-armhf.7z | |||||
| Ubuntu MATE-32bit | 20.10 | PI4,PI3,PI2 | user:pi
password:raspberry |
MPI7006-MPI7008-7inch-H-S-ubuntu-mate-20.10-desktop-armhf+raspi7zFetch Code:159d | |
| MPI7006-MPI7008-7inch-H-S-ubuntu-mate-20.10-desktop-armhf+raspi | |||||
| Kali Linux RaspberryPi 2, 3 and 4 | 2020.4 | PI4B,PI3B+,PI3,PI2 | user: kali
password: kali |
MPI7008-MPI7006-7inch-S-H-kali-linux-2020.4-rpi4-nexmon.7z Fetch Code:y3t5 | |
| MPI7008-MPI7006-7inch-S-H-kali-linux-2020.4-rpi4-nexmon.7z | |||||
- Software


