More actions
No edit summary |
|||
| (7 intermediate revisions by one other user not shown) | |||
| Line 126: | Line 126: | ||
[[file:MPI2411-004.jpg|500px]] | [[file:MPI2411-004.jpg|500px]] | ||
==<font color="blue"> How to use | ==<font color="blue">How to use with Raspberry Pi OS </font>== | ||
''' | *<font color="blue">Step 1, Install official image '''Raspberry Pi OS'''</font><br /> | ||
1) Download the latest image from the official download <br /> | |||
https://www.raspberrypi.com/software/operating-systems/ | |||
2) Install the system according to the official tutorial steps.<br /> | |||
*<font color="blue">Step 2, Install the driver for the LCD </font><br /> | |||
1) Connect the '''2.4inch RPi Display For RPi 3A+ ''' with the Raspberry Pi and plug it in<br /> | |||
2) Log into the command line interface for Raspberry Pi(Initial user name: pi, Password: raspberry), Get the latest drive from GitHub (the raspberry pie needs to connect to the Internet), Execute the following commands: | |||
{{code|1= | |||
: | |||
sudo rm -rf LCD-show | sudo rm -rf LCD-show | ||
git clone https://github.com/goodtft/LCD-show.git | git clone https://github.com/goodtft/LCD-show.git | ||
| Line 175: | Line 147: | ||
cd LCD-show/ | cd LCD-show/ | ||
sudo ./LCD24-3A+-show}} | sudo ./LCD24-3A+-show}} | ||
After execution, the system will be restarted. If the display and touch are normal, the installation is successful. | |||
==<font color="blue"> Download Resources</font>== | ==<font color="blue"> Download Resources</font>== | ||
| Line 242: | Line 178: | ||
|- | |- | ||
| rowspan="2" |Raspbian | | rowspan="2" |Raspbian | ||
| rowspan="2" | | | rowspan="2" |2024-10-22 | ||
| rowspan="2" |PI4/PI3B+/PI3/ | | rowspan="2" |PI5/PI4/PI3B+/PI3/ | ||
PI2/PI1/ZERO/ZERO W | PI2/PI1/ZERO/ZERO W | ||
| rowspan="2" |user: pi | | rowspan="2" |user: pi | ||
password: raspberry | password: raspberry | ||
|[[File:Baiduyun.jpg|24px]]BaiduYun: | |[[File:Baiduyun.jpg|24px]]BaiduYun: | ||
|[https://pan.baidu.com/s/1EHOxfawLOr_3ESo1E7huyg | |[https://pan.baidu.com/s/1EHOxfawLOr_3ESo1E7huyg '''MPI2411-2.4inch-for3A+-2024-10-22-raspios-bookworm-armhf(Pi4-Pi5)'''] 提取码:1fv0 | ||
|- | |- | ||
|[[File:Mega-1.jpg|24px]] Mega: | |[[File:Mega-1.jpg|24px]] Mega: | ||
| Line 262: | Line 198: | ||
|- | |- | ||
|[[File:Mega-1.jpg|24px]] Mega: | |[[File:Mega-1.jpg|24px]] Mega: | ||
|[https://mega.nz/folder/IzZ1RajK#LdSZs4LyKAQ25ArDzyaC1A '''MPI2411-2.4inch-for3A+-ubuntu-mate- | |[https://mega.nz/folder/IzZ1RajK#LdSZs4LyKAQ25ArDzyaC1A '''MPI2411-2.4inch-for3A+-ubuntu-mate-22.04-desktop-armhf+raspi.7z'''] | ||
|- | |- | ||
| rowspan="2" |Kali-linux | | rowspan="2" |Kali-linux | ||
| rowspan="2" | | | rowspan="2" |2023.1 | ||
| rowspan="2" |PI4B,PI3B+,PI3,PI2 | | rowspan="2" |PI4B,PI3B+,PI3,PI2 | ||
| rowspan="2" |user: kali | | rowspan="2" |user: kali | ||
password: kali | password: kali | ||
|[[File:Baiduyun.jpg|24px]]BaiduYun: | |[[File:Baiduyun.jpg|24px]]BaiduYun: | ||
|[https://pan.baidu.com/s/1EcjaDzykz4KUmRYTHUNxuA '''MPI2411-2.4inch-for3A+-kali-linux- | |[https://pan.baidu.com/s/1EcjaDzykz4KUmRYTHUNxuA '''MPI2411-2.4inch-for3A+-kali-linux-2023.1'''] 提取码:x52b | ||
|- | |- | ||
|[[File:Mega-1.jpg|24px]] Mega: | |[[File:Mega-1.jpg|24px]] Mega: | ||
|[https://mega.nz/folder/ | |[https://mega.nz/folder/knhBSaxS#Uy4Zl9W98lL9gg6oRo4PVA '''MPI2411-2.4inch-for3A+-kali-linux-2020.4'''] | ||
|} | |} | ||
Latest revision as of 16:58, 11 November 2024
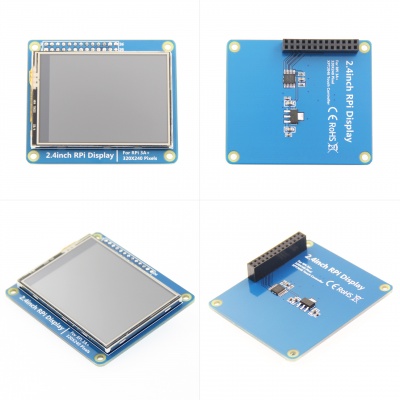
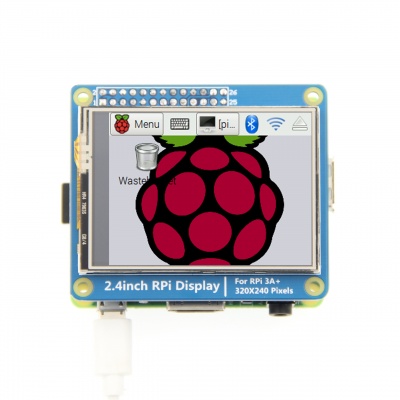
Product Pictures
Product Features
- 2.4inch standard display with physical resolution of 320×240
- SPI interface with resistive touch screen for touch control
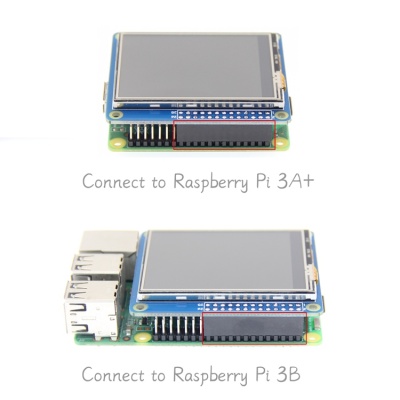
- perfectly compatible and can be directly inserted into any version of the Raspberry Pi (Raspberry Pi ZeroW, A, A+, B, B+, 2B, 3B, 3B+)
- Support for Raspbian/Ubuntu/Kali systems, Provide driver, image, and online wiki guidance documents
- This product has passed CE and RoHS certification
Main Parameters
| Name | Description |
| SKU | MPI2411 |
| Screen Size | 2.4inch |
| LCD Type | TFT |
| Module Interface | SPI |
| Resolution | 320*240 (Pixel) |
| Active Area | 36.72x48.96(mm) |
| Touch Screen Controller | XPT2046 |
| LCD Driver IC | ILI9341 |
| Backlight | LED |
| Power Consumption | 0.08A*5V |
| Operating Temperature(℃) | -20~60 |
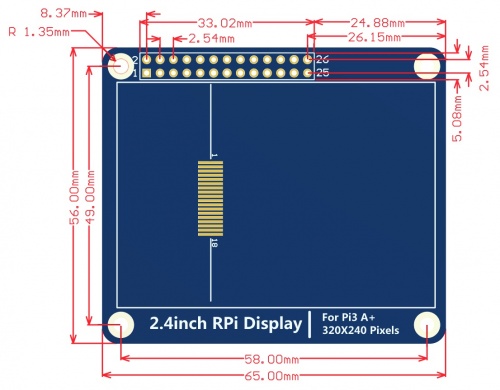
| Module PCB Size | 56.00x65.00(mm) |
| Rough Weight(Package containing)(g) | 37 (g) |
Hardware Description
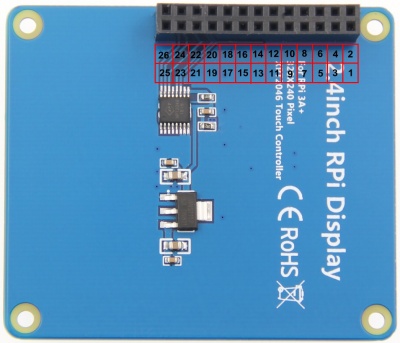
- Interface Definition
| Pin Number | Identification | Description |
|---|---|---|
| 1, 17 | 3.3V | Power supply (3.3V power input) |
| 2, 4 | 5V | Power supply (5V power input) |
| 3, 5, 7, 8, 10, 12, 16,18,22 | NC | Not connected |
| 6, 9, 14, 20, 25 | GND | Power ground |
| 11 | TP_IRQ | The touch panel is interrupted, and it is detected that the touch panel is pressed low. |
| 15 | LCD_RS | Instruction/data register selection, low level is instruction, high level is data |
| 19 | LCD_SI / TP_SI | LCD display / touch panel SPI data input |
| 21 | TP_SO | Touch panel SPI data output |
| 13 | RST | Reset signal, low reset |
| 23 | LCD_SCK / TP_SCK | LCD display / touch panel SPI clock signal |
| 24 | LCD_CS | LCD chip select signal, low level enable |
| 26 | TP_CS | Touch panel chip select signal, low level enable |
- Product Size
How to use with Raspberry Pi OS
- Step 1, Install official image Raspberry Pi OS
1) Download the latest image from the official download
https://www.raspberrypi.com/software/operating-systems/
2) Install the system according to the official tutorial steps.
- Step 2, Install the driver for the LCD
1) Connect the 2.4inch RPi Display For RPi 3A+ with the Raspberry Pi and plug it in
2) Log into the command line interface for Raspberry Pi(Initial user name: pi, Password: raspberry), Get the latest drive from GitHub (the raspberry pie needs to connect to the Internet), Execute the following commands:
sudo rm -rf LCD-show
git clone https://github.com/goodtft/LCD-show.git
chmod -R 755 LCD-show
cd LCD-show/
sudo ./LCD24-3A+-show
After execution, the system will be restarted. If the display and touch are normal, the installation is successful.
Download Resources
- Document
- 2.4inch RPi Display For RPi 3A+ quick start
- 2.4inch RPi Display For RPi 3A+ user manual
- How to install the LCD driver
- How to calibrate the resistance touch screen
- How to install matchbox-keyboard
- How to change display direction GPIO resistive touch
- How to use Raspberry Pi(Download,Format,Burn,SSH,PuTTy)
- RaspberryPi Ubuntu-mate open ssh instructions
- RaspberryPi Ubuntu-mate-18.04 ssh connect
- Images Download
- If you have difficulty installing the driver, or if you still can't use the display properly after installing the driver,
- Please Try our Configned images for tested.
- Just need download and write the image into the TF card. DO NOT need any driver installation steps.
| System Name | System Version | Supported Raspberry Pi version | Default user and passwd | Download Link | |
|---|---|---|---|---|---|
| Raspbian | 2024-10-22 | PI5/PI4/PI3B+/PI3/
PI2/PI1/ZERO/ZERO W |
user: pi
password: raspberry |
MPI2411-2.4inch-for3A+-2024-10-22-raspios-bookworm-armhf(Pi4-Pi5) 提取码:1fv0 | |
| MPI2411-2.4inch-for3A+-2021-03-04-raspios-buster-armhf.7z | |||||
| Ubuntu-mate | 22.04 | PI4,PI3B+,PI3,PI2 | user: pi
password: raspberry |
MPI2411-2.4inch-for3A+-ubuntu-mate-22.04-desktop-armhf+raspi.7z 提取码:0idx | |
| MPI2411-2.4inch-for3A+-ubuntu-mate-22.04-desktop-armhf+raspi.7z | |||||
| Kali-linux | 2023.1 | PI4B,PI3B+,PI3,PI2 | user: kali
password: kali |
MPI2411-2.4inch-for3A+-kali-linux-2023.1 提取码:x52b | |
| MPI2411-2.4inch-for3A+-kali-linux-2020.4 | |||||
- MD5 checksum of the image files
- Common software

