More languages
More actions
No edit summary |
|||
| (6 intermediate revisions by one other user not shown) | |||
| Line 1: | Line 1: | ||
[[zh:7inch_HDMI_Display-C]] | [[zh:7inch_HDMI_Display-C]] | ||
{{lan | |||
| | |||
cn=http://www.lcdwiki.com/zh/7inch_HDMI_Display-C | |||
| | |||
en=http://www.lcdwiki.com/7inch_HDMI_Display-C | |||
}} | |||
{{#widget:StyledHeader | |||
| color = #36a5e8 | |||
}} | |||
= | = Product Video = | ||
{{#ev:youtube|yHehh-cVZbE}} | {{#ev:youtube|yHehh-cVZbE}} | ||
*[http://www.lcdwiki.com/Video_Presentation Related Video] | *[http://www.lcdwiki.com/Video_Presentation Related Video] | ||
= | |||
{{gallery | = Product pictures = | ||
{{gallery|width=300px|height=300px | |||
|File:MPI7002-01.png|MPI7002-TopView | |File:MPI7002-01.png|MPI7002-TopView | ||
|File:MPI7002-03.jpg|MPI7002-ButtomView | |File:MPI7002-03.jpg|MPI7002-ButtomView | ||
}} | }} | ||
= | = Product Description = | ||
*7’’ standard display, 1024 × 600 Hardware resolution, Up to 1920x1080 software configuration resolution. | *7’’ standard display, 1024 × 600 Hardware resolution, Up to 1920x1080 software configuration resolution. | ||
*Capacitive touch screen, maximum support 5 point touch | *Capacitive touch screen, maximum support 5 point touch | ||
| Line 21: | Line 30: | ||
*'''CE, RoHS '''certification | *'''CE, RoHS '''certification | ||
= Product Parameters = | |||
= | |||
*Size: 7.0 (inch) | *Size: 7.0 (inch) | ||
*SKU: MPI7002 | *SKU: MPI7002 | ||
| Line 34: | Line 41: | ||
*Power Dissipation: 0.62A*5V @1024*600 | *Power Dissipation: 0.62A*5V @1024*600 | ||
= | = Hardware Description = | ||
[[file:MPI7002-Hardware.jpg| | [[file:MPI7002-Hardware.jpg|523x523px]]<br /> | ||
* <font color="blue"> '''①'''</font> Backlight Power switch: Controls the backlight turned on and off to save power. | * <font color="blue"> '''①'''</font> Backlight Power switch: Controls the backlight turned on and off to save power. | ||
* <font color="blue"> '''②&③'''</font> USB Touch / power supply connector: For power supply and touch output, the functions of the both are the same, can just use one of them. | * <font color="blue"> '''②&③'''</font> USB Touch / power supply connector: For power supply and touch output, the functions of the both are the same, can just use one of them. | ||
* <font color="blue"> '''④'''</font> HDMI interface: For connecting motherboard and LCD monitor to HDMI transmission. | * <font color="blue"> '''④'''</font> HDMI interface: For connecting motherboard and LCD monitor to HDMI transmission. | ||
== | = How to Use = | ||
== How to use with Raspbian/Ubuntu Mate/Win10 IoT Core System == | |||
=== '''Step 1, Install Raspbian official image''' === | === '''Step 1, Install Raspbian official image''' === | ||
# Download the latest image from the official download. | # Download the latest image from the official download. | ||
# Install the system according to the official tutorial steps. | # Install the system according to the official tutorial steps. | ||
| Line 62: | Line 68: | ||
hdmi_cvt 1024 600 60 6 0 0 0 | hdmi_cvt 1024 600 60 6 0 0 0 | ||
}} | }} | ||
==='''Step 3, Drive the 5inch HDMI Display-B with the Raspberry Pi'''=== | ==='''Step 3, Drive the 5inch HDMI Display-B with the Raspberry Pi'''=== | ||
:Insert the TF Card to Raspberry Pi, connect the Raspberry Pi and LCD by HDMI cable; connect USB cable to one of the four USB ports of Raspberry Pi, | :Insert the TF Card to Raspberry Pi, connect the Raspberry Pi and LCD by HDMI cable; connect USB cable to one of the four USB ports of Raspberry Pi, | ||
| Line 70: | Line 75: | ||
:it means drive successfully (please use the full 2A for power supply). | :it means drive successfully (please use the full 2A for power supply). | ||
== | == How to use as PC monitor == | ||
* Connect the computer HDMI output signal to the LCD HDMI interface by using the HDMI cable | * Connect the computer HDMI output signal to the LCD HDMI interface by using the HDMI cable | ||
* Connect the LCD's USB Touch interface (Either of the two MicroUSB) to the USB port of the device | * Connect the LCD's USB Touch interface (Either of the two MicroUSB) to the USB port of the device | ||
* If there are several monitors, please unplug other monitor connectors first, and use LCD as the only monitor for testing. | * If there are several monitors, please unplug other monitor connectors first, and use LCD as the only monitor for testing. | ||
== | == How to rotate the display direction == | ||
*'''Step 1''',If the driver is not installed, execute the following command (Raspberry Pi needs to connected to the Internet): | *'''Step 1''',If the driver is not installed, execute the following command (Raspberry Pi needs to connected to the Internet): | ||
{{code| | {{code| | ||
| Line 84: | Line 88: | ||
cd LCD-show/ | cd LCD-show/ | ||
sudo ./LCD7C-show }} | sudo ./LCD7C-show }} | ||
After execution, the driver will be installed. | After execution, the driver will be installed. | ||
*'''Step 2''',If the driver is already installed, execute the following command: | *'''Step 2''',If the driver is already installed, execute the following command: | ||
| Line 93: | Line 97: | ||
( ' <font color="blue">90</font> ' can be changed to 0, 90, 180 and 270, respectively representing rotation angles of 0 degrees, 90 degrees, 180 degrees, 270 degrees) <br/> | ( ' <font color="blue">90</font> ' can be changed to 0, 90, 180 and 270, respectively representing rotation angles of 0 degrees, 90 degrees, 180 degrees, 270 degrees) <br/> | ||
<font color="red">If the '''rotate.sh''' prompt cannot be found, use '''Step 1''' to install the latest drivers</font> | <font color="red">If the '''rotate.sh''' prompt cannot be found, use '''Step 1''' to install the latest drivers</font> | ||
==Resource== | |||
== | ==== Product Dimensions ==== | ||
*[http://www.lcdwiki.com/res/MPI7002/MPI7002_Product_Dimensions.png MPI7002_Product_Dimensions] | *[http://www.lcdwiki.com/res/MPI7002/MPI7002_Product_Dimensions.png MPI7002_Product_Dimensions] | ||
== | ==== '''Document''' ==== | ||
#[http://www.lcdwiki.com/res/MPI7002/7inch_HDMI_Display-C_User_Manual(En).pdf 7inch_HDMI_Display-C_User_Manual(En)] | #[http://www.lcdwiki.com/res/MPI7002/7inch_HDMI_Display-C_User_Manual(En).pdf 7inch_HDMI_Display-C_User_Manual(En)] | ||
#[http://www.lcdwiki.com/res/MPI5001/EN/How_to_install_the_LCD_driver_V1.2.pdf How_to_install_the_LCD_driver_V1.2] | #[http://www.lcdwiki.com/res/MPI5001/EN/How_to_install_the_LCD_driver_V1.2.pdf How_to_install_the_LCD_driver_V1.2] | ||
#[http://www.lcdwiki.com/res/MPI5001/EN/How_to_install_matchbox-keyboard(En).pdf How_to_install_matchbox-keyboard] | #[http://www.lcdwiki.com/res/MPI5001/EN/How_to_install_matchbox-keyboard(En).pdf How_to_install_matchbox-keyboard] | ||
#[http://www.lcdwiki.com/res/PublicFile/How_to_use_Raspberry_Pi(Download,Format,Burn,SSH,PuTTy)-V1.0.pdf How_to_use_Raspberry_Pi(Download,Format,Burn,SSH,PuTTy)-V1.0.pdf] | #[http://www.lcdwiki.com/res/PublicFile/How_to_use_Raspberry_Pi(Download,Format,Burn,SSH,PuTTy)-V1.0.pdf How_to_use_Raspberry_Pi(Download,Format,Burn,SSH,PuTTy)-V1.0.pdf] | ||
==== '''Driver download''' ==== | |||
#Local download: [http://www.lcdwiki.com/res/RaspDriver/LCD-show.tar.gz LCD-show.tar.gz] | #Local download: [http://www.lcdwiki.com/res/RaspDriver/LCD-show.tar.gz LCD-show.tar.gz] | ||
==== '''Images Download''' ==== | |||
:If you have difficulty installing the driver, or if you still can't use the display properly after installing the driver, | :If you have difficulty installing the driver, or if you still can't use the display properly after installing the driver, | ||
| Line 118: | Line 118: | ||
:Just need download and write the image into the TF card. DO NOT need any driver installation steps. | :Just need download and write the image into the TF card. DO NOT need any driver installation steps. | ||
{| class="wikitable | {| class="wikitable prettytable " | ||
!Image Name | !Image Name | ||
!Version | !Version | ||
| Line 126: | Line 126: | ||
|- | |- | ||
| rowspan="2" |Raspbian | | rowspan="2" |Raspbian | ||
| rowspan="2" |2024- | | rowspan="2" |2024-10-22 | ||
| rowspan="2" |PI4/PI3B+/PI3/ | | rowspan="2" |PI4/PI3B+/PI3/ | ||
PI2/ZERO/ZERO W | PI2/ZERO/ZERO W | ||
| rowspan="2" |user:pi | | rowspan="2" |user:pi | ||
password:raspberry | password: | ||
raspberry | |||
|[[File:Baiduyun.jpg|24px]]BaiduYun: | |[[File:Baiduyun.jpg|24px]]BaiduYun: | ||
|[https://pan.baidu.com/s/10QVcI9tLn17zIf9rcuiXqw | |[https://pan.baidu.com/s/10QVcI9tLn17zIf9rcuiXqw MPI7002-7inch-C-2024-10-22-raspios-bookworm-armhf(Pi4-Pi5)] 提取码:4464 | ||
|- | |- | ||
|[[File:Mega-1.jpg|24px]]Mega: | |[[File:Mega-1.jpg|24px]]Mega: | ||
|[https://mega.nz/folder/DDwyEQDB#_UZtBNlHnM6GaVPdCQcy_A MPI7002-7inch-C-2022-04-04-raspios-buster-armhf.7z] | |[https://mega.nz/folder/DDwyEQDB#_UZtBNlHnM6GaVPdCQcy_A MPI7002-7inch-C-2022-04-04-raspios-buster-armhf.7z] | ||
|- | |- | ||
| rowspan="2" |Ubuntu-MATE-32bit | | rowspan="2" |Ubuntu- | ||
MATE-32bit | |||
| rowspan="2" |22.04 | | rowspan="2" |22.04 | ||
| rowspan="2" |PI4,PI3B+,PI3,PI2 | | rowspan="2" |PI4,PI3B+,PI3,PI2 | ||
| rowspan="2" |user:pi | | rowspan="2" |user:pi | ||
password:raspberry | password: | ||
raspberry | |||
|[[File:Baiduyun.jpg|24px]]BaiduYun: | |[[File:Baiduyun.jpg|24px]]BaiduYun: | ||
|[https://pan.baidu.com/s/1hBsuwWZCJwlJ1bwQWH7hbg MPI7002-7inch-C-ubuntu-mate-22.04-desktop-armhf+raspi.7z] 提取码:kg0i | |[https://pan.baidu.com/s/1hBsuwWZCJwlJ1bwQWH7hbg MPI7002-7inch-C-ubuntu-mate-22.04-desktop-armhf+raspi.7z] 提取码:kg0i | ||
| Line 148: | Line 153: | ||
|[https://mega.nz/folder/yeoBGA5L#W02uzKTC0eseuNRFqaPx5w MPI7002-7inch-C-ubuntu-mate-22.04-desktop-armhf+raspi.7z] | |[https://mega.nz/folder/yeoBGA5L#W02uzKTC0eseuNRFqaPx5w MPI7002-7inch-C-ubuntu-mate-22.04-desktop-armhf+raspi.7z] | ||
|- | |- | ||
| rowspan="2" |Kali Linux RaspberryPi-32bit | | rowspan="2" |Kali Linux | ||
RaspberryPi | |||
-32bit | |||
| rowspan="2" |2023.1 | | rowspan="2" |2023.1 | ||
| rowspan="2" |PI4B,PI3B+,PI3,PI2 | | rowspan="2" |PI4B,PI3B+,PI3,PI2 | ||
| rowspan="2" |user: kali | | rowspan="2" |user: kali | ||
password: kali | password: | ||
kali | |||
|[[File:Baiduyun.jpg|24px]]BaiduYun: | |[[File:Baiduyun.jpg|24px]]BaiduYun: | ||
|[https://pan.baidu.com/s/1N1q6A87xCbUd0yS0qBQEzg MPI7002-7inch-C-1024x600-kali-linux-2023.1] 提取码:r7sa | |[https://pan.baidu.com/s/1N1q6A87xCbUd0yS0qBQEzg MPI7002-7inch-C-1024x600-kali-linux-2023.1] 提取码:r7sa | ||
| Line 171: | Line 180: | ||
*[http://www.lcdwiki.com/MD5 MD5 of Image] | *[http://www.lcdwiki.com/MD5 MD5 of Image] | ||
==== '''Software''' ==== | |||
# [http://www.lcdwiki.com/res/software/Panasonic_SDFormatter.zip Panasonic SDFormatter] | # [http://www.lcdwiki.com/res/software/Panasonic_SDFormatter.zip Panasonic SDFormatter] | ||
# [http://www.lcdwiki.com/res/software/Win32DiskImager.zip Win32DiskImager] | # [http://www.lcdwiki.com/res/software/Win32DiskImager.zip Win32DiskImager] | ||
# [http://www.lcdwiki.com/res/software/putty.zip PuTTY] | # [http://www.lcdwiki.com/res/software/putty.zip PuTTY] | ||
Latest revision as of 16:41, 11 November 2024
Product Video
Product pictures
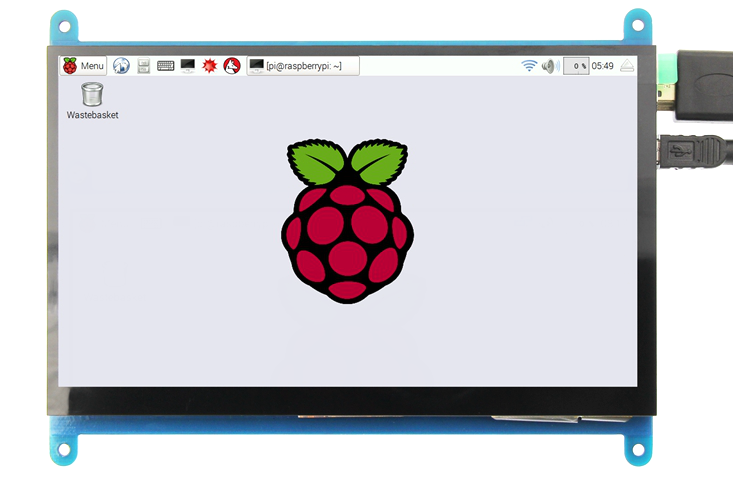
MPI7002-TopView
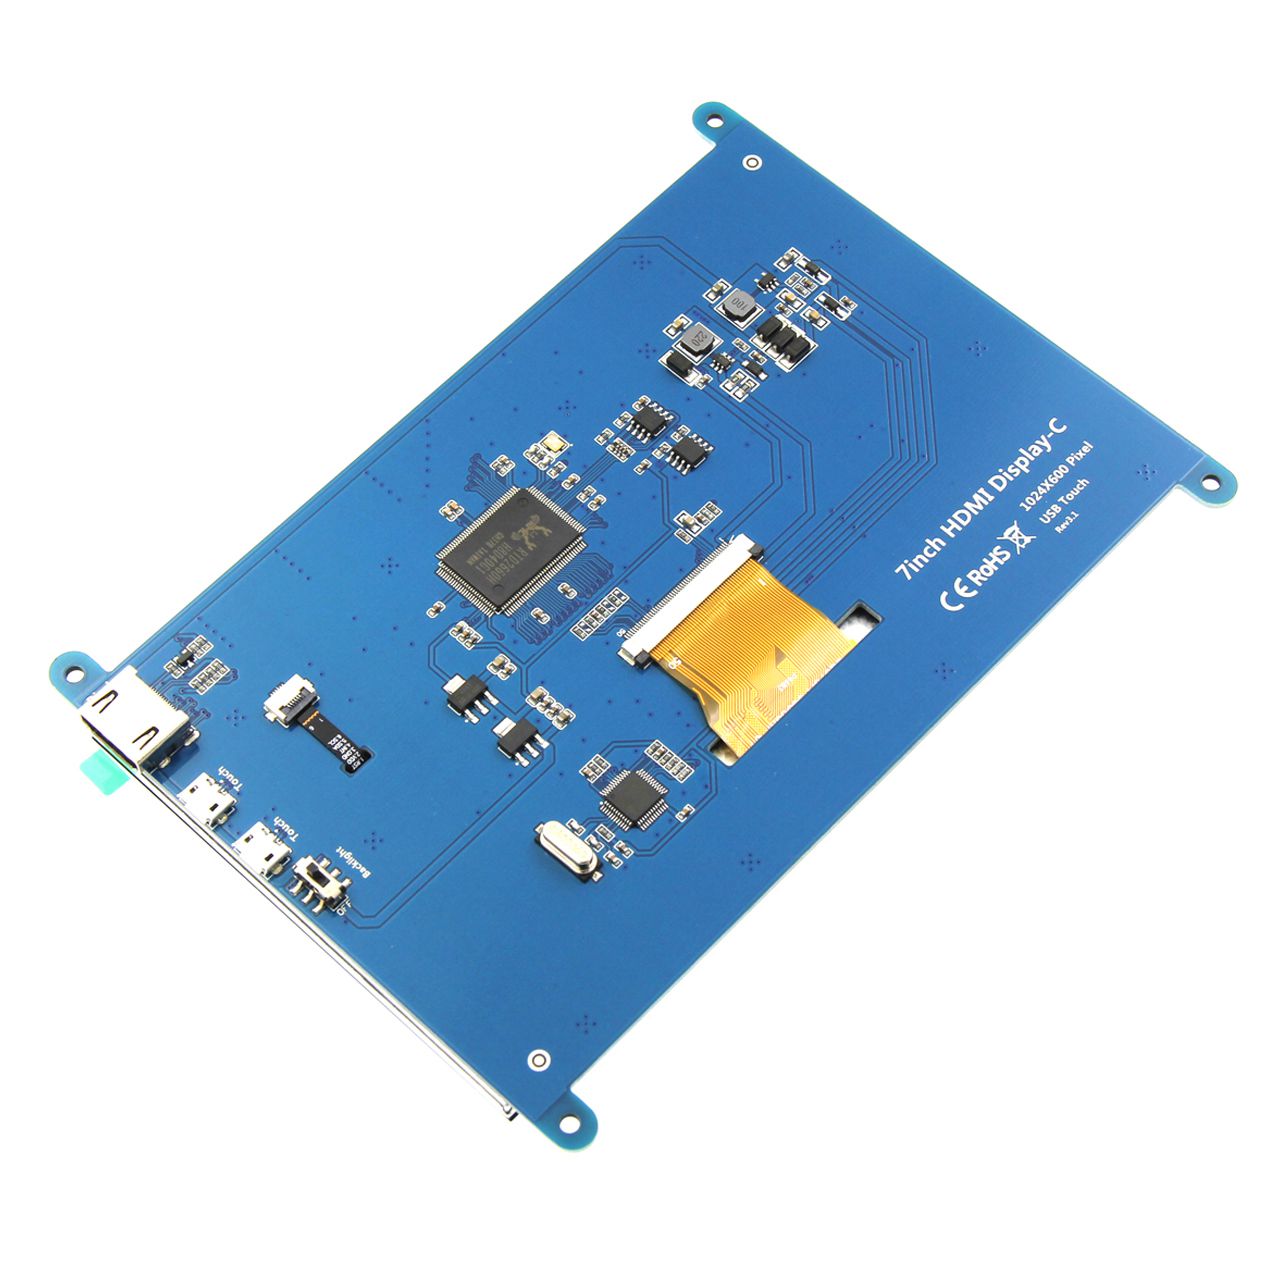
MPI7002-ButtomView


Product Description
- 7’’ standard display, 1024 × 600 Hardware resolution, Up to 1920x1080 software configuration resolution.
- Capacitive touch screen, maximum support 5 point touch
- Support backlight control alone, the backlight can be turned off to save power
- Support Raspberry Pi, BB Black, Banana Pi and other mainstream mini PC
- Can be used as general-purpose-use HDMI monitor, for example: connect with a computer HDMI as the sub-display
- Used as a raspberry pi display that supports Raspbian, Ubuntu, Kali-Linux, Kodi, win10 IOT, single-touch, free drive
- Work as a PC monitor, support win7, win8, win10 system 5 point touch (XP and older version system: single-point touch), free drive
- CE, RoHS certification
Product Parameters
- Size: 7.0 (inch)
- SKU: MPI7002
- Resolution: 1024*600 (dots)
- Touch: five-point capacitive touch
- Active Area: 154.2144*85.92(mm)
- Product Size: 164.9*124.27 (mm)
- Package Size: 211*150*53 (mm)
- Rough Weight(Package containing): 405 (g)
- Power Dissipation: 0.62A*5V @1024*600
Hardware Description

- ① Backlight Power switch: Controls the backlight turned on and off to save power.
- ②&③ USB Touch / power supply connector: For power supply and touch output, the functions of the both are the same, can just use one of them.
- ④ HDMI interface: For connecting motherboard and LCD monitor to HDMI transmission.
How to Use
How to use with Raspbian/Ubuntu Mate/Win10 IoT Core System
Step 1, Install Raspbian official image
- Download the latest image from the official download.
- Install the system according to the official tutorial steps.
Step 2, modify the “config.txt”
- After the programming of Step1 is completed, open the config.txt file of TF card root directory and
- add the following code at the end of the file, save and eject Micro SD Card safely:
max_usb_current=1
hdmi_force_hotplug=1
config_hdmi_boost=7
hdmi_group=2
hdmi_mode=87
hdmi_drive=1
display_rotate=0
hdmi_cvt 1024 600 60 6 0 0 0
Step 3, Drive the 5inch HDMI Display-B with the Raspberry Pi
- Insert the TF Card to Raspberry Pi, connect the Raspberry Pi and LCD by HDMI cable; connect USB cable to one of the four USB ports of Raspberry Pi,
- and connect the other end of the USB cable to the USB port of the LCD; then supply power to Raspberry Pi; after that if the display and touch both are OK,
- it means drive successfully (please use the full 2A for power supply).
How to use as PC monitor
- Connect the computer HDMI output signal to the LCD HDMI interface by using the HDMI cable
- Connect the LCD's USB Touch interface (Either of the two MicroUSB) to the USB port of the device
- If there are several monitors, please unplug other monitor connectors first, and use LCD as the only monitor for testing.
How to rotate the display direction
- Step 1,If the driver is not installed, execute the following command (Raspberry Pi needs to connected to the Internet):
sudo rm -rf LCD-show
git clone https://github.com/goodtft/LCD-show.git
chmod -R 755 LCD-show
cd LCD-show/
sudo ./LCD7C-show
After execution, the driver will be installed.
- Step 2,If the driver is already installed, execute the following command:
cd LCD-show/
sudo ./rotate.sh 90
After execution, the system will automatically restart, and the display screen will rotate 90 degrees to display and touch normally.
( ' 90 ' can be changed to 0, 90, 180 and 270, respectively representing rotation angles of 0 degrees, 90 degrees, 180 degrees, 270 degrees)
If the rotate.sh prompt cannot be found, use Step 1 to install the latest drivers
Resource
Product Dimensions
Document
- 7inch_HDMI_Display-C_User_Manual(En)
- How_to_install_the_LCD_driver_V1.2
- How_to_install_matchbox-keyboard
- How_to_use_Raspberry_Pi(Download,Format,Burn,SSH,PuTTy)-V1.0.pdf
Driver download
- Local download: LCD-show.tar.gz
Images Download
- If you have difficulty installing the driver, or if you still can't use the display properly after installing the driver,
- Please Try our Configned images for tested.
- Just need download and write the image into the TF card. DO NOT need any driver installation steps.
| Image Name | Version | Support | Default Password | Download | |
|---|---|---|---|---|---|
| Raspbian | 2024-10-22 | PI4/PI3B+/PI3/
PI2/ZERO/ZERO W |
user:pi
password: raspberry |
MPI7002-7inch-C-2024-10-22-raspios-bookworm-armhf(Pi4-Pi5) 提取码:4464 | |
| MPI7002-7inch-C-2022-04-04-raspios-buster-armhf.7z | |||||
| Ubuntu-
MATE-32bit |
22.04 | PI4,PI3B+,PI3,PI2 | user:pi
password: raspberry |
MPI7002-7inch-C-ubuntu-mate-22.04-desktop-armhf+raspi.7z 提取码:kg0i | |
| MPI7002-7inch-C-ubuntu-mate-22.04-desktop-armhf+raspi.7z | |||||
| Kali Linux
RaspberryPi -32bit |
2023.1 | PI4B,PI3B+,PI3,PI2 | user: kali
password: kali |
MPI7002-7inch-C-1024x600-kali-linux-2023.1 提取码:r7sa | |
| MPI7002-7inch-C-1024x600-kali-linux-2021.2 | |||||
| Win10 IOT | 2017.06 | PI3,PI2 | 7inch-RPI_2B-win10IOT-1024x600.img.zip 提取码:ywlw | ||
| 7inch-RPI2-win10IOT-1024x600.img.zip | |||||