More languages
More actions
No edit summary |
No edit summary |
||
| (9 intermediate revisions by 2 users not shown) | |||
| Line 1: | Line 1: | ||
[[zh:MHS-3.5inch_RPi_Display]] | |||
{{#widget:StyledHeader | {{#widget:StyledHeader | ||
| color = blue | | color = blue | ||
}} | }} | ||
== <font color="blue">Product Video</font> == | == <font color="blue">Product Video</font> == | ||
{{#ev:youtube|iMtsr2h_Seg}} | {{#ev:youtube|iMtsr2h_Seg}} | ||
| Line 28: | Line 25: | ||
== <font color="blue">Main Parameters </font>== | == <font color="blue">Main Parameters </font>== | ||
{| class="wikitable | {| class="wikitable prettytable" | ||
!Name | |||
!Description | |||
|- | |- | ||
|SKU | |SKU | ||
| Line 76: | Line 73: | ||
== <font color="blue">Hardware Description</font>== | == <font color="blue">Hardware Description</font>== | ||
[[File:MHS3528-002.jpg| | [[File:MHS3528-002.jpg|574x574px]] | ||
==== Interface Definition ==== | |||
{| class="wikitable prettytable" | {| class="wikitable prettytable" | ||
|- | |- | ||
| Line 135: | Line 131: | ||
|} | |} | ||
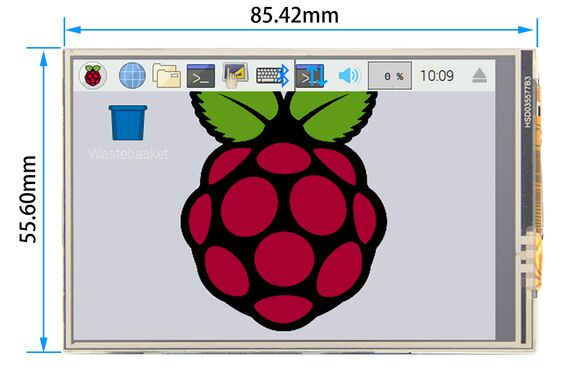
==== Product Size ==== | |||
[[file: 3.5-MHS-size.jpg|575x575px]] | |||
[[file: 3.5-MHS-size.jpg| | |||
==<font color="blue"> How to use in the Raspberry/Ubuntu Mate/Kali/Retropie system </font>== | ==<font color="blue"> How to use in the Raspberry/Ubuntu Mate/Kali/Retropie system </font>== | ||
'''There are two ways to use it''' | '''There are two ways to use it''' | ||
'''The First Method''' | ==== '''The First Method''' ==== | ||
:Directly download the image we created and burn it into the micro SD card and insert it into the RaspberryPi.[http://www.lcdwiki.com/res/PublicFile/How_to_use_Raspberry_Pi(Download,Format,Burn,SSH,PuTTy)-V1.0.pdf <font color="red"> (Q:How to burn?)</font>] | :Directly download the image we created and burn it into the micro SD card and insert it into the RaspberryPi.[http://www.lcdwiki.com/res/PublicFile/How_to_use_Raspberry_Pi(Download,Format,Burn,SSH,PuTTy)-V1.0.pdf <font color="red"> (Q:How to burn?)</font>] | ||
:Image download see the image download section of the [[#Download Resources|'''Download Resources''']] | :Image download see the image download section of the [[#Download Resources|'''Download Resources''']] | ||
'''The second method''' | ==== '''The second method''' ==== | ||
:'''▶Step 1, install the latest official image of various systems [http://www.lcdwiki.com/res/PublicFile/How_to_use_Raspberry_Pi(Download,Format,Burn,SSH,PuTTy)-V1.0.pdf <font color="red"> (Q:How to install?)</font>]''' | |||
:''' | |||
::(1)Download the latest[https://www.raspberrypi.org/downloads/ '''Raspbian''']/[https://ubuntu-mate.org/download/ '''Ubuntu Mate''']/[https://www.offensive-security.com/kali-linux-arm-images/ '''Kali-linux''']/[https://retropie.org.uk/download/ '''Retropie''']image from the official | ::(1)Download the latest[https://www.raspberrypi.org/downloads/ '''Raspbian''']/[https://ubuntu-mate.org/download/ '''Ubuntu Mate''']/[https://www.offensive-security.com/kali-linux-arm-images/ '''Kali-linux''']/[https://retropie.org.uk/download/ '''Retropie''']image from the official | ||
| Line 155: | Line 148: | ||
::(3) Use Win32DiskImager to burn the official image to the Micro SD card | ::(3) Use Win32DiskImager to burn the official image to the Micro SD card | ||
:''' | :'''▶Step 2, connect with the Raspberry Pi''' | ||
::[[file:MHS3521-013.jpg|left|337x337px]] | ::[[file:MHS3521-013.jpg|left|337x337px]] | ||
| Line 174: | Line 167: | ||
<br /> | <br /> | ||
:''' | :'''▶Step 3, install the LCD driver''' | ||
::'''A. Install on the Raspbian system (the Raspberry Pi needs to connect to the Internet)''' | ::'''A. Install on the Raspbian system (the Raspberry Pi needs to connect to the Internet)''' | ||
:::(1) Log in to the Raspberry Pi terminal(SSH remote login user name and password, see the image download of the [[#Download Resources|'''Download Resources''']]) [http://www.lcdwiki.com/res/PublicFile/How_to_use_Raspberry_Pi(Download,Format,Burn,SSH,PuTTy)-V1.0.pdf <font color="red">(Q:The ssh can't connect?)</font>] | :::(1) Log in to the Raspberry Pi terminal(SSH remote login user name and password, see the image download of the [[#Download Resources|'''Download Resources''']]) [http://www.lcdwiki.com/res/PublicFile/How_to_use_Raspberry_Pi(Download,Format,Burn,SSH,PuTTy)-V1.0.pdf <font color="red">(Q:The ssh can't connect?)</font>] | ||
| Line 213: | Line 206: | ||
|} | |} | ||
:''' | :'''▶Step 4, Check if the driver is successfully installed''' | ||
::(1) After the LCD driver is installed, the system will automatically restart. After the startup is successful, the LCD can display and touch normally, | ::(1) After the LCD driver is installed, the system will automatically restart. After the startup is successful, the LCD can display and touch normally, | ||
:::indicating that the driver installation is successful. | :::indicating that the driver installation is successful. | ||
'''Note:''' | ==== '''Note:''' ==== | ||
:A. Ubuntu system default SSH is not enabled, the specific method of opening see[http://www.lcdwiki.com/res/PublicFile/RaspberryPi_Ubuntu-mate_Open_SSH_Instructions_EN.pdf '''RaspberryPi Ubuntu-mate open ssh instructions'''] | :A. Ubuntu system default SSH is not enabled, the specific method of opening see[http://www.lcdwiki.com/res/PublicFile/RaspberryPi_Ubuntu-mate_Open_SSH_Instructions_EN.pdf '''RaspberryPi Ubuntu-mate open ssh instructions'''] | ||
:B. Ubuntu-18.04 system ssh connection may fail, the specific solution is shown in [http://www.lcdwiki.com/res/PublicFile/RaspberryPi_Ubuntu-mate-18.04_SSH_Connect_EN.pdf '''RaspberryPi Ubuntu-mate-18.04 ssh connection failure solution description'''] | :B. Ubuntu-18.04 system ssh connection may fail, the specific solution is shown in [http://www.lcdwiki.com/res/PublicFile/RaspberryPi_Ubuntu-mate-18.04_SSH_Connect_EN.pdf '''RaspberryPi Ubuntu-mate-18.04 ssh connection failure solution description'''] | ||
| Line 233: | Line 225: | ||
==<font color="blue"> Download Resources</font>== | ==<font color="blue"> Download Resources</font>== | ||
==== '''Document''' ==== | |||
# [http://www.lcdwiki.com/res/MHS3528/MHS-3.5inch_Display_QuickStart-V1.0.pdf '''MHS-3.5inch Display quick start'''] | # [http://www.lcdwiki.com/res/MHS3528/MHS-3.5inch_Display_QuickStart-V1.0.pdf '''MHS-3.5inch Display quick start'''] | ||
# [http://www.lcdwiki.com/res/MHS3528/MHS-3.5inch_Display_User_Manual_EN.pdf '''MHS-3.5inch Display user manual'''] | # [http://www.lcdwiki.com/res/MHS3528/MHS-3.5inch_Display_User_Manual_EN.pdf '''MHS-3.5inch Display user manual'''] | ||
| Line 247: | Line 238: | ||
# [http://www.lcdwiki.com/res/PublicFile/RaspberryPi_Retropie_Using_Instructions_EN.pdf '''RaspberryPi Retropie using instructions'''] | # [http://www.lcdwiki.com/res/PublicFile/RaspberryPi_Retropie_Using_Instructions_EN.pdf '''RaspberryPi Retropie using instructions'''] | ||
==== '''Images download''' ==== | |||
: If you have difficulty installing the driver, or if you still can't use the display properly after installing the driver, | : If you have difficulty installing the driver, or if you still can't use the display properly after installing the driver, | ||
: Please Try our Configned images for tested. | : Please Try our Configned images for tested. | ||
: Just need download and write the image into the TF card. DO NOT need any driver installation steps. | : Just need download and write the image into the TF card. DO NOT need any driver installation steps. | ||
{| class="wikitable | {| class="wikitable prettytable" | ||
!System Name | !System Name | ||
!System Version | !System Version | ||
| Line 261: | Line 251: | ||
|- | |- | ||
| rowspan="2" |Raspbian | | rowspan="2" |Raspbian | ||
| rowspan="2" | | | rowspan="2" |2024-11-19 | ||
| rowspan="2" |PI4/PI3B+/PI3/PI2/ | | rowspan="2" |PI4/PI3B+/PI3/PI2/ | ||
PI1/ZERO/ZERO W | PI1/ZERO/ZERO W | ||
| Line 267: | Line 257: | ||
password: raspberry | password: raspberry | ||
|[[File:Baiduyun.jpg|24px]]BaiduYun: | |[[File:Baiduyun.jpg|24px]]BaiduYun: | ||
|[https://pan.baidu.com/s/1jgJthalpEVUrWOuAMGr8Sw | |[https://pan.baidu.com/s/1jgJthalpEVUrWOuAMGr8Sw '''MHS3528-3.5inch-2024-11-19-raspios-bookworm-armhf.7z'''] 提取码:jets | ||
|- | |- | ||
|[[File:Mega-1.jpg|24px]] Mega: | |[[File:Mega-1.jpg|24px]] Mega: | ||
| Line 296: | Line 286: | ||
|- | |- | ||
| rowspan="2" |Kali Linux RaspberryPi | | rowspan="2" |Kali Linux RaspberryPi | ||
| rowspan="2" | | | rowspan="2" |2024.3 | ||
| rowspan="2" |PI4B,PI3B+,PI3,PI2 | | rowspan="2" |PI4B,PI3B+,PI3,PI2 | ||
| rowspan="2" |user: kali | | rowspan="2" |user: kali | ||
password: kali | password: kali | ||
|[[File:Baiduyun.jpg|24px]]BaiduYun: | |[[File:Baiduyun.jpg|24px]]BaiduYun: | ||
|[https://pan.baidu.com/s/1M2UJj1H6AT3KDeQF3ZZnRw | |[https://pan.baidu.com/s/1M2UJj1H6AT3KDeQF3ZZnRw '''MHS3528-3.5inch-kali-linux-2024.3'''] 提取码:48yq | ||
|- | |- | ||
|[[File:Mega-1.jpg|24px]] Mega: | |[[File:Mega-1.jpg|24px]] Mega: | ||
| Line 341: | Line 331: | ||
*[http://www.lcdwiki.com/MD5 MD5 of Image] | *[http://www.lcdwiki.com/MD5 MD5 of Image] | ||
==== '''Software''' ==== | |||
# [http://www.lcdwiki.com/res/software/Panasonic_SDFormatter.zip Panasonic SDFormatter] | # [http://www.lcdwiki.com/res/software/Panasonic_SDFormatter.zip Panasonic SDFormatter] | ||
# [http://www.lcdwiki.com/res/software/Win32DiskImager.zip Win32DiskImager] | # [http://www.lcdwiki.com/res/software/Win32DiskImager.zip Win32DiskImager] | ||
Latest revision as of 17:43, 26 November 2024
Product Video
Product Pictures
Product Features
- Physical resolution 320 x 480, with resistive touch control
- It supports up to 125MHz SPI signal input, showing stable no screen and no flicker
- With the refresh rate of raspberry pie around 50Hz, play video to play the game without pressure
- Support FBCP software drive, support double screen display, can adjust the resolution of the software to zoom
- Same size as the Raspberry Pi, perfectly compatible and can be directly inserted into any version of the Raspberry Pi (Raspberry Pi ZeroW, A, A+, B, B+, 2B, 3B, 3B+,4B)
- Support Raspbian/Ubuntu/Kali system, provide driver and image
- This product has passed CE and RoHS certification
Main Parameters
| Name | Description |
|---|---|
| SKU | MHS3528 |
| Screen Size | 3.5inch |
| LCD Type | TFT |
| Module Interface | SPI (upports up to 125MHz SPI input) |
| Resolution | 320*480 (Pixel) |
| Touch Screen Controller | XPT2046 |
| LCD Driver IC | ILI9486 |
| Backlight | LED |
| power consumption | 0.16A*5V |
| Working temperature(℃) | -20~60 |
| Active Area | 48.96x73.44(mm) |
| Module PCB Size | 85.42*55.60 (mm) |
| Package Size | 136x98x41 (mm) |
| Product Weight(Package containing)(g) | 92 (g) |
Hardware Description
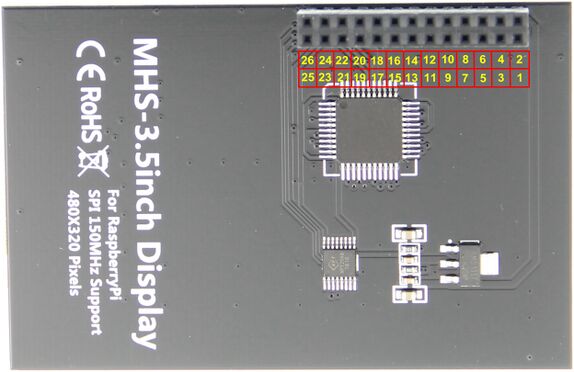
Interface Definition
| PIN NO. | SYMBOL | DESCRIPTION |
|---|---|---|
| 1, 17 | 3.3V | Power positive (3.3V power input) |
| 2, 4 | 5V | Power positive (5V power input) |
| 3, 5, 7, 8, 10, 12, 13, 15, 16 | NC | NC |
| 6, 9, 14, 20, 25 | GND | Power ground |
| 11 | TP_IRQ | The touch panel is interrupted, and it is detected that the touch panel is pressed low |
| 18 | LCD_RS | Instruction/data register selection, low level is instruction, high level is data |
| 19 | LCD_SI / TP_SI | LCD display / touch panel SPI data input |
| 21 | TP_SO | Touch panel SPI data output |
| 22 | RST | Reset signal, low reset |
| 23 | LCD_SCK / TP_SCK | LCD display / touch panel SPI clock signal |
| 24 | LCD_CS | LCD chip select signal, low level enable |
| 26 | TP_CS | Touch panel chip select signal, low level enable |
Product Size
How to use in the Raspberry/Ubuntu Mate/Kali/Retropie system
There are two ways to use it
The First Method
- Directly download the image we created and burn it into the micro SD card and insert it into the RaspberryPi. (Q:How to burn?)
- Image download see the image download section of the Download Resources
The second method
- ▶Step 1, install the latest official image of various systems (Q:How to install?)
- (1)Download the latestRaspbian/Ubuntu Mate/Kali-linux/Retropieimage from the official
- (2) Format the Micro SD card using SDFormatter
- (3) Use Win32DiskImager to burn the official image to the Micro SD card
- ▶Step 2, connect with the Raspberry Pi
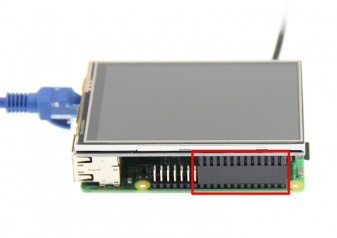
- Align right-side to insert the LCD screen
- Plug-in MicroSD card, connect network and power
- ▶Step 3, install the LCD driver
- A. Install on the Raspbian system (the Raspberry Pi needs to connect to the Internet)
- (1) Log in to the Raspberry Pi terminal(SSH remote login user name and password, see the image download of the Download Resources) (Q:The ssh can't connect?)
- (2) Execute the following command to get the LCD driver and install it (after copying, click the right mouse button in the Putty window to paste):
- A. Install on the Raspbian system (the Raspberry Pi needs to connect to the Internet)
sudo rm -rf LCD-show git clone https://github.com/goodtft/LCD-show.git chmod -R 755 LCD-show cd LCD-show/ sudo ./MHS35-show |
- B. Install on the Ubuntu Mate, Kali, Retropie system
- (1) Download the local driver, the download link is as follows: (Because of system differences, the driver downloaded from github cannot run normally
- in the three systems Ubuntu Mate, Kali, Retropie, so only local drivers can be used)
- Driver download for Ubuntu-mate-18.04 system:LCD-show.tar.gz
- Driver download for Kali-linux system:LCD-show.tar.gz
- Driver download for the retropie-rpi2_rpi3-rpi4 system:LCD-show.tar.gz
- Driver download for retropie-rpi1_zero system:LCD-show.tar.gz
- (2) Log in to the Raspberry Pi terminal(SSH remote login user name and password, see the image download of the Download Resources) (Q:The ssh can't connect?)
- (3) Copy the local driver to the running Raspberry Pi system and execute the following command to extract it (can be copied by SD card or FileZilla software)
- (1) Download the local driver, the download link is as follows: (Because of system differences, the driver downloaded from github cannot run normally
- B. Install on the Ubuntu Mate, Kali, Retropie system
tar -xvzf LCD-show.tar.gz |
- (4) Execute the following command to install the LCD driver
chmod -R 755 LCD-show cd LCD-show/ sudo ./MHS35-show |
- ▶Step 4, Check if the driver is successfully installed
- (1) After the LCD driver is installed, the system will automatically restart. After the startup is successful, the LCD can display and touch normally,
- indicating that the driver installation is successful.
- (1) After the LCD driver is installed, the system will automatically restart. After the startup is successful, the LCD can display and touch normally,
Note:
- A. Ubuntu system default SSH is not enabled, the specific method of opening seeRaspberryPi Ubuntu-mate open ssh instructions
- B. Ubuntu-18.04 system ssh connection may fail, the specific solution is shown in RaspberryPi Ubuntu-mate-18.04 ssh connection failure solution description
- C. The retropie-rpi1_zero system cannot log in via SSH (no network port and wifi module). You need to copy the driver through the serial port. For details, see RaspberryPi Zero open serial instructions
- D. Retropie system game installation and setup instructions see RaspberryPi Retropie using instructions
How to rotate the display direction
This method only applies to the Raspberry Pi series of display screens, other display screens do not apply.
- Method 1,If the driver is not installed, execute the following command (Raspberry Pi needs to connected to the Internet):
sudo rm -rf LCD-show
git clone https://github.com/goodtft/LCD-show.git
chmod -R 755 LCD-show
cd LCD-show/
sudo ./XXX-show 90
After execution, the driver will be installed. The system will automatically restart, and the display screen will rotate 90 degrees to display and touch normally.
( ' XXX-show ' can be changed to the corresponding driver, and ' 90 ' can be changed to 0, 90, 180 and 270, respectively representing rotation angles of 0 degrees, 90 degrees, 180 degrees, 270 degrees)
- Method 2,If the driver is already installed, execute the following command:
cd LCD-show/
sudo ./rotate.sh 90
After execution, the system will automatically restart, and the display screen will rotate 90 degrees to display and touch normally.
( ' 90 ' can be changed to 0, 90, 180 and 270, respectively representing rotation angles of 0 degrees, 90 degrees, 180 degrees, 270 degrees)
If the rotate.sh prompt cannot be found, use Method 1 to install the latest drivers
FAQ
- How to resolve the issue of touch flip in resistive touch production
- HDMI display does not display after installing FBCP driver
Download Resources
Document
- MHS-3.5inch Display quick start
- MHS-3.5inch Display user manual
- How to install the LCD driver
- How to calibrate the resistance touch screen
- How to install matchbox-keyboard
- How to change display direction GPIO resistive touch
- How to use Raspberry Pi(Download,Format,Burn,SSH,PuTTy)
- RaspberryPi Ubuntu-mate open ssh instructions
- RaspberryPi Ubuntu-mate-18.04 ssh connect
- RaspberryPi Zero open serial instructions
- RaspberryPi Retropie using instructions
Images download
- If you have difficulty installing the driver, or if you still can't use the display properly after installing the driver,
- Please Try our Configned images for tested.
- Just need download and write the image into the TF card. DO NOT need any driver installation steps.
| System Name | System Version | Supported | User and passwd | Download | |
|---|---|---|---|---|---|
| Raspbian | 2024-11-19 | PI4/PI3B+/PI3/PI2/
PI1/ZERO/ZERO W |
user: pi
password: raspberry |
MHS3528-3.5inch-2024-11-19-raspios-bookworm-armhf.7z 提取码:jets | |
| 3.5-MHS3528-2021-03-04-raspios-buster-armhf.7z | |||||
| Ubuntu-mate-32bit | 22.04 | PI4,PI3B+,PI3,PI2 | user: pi
password: raspberry |
MHS3528-3.5inch-ubuntu-mate-22.04-desktop-armhf+raspi.7z提取码:p7mc | |
| MHS3528-3.5inch-ubuntu-mate-20.10-desktop-armhf+raspi.7z | |||||
| Ubuntu-mate-64bit | 20.04.1-beta2 | PI4,PI3B+,PI3 | user: pi
password: raspberry |
MHS3528-3.5inch-MHS-ubuntu-mate-20.04.1-beta2-desktop-arm64+raspi.7z提取码:oebw | |
| MHS3528-3.5inch-MHS-ubuntu-mate-20.04.1-beta2-desktop-arm64+raspi.7z | |||||
| Kali Linux RaspberryPi | 2024.3 | PI4B,PI3B+,PI3,PI2 | user: kali
password: kali |
MHS3528-3.5inch-kali-linux-2024.3 提取码:48yq | |
| MHS3528-3.5inch-kali-linux-2021.2 | |||||
| RetroPie-rpi4 | 4.6 | PI4 | user: pi
password: raspberry |
3.5-MHS3528-retropie-buster-4.6-rpi4.7z提取码:avd7 | |
| 3.5-MHS3528-retropie-buster-4.6-rpi4.7z | |||||
| RetroPie-rpi2_rpi3 | April 14, 2018. | PI3B+,PI3,PI2 | user: pi
password: raspberry |
MHS35-retropie-4.4-rpi2_rpi3.7z提取码:avd7 | |
| MHS35-retropie-4.4-rpi2_rpi3.7z | |||||
| RetroPie-rpi1_zero | April 14, 2018. | Pi1/ZERO/ZERO W | user: pi
password: raspberry |
MHS35-retropie-4.4-rpi1_zero.7z 提取码:avd7 | |
| MHS35-retropie-4.4-rpi1_zero.7z | |||||

