More languages
More actions
| (6 intermediate revisions by 3 users not shown) | |||
| Line 10: | Line 10: | ||
==<font color="blue"> Product Picture</font> == | ==<font color="blue"> Product Picture</font> == | ||
{{gallery|width=300px|height=300px | {{gallery|width=300px|height=300px | ||
|File:MPI7009-1-Top.jpg|MPI7009- | |File:MPI7009-1-Top.jpg|MPI7009-1 With Holster-TopView | ||
|File:MPI7009-Top.png| | |File:MPI7009-Top.png|MPI7009 No Holster-TopView | ||
|File:MPI7009-Bottom.jpg|MPI7009-ButtomView | |File:MPI7009-Bottom.jpg|MPI7009-ButtomView | ||
| Line 50: | Line 50: | ||
: ○Supports up to 5 touch points | : ○Supports up to 5 touch points | ||
* HDMI | * HDMI video input interfaces | ||
: ○High definition video display | : ○High definition video display | ||
| Line 65: | Line 65: | ||
: ○Support menu settings | : ○Support menu settings | ||
* Support multiple device access | * Support multiple device access | ||
| Line 86: | Line 84: | ||
== <font color="blue"> Product Description</font> == | == <font color="blue"> Product Description</font> == | ||
==== | ==== Product Parameters ==== | ||
{| class="wikitable" | {| class="wikitable" | ||
|'''SKU''' | |'''SKU''' | ||
|MPI7009 | |MPI7009 | ||
|- | |- | ||
|''' | |'''Panel Type''' | ||
| | |IPS | ||
|- | |- | ||
|''' | |'''Panel Size''' | ||
| | |7.0inch | ||
|- | |- | ||
|''' | |'''Resolution''' | ||
| | |1024 x 600(RGB) (pixels) | ||
|- | |- | ||
|''' | |'''Active Area''' | ||
| | |154.21(W) x 85.92(H) (mm) | ||
|- | |- | ||
|''' | |'''Pixel Pitch''' | ||
| | |0.0502(H) x 0.1432(V) (mm) | ||
|- | |- | ||
|''' | |'''View Angle''' | ||
|ALL 0’ CLOCK | |ALL 0’ CLOCK | ||
|- | |- | ||
|''' | |'''Luminance(TYP)''' | ||
| | |400 cd/m<sup>2</sup> | ||
|- | |- | ||
|''' | |'''Contrast Ratio(TYP)''' | ||
| | |800 | ||
|- | |- | ||
|''' | |'''Backlight Arrangement''' | ||
| | |3 strings in 7 parallel (21 white LED lights) | ||
|- | |- | ||
|''' | |'''Backlight Current(Max)''' | ||
| | |140mA | ||
|- | |- | ||
|''' | |'''Operation Temperature''' | ||
| -10~50(℃) | | -10~50(℃) | ||
|- | |- | ||
|''' | |'''Storage Temperature''' | ||
| -20~60(℃) | | -20~60(℃) | ||
|- | |- | ||
|''' | |'''Backlight Adjustment''' | ||
| | |Leave switch adjustment | ||
|- | |- | ||
|''' | |'''Volume Adjustment''' | ||
| | |Leave switch adjustment | ||
|- | |- | ||
|''' | |'''Touch Screen Type''' | ||
| | |Capacitive Touch Screen | ||
|- | |- | ||
|''' | |'''Touch IC''' | ||
|GT911 | |GT911 | ||
|- | |- | ||
|''' | |'''Touch Screen Size''' | ||
| | |174.0±0.1(W) x 110.0±0.1(H) (mm) | ||
|- | |- | ||
|''' | |'''Touch Screen Visual Area''' | ||
| | |155.21±0.2(W) x 86.92±0.2(H) (mm) | ||
|- | |- | ||
|''' | |'''Power Voltage''' | ||
|5V | |5V | ||
|- | |- | ||
|''' | |'''Speaker Power''' | ||
|8Ω 2W x 2 | |8Ω 2W x 2 | ||
|- | |- | ||
|''' | |'''Total Power''' | ||
| | |2.5W (100% brightness, 0% volume),3.2W(100% brightness, 100% volume) | ||
|- | |- | ||
|''' | |'''Video Input Interface''' | ||
|Mini HDMI | |Mini HDMI | ||
|- | |- | ||
|''' | |'''Audio Output Interface''' | ||
|3. | |3.5mm Audio Interface and Stereo speakers | ||
|- | |- | ||
|''' | |'''Power Interface''' | ||
|Type-C | |Type-C | ||
|- | |- | ||
|''' | |'''Touch Output Interface''' | ||
|Type-C | |Type-C | ||
|- | |- | ||
|''' | |'''Outline Size''' | ||
| | |175.0(W) x 112.0(H) x 11.61(T)(mm) | ||
|- | |- | ||
|''' | |'''Package size''' | ||
| | |211.0(W) x 150.0(H) x 53.0(T) (mm) | ||
|- | |- | ||
|''' | |'''Weight(including package)''' | ||
| | |469(g) | ||
|} | |} | ||
==== | ==== Key and Interface Function Description ==== | ||
[[file: | [[file:MPI7009-01.png|1000px]] | ||
{| class="wikitable" border="1" style="width: 700px; background-color: white;" | {| class="wikitable" border="1" style="width: 700px; background-color: white;" | ||
|''' | |'''Key and Interface''' | ||
|''' | |'''Description''' | ||
|- | |- | ||
| | |DISPLAY | ||
| | |Input HDMI signal, connect using Mini HDMI cable, commonly used to connect to a computer, with a maximum support resolution of 1920x1080 | ||
|- | |- | ||
|POWER | |POWER/TOUCH | ||
|The power and touch interfaces are shared, connected using Type-C cables, and provide both power and touch functions. | |||
| | |||
|- | |- | ||
|Headphone | |Headphone | ||
|3.5mm | |3.5mm audio output interface for connecting audio devices, such as headphones or audio systems | ||
|- | |- | ||
| rowspan="4" |MENU | | rowspan="4" |MENU | ||
| | |Brightness Adjustment: | ||
When there is no OSD interface displayed in the display state, turning the pulsator switch in the "+" direction triggers the brightness setting function. After triggering, turning the switch up and down can adjust the brightness value. After the adjustment is completed, press the switch briefly to exit or wait for 10 seconds for automatic exit. | |||
|- | |- | ||
| | |Volume Adjustment: | ||
When there is no OSD interface displayed in the display state, turning the pulsator switch in the "-" direction triggers the volume setting function. After triggering, turning the switch up and down can adjust the volume value. After the adjustment is completed, press the switch briefly to exit or wait for 10 seconds for automatic exit. | |||
|- | |- | ||
| | |Menu Setting: | ||
When there is no OSD interface displayed in the display state, short press the pulsator to trigger the menu setting function. After triggering, enter the menu and toggle the switch up and down to select or adjust the setting items. Short press the switch to confirm, long press the switch to return or exit. | |||
|- | |- | ||
| | |Turn off Display: | ||
When there is no OSD interface displayed in the display state, long pressing the wave wheel development triggers the shutdown of the display function, and the product goes black at this time. Press the switch again briefly to turn on the display. | |||
|} | |} | ||
==== | ==== Product Size ==== | ||
[[:en:res/MPI7009/MPI7009_Size.pdf|'''MPI7009 Size''']] | |||
[[File:MPI7009-铁壳-size-2560.png|770x770像素]] | [[File:MPI7009-铁壳-size-2560.png|770x770像素]] | ||
==<font color="blue"> | ==<font color="blue">Connect to Raspberry Pi</font> == | ||
[[file:MPI1009-007.jpg|750px]] <br> | [[file:MPI1009-007.jpg|750px]] <br> | ||
[[file:MPI1009-009.jpg|750px]] | [[file:MPI1009-009.jpg|750px]] | ||
==<font color="blue"> | ==<font color="blue">Working with Raspberry Pi</font> == | ||
''' | '''Step 1. Download the Official image''' | ||
: | :1) Download '''Raspbian''' Official Image | ||
:: | ::Download URL: '''https://www.raspberrypi.org/downloads/raspbian/''' | ||
:: | ::Username: '''pi''' Password: '''raspberry''' | ||
: | :2) Download '''Ubuntu Mate''' Official Image | ||
:: | ::Download URL: '''https://ubuntu-mate.org/download/''' | ||
::''' | ::'''The user name and password can be set by yourself after startup''' | ||
: | :3) Download '''Kail''' Official Image | ||
:: | ::Download URL: '''https://www.offensive-security.com/kali-linux-arm-images/''' | ||
:: | ::Username: '''kali''' (The old version is '''root''') Password: '''kali'''(The old version is '''toor''') | ||
: | :4) Download '''Retropie''' Official Image | ||
:: | ::Download URL: '''https://retropie.org.uk/download/''' | ||
:: | ::Username: '''pi''' Password: '''raspberry''' | ||
''' | '''Step 2. Brun Official Image''' | ||
: | :1) Download and install tool software(If they are already installed,this step can be ignored) | ||
:: | ::SD card format software '''SDCard Formatter''' download URL : | ||
::'''https://www.sdcard.org/downloads/formatter_4/''' | ::'''https://www.sdcard.org/downloads/formatter_4/''' | ||
:: | ::Image burning software '''win32diskimager''' download URL: | ||
::'''https://sourceforge.net/projects/win32diskimager/''' | ::'''https://sourceforge.net/projects/win32diskimager/''' | ||
: | :2) Format SD card | ||
:: | ::Insert the SD card into the card reader -> Insert the card reader into the computer -> Open the SDFormatter software -> Select SD card -> | ||
::( | ::Select quick format (generally select quick format, other options can be selected according to your own needs) -> Click the Format button -> | ||
: | ::Select "Yes" -> Click OK after formatting. | ||
:: | :3) Brun Image | ||
:: | ::Open the win32diskimager software -> Select the image file to be burned (xxx.img ) -> Select SD card -> Click the "write" button -> | ||
::Select "Yes" -> Wait for the burning to complete (the whole process lasts about 10 minutes) | |||
''' | '''Step 3. Modify the “config.txt” configuration file''' | ||
: | :Open the "config.txt" file in the root directory of the SD card on the computer and find the following content: | ||
::'''dtoverlay=vc4-kms-v3d''' | ::'''dtoverlay=vc4-kms-v3d''' | ||
: | :Modify it to: | ||
::'''dtoverlay=vc4-fkms-v3d''' | ::'''dtoverlay=vc4-fkms-v3d''' | ||
: | :After completing the modifications, add the following content at the end of the file, save it, and exit. | ||
{{code|1= | {{code|1= | ||
max_usb_current=1 | max_usb_current=1 | ||
| Line 270: | Line 263: | ||
hdmi_mode=87 | hdmi_mode=87 | ||
hdmi_drive=2 | hdmi_drive=2 | ||
hdmi_cvt | hdmi_cvt 1024 600 60 6 0 0 0 | ||
}} | }} | ||
'''Step 4. Insert SD card''' | |||
:After the above steps are completed, pop up the SD card on the computer and insert it into the SD card slot on the back of the raspberry pie. | |||
'''Step 5. Running system''' | |||
:Connect the HDMI interface and touch interface of the display screen to raspberry pie, connect the power supply of raspberry pie, | |||
:and start the machine to display and touch normally.. | |||
==<font color="blue">Work as HDMI touch monitor</font> == | |||
This product can be used as the HDMI touch monitor of Windows computer, only need to connect HDMI interface and TOUCH interface, | |||
==<font color="blue"> | can normally display and support up to five points touch. | ||
[[file:MPI1009-010.jpg|750px]] | [[file:MPI1009-010.jpg|750px]] | ||
: | : | ||
[[file:MPI1009-011.jpg|750px]] | [[file:MPI1009-011.jpg|750px]] | ||
==<font color="blue"> | ==<font color="blue"> Connect to Jetson Nano</font> == | ||
[[file:MPI1009-012.jpg|750px]] | [[file:MPI1009-012.jpg|750px]] | ||
==<font color="blue">Resource</font>== | |||
*'''Document''' | |||
#[http://www.lcdwiki.com/res/MPI5001/EN/How_to_install_the_LCD_driver_V1.2.pdf How_to_install_the_LCD_driver_V1.2] | |||
#[http://www.lcdwiki.com/res/MPI5001/EN/How_to_install_matchbox-keyboard(En).pdf How_to_install_matchbox-keyboard] | |||
#[http://www.lcdwiki.com/res/PublicFile/How_to_use_Raspberry_Pi(Download,Format,Burn,SSH,PuTTy)-V1.0.pdf How_to_use_Raspberry_Pi(Download,Format,Burn,SSH,PuTTy)-V1.0.pdf] | |||
*'''Driver download''' | |||
#Local download: [http://www.lcdwiki.com/res/RaspDriver/LCD-show.tar.gz LCD-show.tar.gz] | |||
*'''Images Download''' | |||
:If you have difficulty installing the driver, or if you still can't use the display properly after installing the driver, | |||
: | :Please Try our Configned images for tested. | ||
{| class="wikitable" style="width: | :Just need download and write the image into the TF card. DO NOT need any driver installation steps. | ||
{| class="wikitable" border="1" style="width: 100%; margin-left:1.5%;background-color: white;" | |||
!Image Name | !Image Name | ||
!Version | !Version | ||
!Support | !Support | ||
!Default Password | |||
|- | |- | ||
| | |Raspberry Pi OS | ||
|2024-03-15 | |2024-03-15 | ||
|PI5/PI4/PI3B+/PI3/ | |PI5/PI4/PI3B+/PI3/PI2/ ZERO/ZERO W | ||
PI2/ZERO/ZERO W | |user:pi | ||
password:raspberry | |||
|- | |- | ||
|Ubuntu MATE | |Ubuntu MATE-32bit | ||
|22.04 | |22.04 | ||
|PI4 | |PI4,PI3,PI2 | ||
|user:pi | |||
password:raspberry | |||
|- | |- | ||
|Kali Linux RaspberryPi 2, 3 and 4 | |Kali Linux RaspberryPi 2, 3 and 4 | ||
| | |2023.1 | ||
|PI4B,PI3B+,PI3,PI2 | |PI4B,PI3B+,PI3,PI2 | ||
|user: kali | |||
password: kali | |||
|- | |||
|retropie-buster-rpi4 | |||
|4.6 | |||
|PI4B | |||
|user:pi | |||
password:raspberry | |||
|- | |||
|retropie-buster-rpi2_rpi3 | |||
|4.6 | |||
|PI3B+,PI3,PI2 | |||
|user:pi | |||
password:raspberry | |||
|- | |||
|retropie-buster-rpi1_zero | |||
|4.6 | |||
|PI1,PI ZERO/ZERO W | |||
|user:pi | |||
password:raspberry | |||
|} | |} | ||
{| class="wikitable" | {| class="wikitable" border="1" style="width: 100%; margin-left:1.5%;background-color: white;" | ||
!Image Name | !Image Name | ||
!Version | !Version | ||
!Download | ! colspan="2" |Download | ||
|- | |- | ||
| rowspan="2" | | | rowspan="2" |Raspberry Pi OS | ||
| rowspan="2" |2024- | | rowspan="2" |2024-10-22 | ||
|[[File:Baiduyun.jpg|24px]]BaiduYun: [https://pan.baidu.com/s/ | |[[File:Baiduyun.jpg|24px]]BaiduYun: | ||
|[https://pan.baidu.com/s/1iOSVyoKOvS2dROZtwq6ktg MPI7006-MPI7008-7inch-H-S-2024-10-22-raspios-bookworm-armhf(Pi4-Pi5)] 提取码:6fun | |||
|- | |- | ||
|[[File:Mega-1.jpg|24px]]Mega: [https://mega.nz/folder/ | |[[File:Mega-1.jpg|24px]]Mega: | ||
|[https://mega.nz/folder/oKU0AKpa#msgCteekNoZQiDBOa3-fGw MPI7006-MPI7008-7inch-H-S-2023-02-21-raspios-bullseye-armhf] | |||
|- | |- | ||
| rowspan="2" |Ubuntu MATE | | rowspan="2" |Ubuntu MATE-32bit | ||
| rowspan="2" |22.04 | | rowspan="2" |22.04 | ||
|[[File:Baiduyun.jpg|24px]]BaiduYun: [https://pan.baidu.com/s/ | |[[File:Baiduyun.jpg|24px]]BaiduYun: | ||
|[https://pan.baidu.com/s/1J3lYp0QXzKVmPB2qlk8vtw MPI7006-MPI7008-7inch-H-S-ubuntu-mate-22.04-desktop-armhf+raspi]提取码:159d | |||
|- | |- | ||
|[[File:Mega-1.jpg|24px]]Mega: [https://mega.nz/folder/ | |[[File:Mega-1.jpg|24px]]Mega: | ||
|[https://mega.nz/folder/teEUwBTJ#-QHy1pSlA0jvh87oj3QZvw MPI7006-MPI7008-7inch-H-S-ubuntu-mate-22.04-desktop-armhf+raspi] | |||
|- | |- | ||
| rowspan="2" |Kali Linux RaspberryPi 2, 3 and 4 | | rowspan="2" |Kali Linux RaspberryPi 2, 3 and 4 | ||
| rowspan="2" |2023.1 | | rowspan="2" |2023.1 | ||
|[[File:Baiduyun.jpg|24px]]BaiduYun: [https://pan.baidu.com/s/ | |[[File:Baiduyun.jpg|24px]]BaiduYun: | ||
|[https://pan.baidu.com/s/1TPcUqPUaJUK-Oo-b2HdvqQ MPI7008-MPI7006-7inch-S-H-kali-linux-2023.1] 提取码:y3t5 | |||
|- | |||
|[[File:Mega-1.jpg|24px]]Mega: | |||
|[https://mega.nz/folder/se0GxLQI#QWdz1ho8jozy8lQlDebx9g MPI7008-MPI7006-7inch-S-H-kali-linux-2023.1] | |||
|- | |- | ||
|[[File:Mega-1.jpg|24px]]Mega: [https://mega.nz/folder/ | | rowspan="2" |retropie-buster-rpi4 | ||
|} | | rowspan="2" |4.6 | ||
|[[File:Baiduyun.jpg|24px]]BaiduYun: | |||
|[https://pan.baidu.com/s/1cfoskUr_nqXlyqPH68dj_w MPI7006-7inch-H-1024x600-retropie-buster-4.6-rpi4] 提取码:lxch | |||
|- | |||
|[[File:Mega-1.jpg|24px]]Mega: | |||
|[https://mega.nz/folder/ylgHAQCb#RZmS28YTzgCHJyMHFBUEww MPI7006-7inch-H-1024x600-retropie-buster-4.6-rpi4] | |||
|- | |||
| rowspan="2" |retropie-buster-rpi2_rpi3 | |||
| rowspan="2" |4.6 | |||
|[[File:Baiduyun.jpg|24px]]BaiduYun: | |||
|[https://pan.baidu.com/s/1zrvef8uKwF2IfVjpcMpzkQ MPI7006-7inch-H-1024x600-retropie-buster-4.6-rpi2_rpi3] 提取码:ti7w | |||
|- | |||
|[[File:Mega-1.jpg|24px]]Mega: | |||
|[https://mega.nz/folder/mlwFVKDC#AJe0OLpeRX6qUSbTOy_p2A MPI7006-7inch-H-1024x600-retropie-buster-4.6-rpi2_rpi3] | |||
|- | |||
| rowspan="2" |retropie-buster-rpi1_zero | |||
| rowspan="2" |4.6 | |||
|[[File:Baiduyun.jpg|24px]]BaiduYun: | |||
|[https://pan.baidu.com/s/1EM9jJ6_lp9uhQllgJaSZcA MPI7006-7inch-H-1024x600-retropie-buster-4.6-rpi1_zero] 提取码:l09u | |||
|- | |||
|[[File:Mega-1.jpg|24px]]Mega: | |||
|[https://mega.nz/folder/z44FUApA#P_tFhydd9ExRa4pAkcy_AA MPI7006-7inch-H-1024x600-retropie-buster-4.6-rpi1_zero] | |||
|} | |||
*'''Software''' | |||
# [http://www.lcdwiki.com/res/software/Panasonic_SDFormatter.zip Panasonic SDFormatter] | |||
# [http://www.lcdwiki.com/res/software/Win32DiskImager.zip Win32DiskImager] | |||
# [http://www.lcdwiki.com/res/software/putty.zip PuTTY] | |||
[[#top|BACK TO TOP]] | |||
# | |||
Latest revision as of 15:54, 21 November 2024
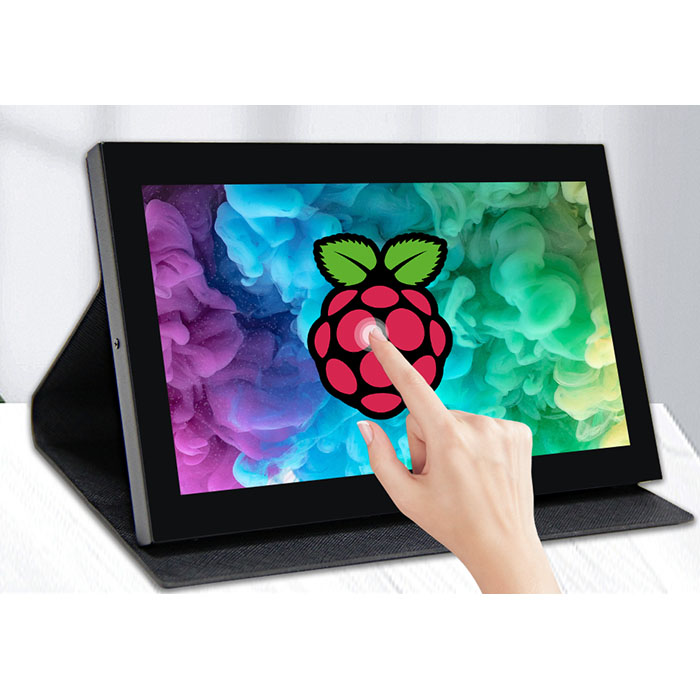
Product Picture
MPI7009-1 With Holster-TopView
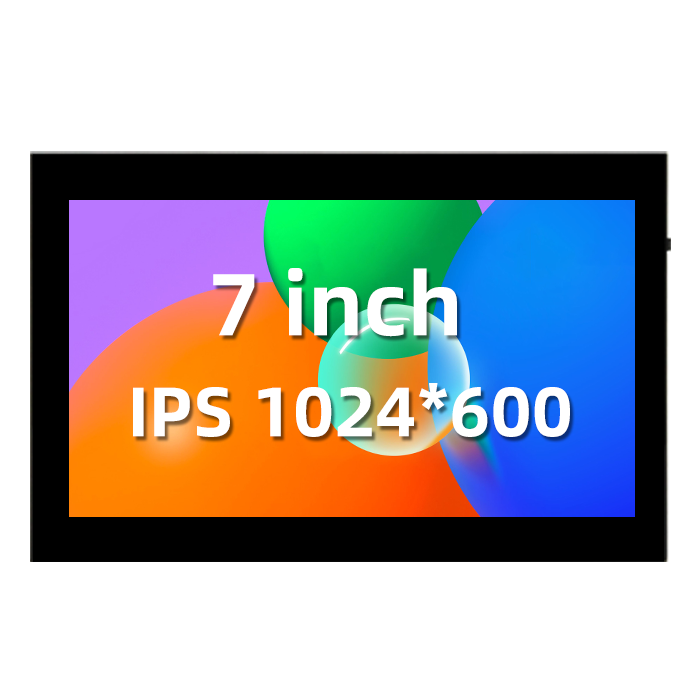
MPI7009 No Holster-TopView
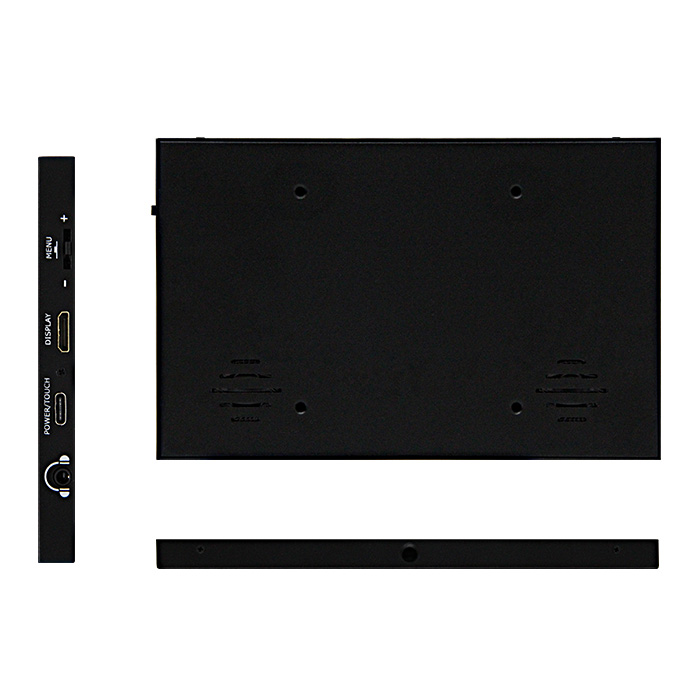
MPI7009-ButtomView
Product characteristics
- Own shell
- ○Hard iron shell
- 7inch IPS full Angle display
- ○The viewing Angle is large
- ○true color
- ○Dynamic picture quality is excellent
- 1024X600 Resolution
- ○HD Vision
- ○Display is very delicate
- ○Software settings, resolution can be increased to 1920X1080
- New touch panel
- ○Tempered glass touch panel
- ○Hardness up to 6H, more durable and more scratch resistant
- High sensitivity capacitive touch screen
- ○Accurate touch
- ○Supports up to 5 touch points
- HDMI video input interfaces
- ○High definition video display
- audio output
- ○Stereo dual speaker output shock sound
- ○3.5mm external audio interface
- Multifunctional leave Switch
- ○Support brightness and volume adjustment
- ○Support menu settings
- Support multiple device access
- ○Can connect to mainstream development boards such as Raspberry Pi, Banana Pi, BB Black, etc
- ○Can connect to mainstream game consoles such as PS4, Xbox360, Switch, etc
- ○Can connect to mainstream TV boxes and digital cameras (display only)
- Supports multiple system displays
- ○Support systems such as Raspbian, Kali Linux, Ubuntu, Kodi, Win10 IOT, and touch free drive
- ○Support Win7/8/10/11 and other systems, touch free drive
- CE and RoHS certified
Product Description
Product Parameters
| SKU | MPI7009 |
| Panel Type | IPS |
| Panel Size | 7.0inch |
| Resolution | 1024 x 600(RGB) (pixels) |
| Active Area | 154.21(W) x 85.92(H) (mm) |
| Pixel Pitch | 0.0502(H) x 0.1432(V) (mm) |
| View Angle | ALL 0’ CLOCK |
| Luminance(TYP) | 400 cd/m2 |
| Contrast Ratio(TYP) | 800 |
| Backlight Arrangement | 3 strings in 7 parallel (21 white LED lights) |
| Backlight Current(Max) | 140mA |
| Operation Temperature | -10~50(℃) |
| Storage Temperature | -20~60(℃) |
| Backlight Adjustment | Leave switch adjustment |
| Volume Adjustment | Leave switch adjustment |
| Touch Screen Type | Capacitive Touch Screen |
| Touch IC | GT911 |
| Touch Screen Size | 174.0±0.1(W) x 110.0±0.1(H) (mm) |
| Touch Screen Visual Area | 155.21±0.2(W) x 86.92±0.2(H) (mm) |
| Power Voltage | 5V |
| Speaker Power | 8Ω 2W x 2 |
| Total Power | 2.5W (100% brightness, 0% volume),3.2W(100% brightness, 100% volume) |
| Video Input Interface | Mini HDMI |
| Audio Output Interface | 3.5mm Audio Interface and Stereo speakers |
| Power Interface | Type-C |
| Touch Output Interface | Type-C |
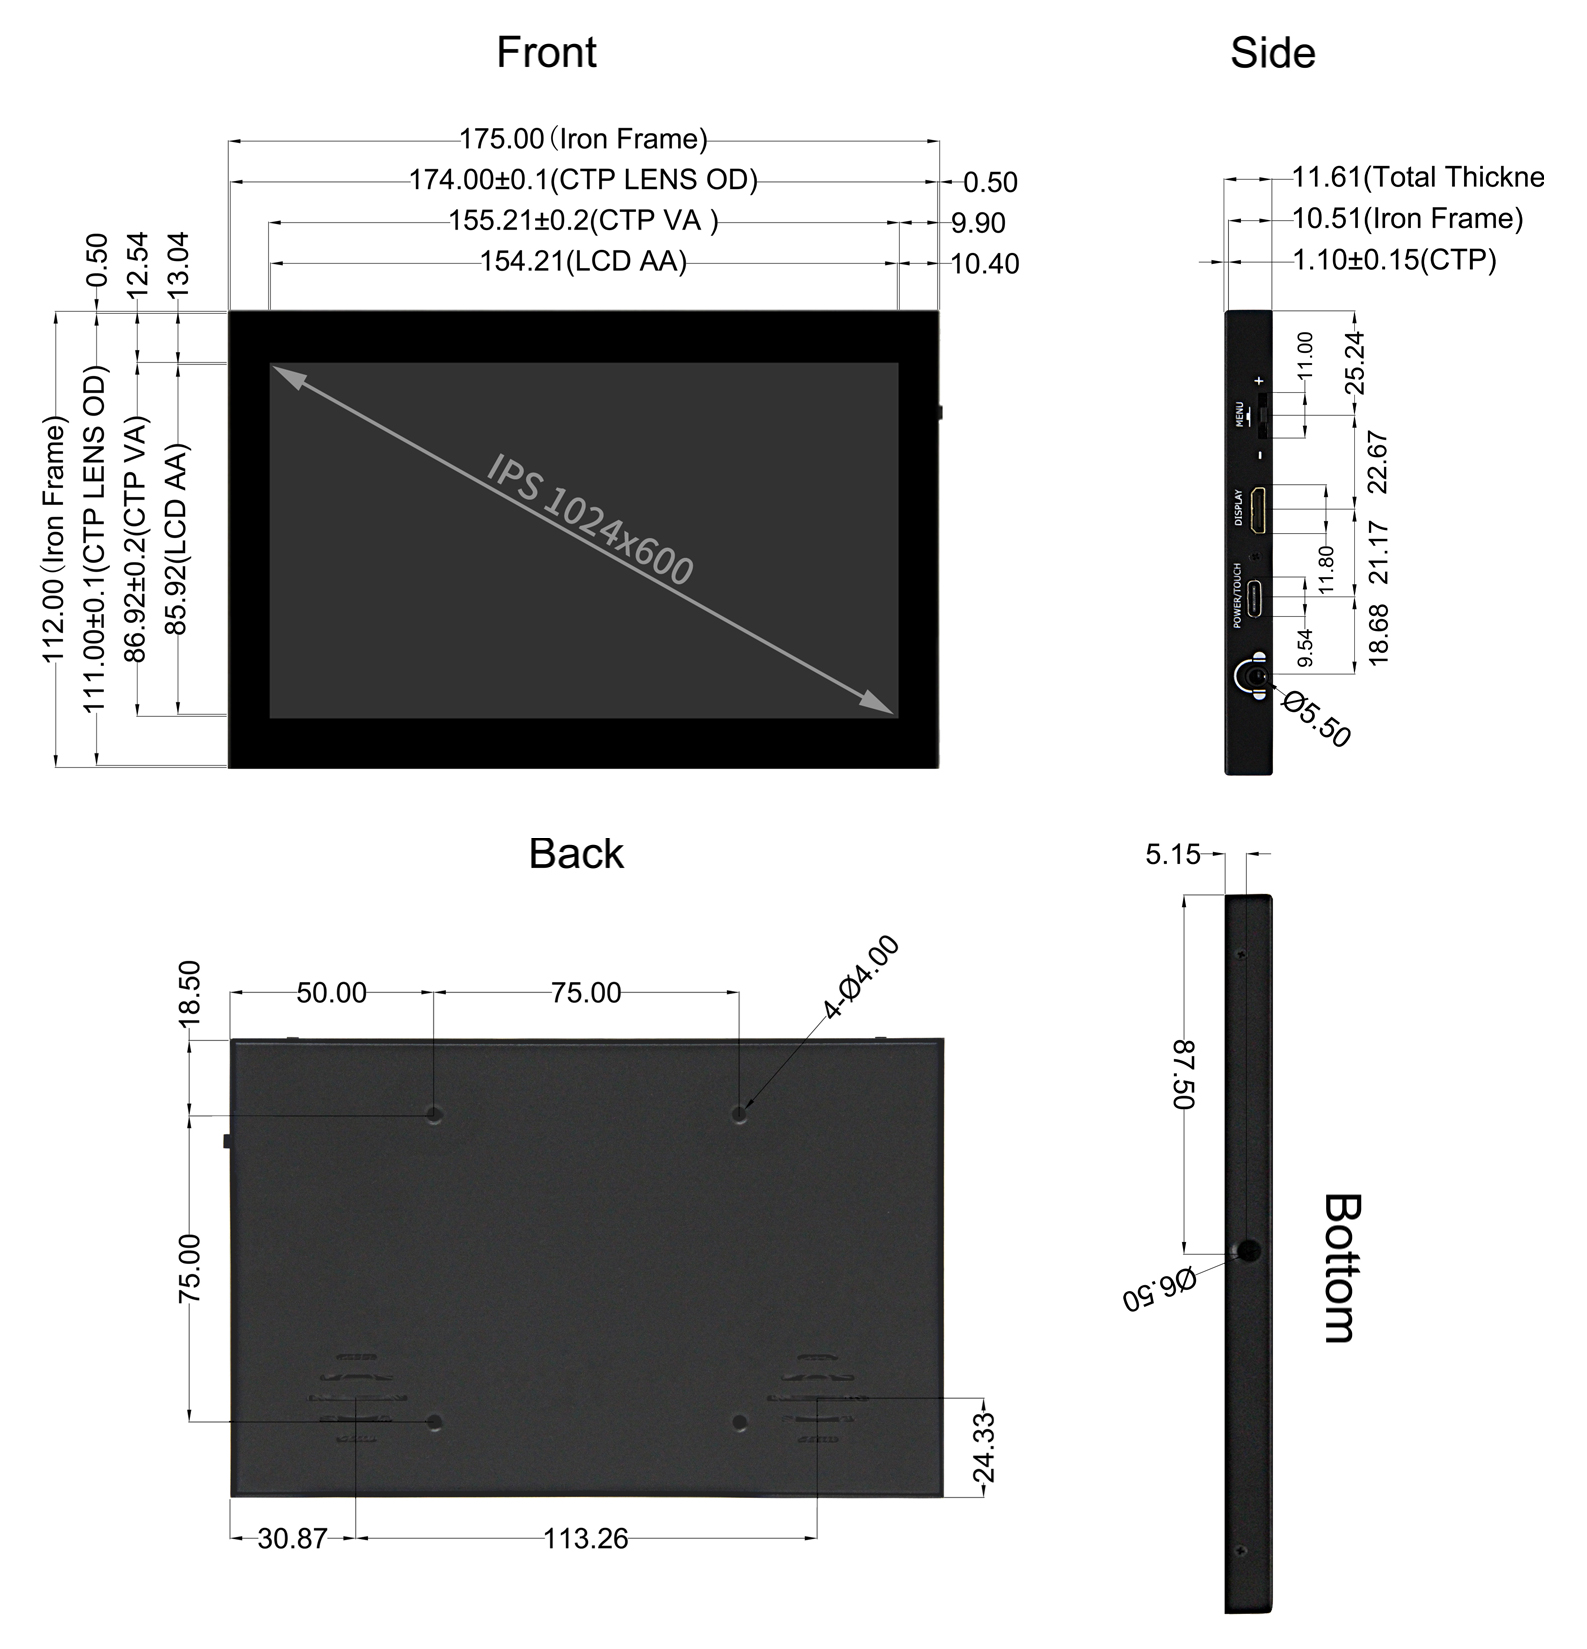
| Outline Size | 175.0(W) x 112.0(H) x 11.61(T)(mm) |
| Package size | 211.0(W) x 150.0(H) x 53.0(T) (mm) |
| Weight(including package) | 469(g) |
Key and Interface Function Description
| Key and Interface | Description |
| DISPLAY | Input HDMI signal, connect using Mini HDMI cable, commonly used to connect to a computer, with a maximum support resolution of 1920x1080 |
| POWER/TOUCH | The power and touch interfaces are shared, connected using Type-C cables, and provide both power and touch functions. |
| Headphone | 3.5mm audio output interface for connecting audio devices, such as headphones or audio systems |
| MENU | Brightness Adjustment:
When there is no OSD interface displayed in the display state, turning the pulsator switch in the "+" direction triggers the brightness setting function. After triggering, turning the switch up and down can adjust the brightness value. After the adjustment is completed, press the switch briefly to exit or wait for 10 seconds for automatic exit. |
| Volume Adjustment:
When there is no OSD interface displayed in the display state, turning the pulsator switch in the "-" direction triggers the volume setting function. After triggering, turning the switch up and down can adjust the volume value. After the adjustment is completed, press the switch briefly to exit or wait for 10 seconds for automatic exit. | |
| Menu Setting:
When there is no OSD interface displayed in the display state, short press the pulsator to trigger the menu setting function. After triggering, enter the menu and toggle the switch up and down to select or adjust the setting items. Short press the switch to confirm, long press the switch to return or exit. | |
| Turn off Display:
When there is no OSD interface displayed in the display state, long pressing the wave wheel development triggers the shutdown of the display function, and the product goes black at this time. Press the switch again briefly to turn on the display. |
Product Size
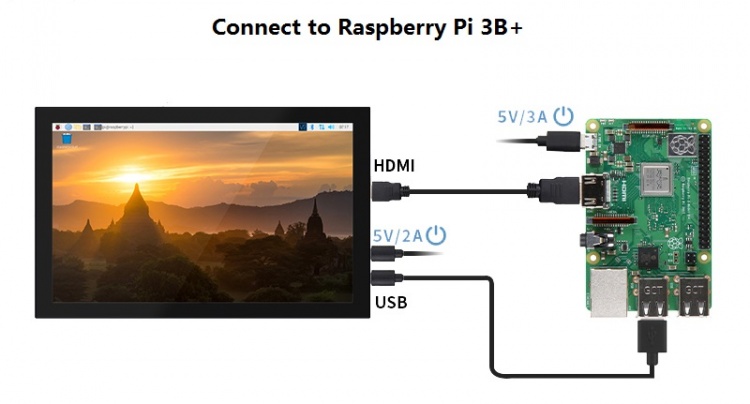
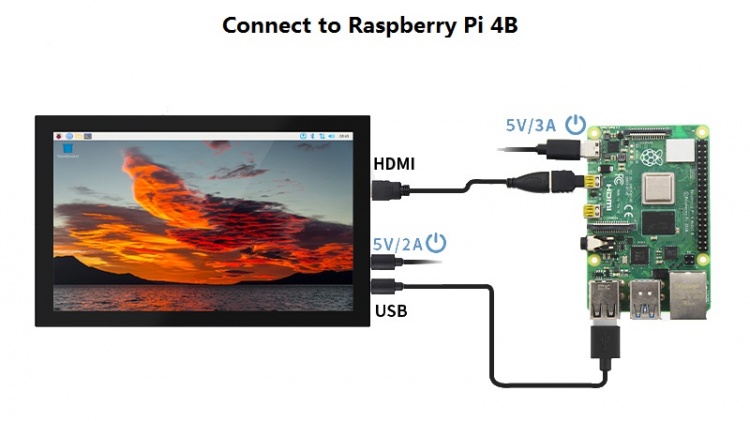
Connect to Raspberry Pi
Working with Raspberry Pi
Step 1. Download the Official image
- 1) Download Raspbian Official Image
- Download URL: https://www.raspberrypi.org/downloads/raspbian/
- Username: pi Password: raspberry
- 2) Download Ubuntu Mate Official Image
- Download URL: https://ubuntu-mate.org/download/
- The user name and password can be set by yourself after startup
- 3) Download Kail Official Image
- Download URL: https://www.offensive-security.com/kali-linux-arm-images/
- Username: kali (The old version is root) Password: kali(The old version is toor)
- 4) Download Retropie Official Image
- Download URL: https://retropie.org.uk/download/
- Username: pi Password: raspberry
Step 2. Brun Official Image
- 1) Download and install tool software(If they are already installed,this step can be ignored)
- SD card format software SDCard Formatter download URL :
- https://www.sdcard.org/downloads/formatter_4/
- Image burning software win32diskimager download URL:
- https://sourceforge.net/projects/win32diskimager/
- 2) Format SD card
- Insert the SD card into the card reader -> Insert the card reader into the computer -> Open the SDFormatter software -> Select SD card ->
- Select quick format (generally select quick format, other options can be selected according to your own needs) -> Click the Format button ->
- Select "Yes" -> Click OK after formatting.
- 3) Brun Image
- Open the win32diskimager software -> Select the image file to be burned (xxx.img ) -> Select SD card -> Click the "write" button ->
- Select "Yes" -> Wait for the burning to complete (the whole process lasts about 10 minutes)
Step 3. Modify the “config.txt” configuration file
- Open the "config.txt" file in the root directory of the SD card on the computer and find the following content:
- dtoverlay=vc4-kms-v3d
- Modify it to:
- dtoverlay=vc4-fkms-v3d
- After completing the modifications, add the following content at the end of the file, save it, and exit.
max_usb_current=1
hdmi_force_hotplug=1
config_hdmi_boost=7
hdmi_group=2
hdmi_mode=1
hdmi_mode=87
hdmi_drive=2
hdmi_cvt 1024 600 60 6 0 0 0
Step 4. Insert SD card
- After the above steps are completed, pop up the SD card on the computer and insert it into the SD card slot on the back of the raspberry pie.
Step 5. Running system
- Connect the HDMI interface and touch interface of the display screen to raspberry pie, connect the power supply of raspberry pie,
- and start the machine to display and touch normally..
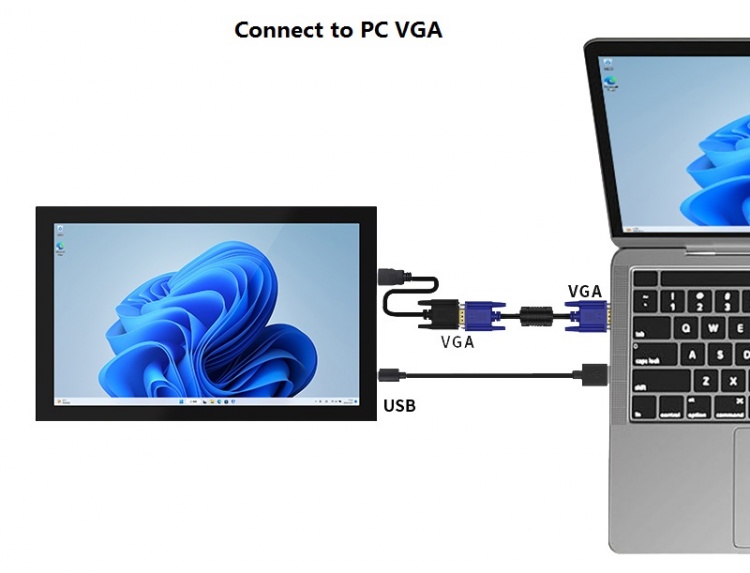
Work as HDMI touch monitor
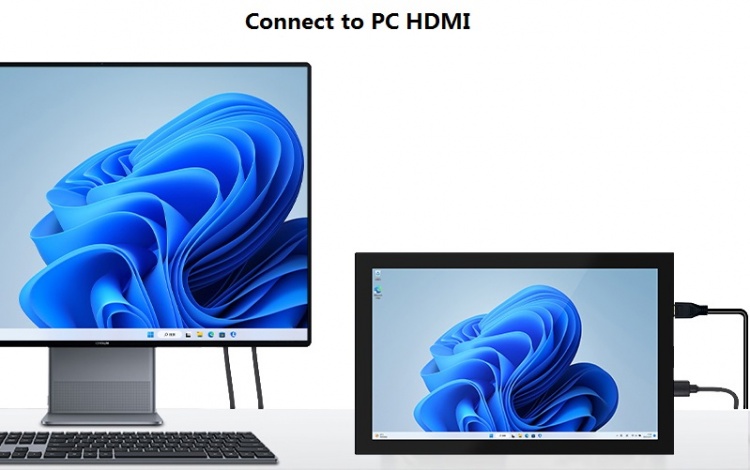
This product can be used as the HDMI touch monitor of Windows computer, only need to connect HDMI interface and TOUCH interface,
can normally display and support up to five points touch.
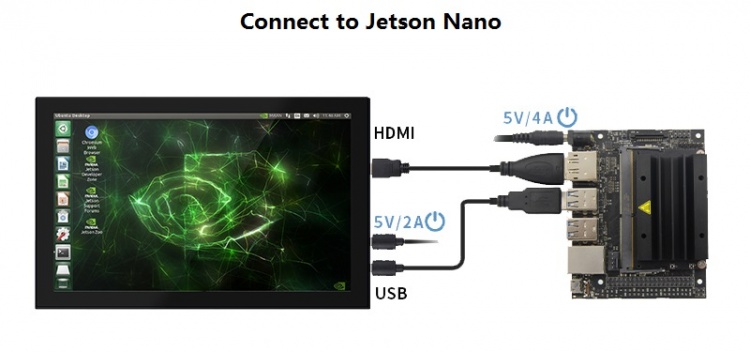
Connect to Jetson Nano
Resource
- Document
- How_to_install_the_LCD_driver_V1.2
- How_to_install_matchbox-keyboard
- How_to_use_Raspberry_Pi(Download,Format,Burn,SSH,PuTTy)-V1.0.pdf
- Driver download
- Local download: LCD-show.tar.gz
- Images Download
- If you have difficulty installing the driver, or if you still can't use the display properly after installing the driver,
- Please Try our Configned images for tested.
- Just need download and write the image into the TF card. DO NOT need any driver installation steps.
| Image Name | Version | Support | Default Password |
|---|---|---|---|
| Raspberry Pi OS | 2024-03-15 | PI5/PI4/PI3B+/PI3/PI2/ ZERO/ZERO W | user:pi
password:raspberry |
| Ubuntu MATE-32bit | 22.04 | PI4,PI3,PI2 | user:pi
password:raspberry |
| Kali Linux RaspberryPi 2, 3 and 4 | 2023.1 | PI4B,PI3B+,PI3,PI2 | user: kali
password: kali |
| retropie-buster-rpi4 | 4.6 | PI4B | user:pi
password:raspberry |
| retropie-buster-rpi2_rpi3 | 4.6 | PI3B+,PI3,PI2 | user:pi
password:raspberry |
| retropie-buster-rpi1_zero | 4.6 | PI1,PI ZERO/ZERO W | user:pi
password:raspberry |
- Software

