More actions
| (One intermediate revision by the same user not shown) | |||
| Line 34: | Line 34: | ||
* After executing the above command, the system will restart automatically, and display and touch will be OK. | * After executing the above command, the system will restart automatically, and display and touch will be OK. | ||
</div> | |||
</div> | </div> | ||
| Line 84: | Line 85: | ||
sudo ./MPI3508-show | sudo ./MPI3508-show | ||
}} | }} | ||
</div> | |||
</div> | </div> | ||
</div> | </div> | ||
| Line 115: | Line 116: | ||
:Just need download and write the image into the TF card. DO NOT need any driver installation steps. | :Just need download and write the image into the TF card. DO NOT need any driver installation steps. | ||
{| class="wikitable" border="1" style=" | {| class="wikitable" border="1" style=" margin-left:1.5%;background-color: white;" | ||
!Image Name | !Image Name | ||
!Version | !Version | ||
Latest revision as of 14:19, 11 August 2018
Features
- 320×480 resolution
- Resistive touch control
- Supports any revision of Raspberry Pi (directly-pluggable)
- Compatible with Raspberry Pi A, B, A+, B+, 2B, 3B, 3B+versions
- Drivers provided (works with your own Raspbian/Ubuntu directly)
- Size perfectly fits the Pi
- High quality immersion gold surface plating
- Supports Raspbian system, ubuntu system ,kali Linux system
How to use with Raspbian/Ubuntu Mate System
- Step 1, Install Raspbian official image
- Download the latest image from the official download.
- Install the system according to the official tutorial steps.
- Step2,Install LCD driver
1) log in the raspberry pie system with Putty connection to the user command line (initial username: PI password :raspberry) 2) execute the following command (Mouse Right-click can paste the code in Putty):
git clone https://github.com/goodtft/LCD-show.git
chmod -R 755 LCD-show
cd LCD-show/
sudo ./MPI3508-show
- After executing the above command, the system will restart automatically, and display and touch will be OK.
- Method 2: offline installation
- Install video:
- VideoService "youku" not recognized.
- Step 1: install the official image of Raspbian/Ubuntu
- 1)Download the latest Raspbian or Ubuntu image from the official website https://www.raspberrypi.org/downloads/
- 2)Format the TF card with SDFormatter,
- 3)Use Win32DiskImager to burn the official image to the TF card.
- Step 2, modify the "config.txt"
- After the step 1 completion of burning in the CD Driver in the folder "- show LCD. Tar. Gz" copy to TF-card root directory,
- Open the config.txt file in TF-card root directory and add the following code to the end of the file. Save and colse TF card:
hdmi_force_hotplug=1
config_hdmi_boost=7
hdmi_drive=2
hdmi_force_hotplug=1
hdmi_group=2
hdmi_mode=87
hdmi_cvt 480 320 60 6 0 0 0
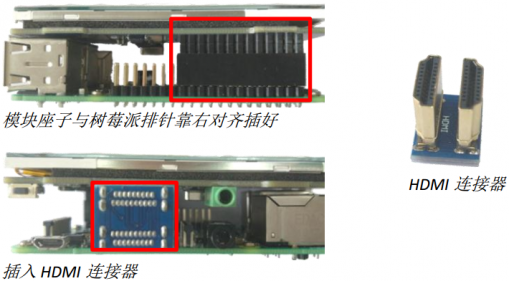
- Step 3: insert the SD card into the raspberry pie and connect the hardware as shown in the picture:
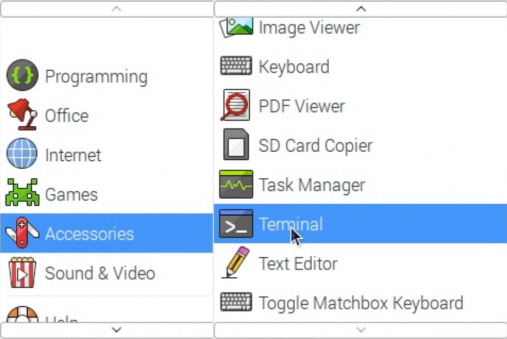
- Step 4: power the raspberry, connect the mouse keyboard, and open the terminal terminal terminal on the raspberry pie:
- Step 5. Enter the following instructions in the terminal terminal:
cd /boot
cp LCD-show.tar.gz ~
cd ~
sudo tar zxvf LCD-show.tar.gz
cd LCD-show/
sudo ./MPI3508-show
How to use as PC monitor
- Connect the computer HDMI output signal to the LCD HDMI interface by using the HDMI cable
- Connect the LCD's USB Power interface to the USB port of the device
- If there are several monitors, please unplug other monitor connectors first, and use LCD as the only monitor for testing.
- Note: touch function can only be used for raspberry pi.
Resource
- Document
- 如何安装LCD驱动(CN)
- 如何安装虚拟键盘(CN)
- Product size:File:MPI3508-07.PNG
- Driver download
- download:LCD-show.tar.gz
- Images download
- If you have difficulty installing the driver, or if you still can't use the display properly after installing the driver,
- Please Try our Configned images for tested.
- Just need download and write the image into the TF card. DO NOT need any driver installation steps.
| Image Name | Version | Support | Password | Download | |
|---|---|---|---|---|---|
| Raspbian(480X320) | 2018-04-18 | PI3B+/A/A+/B/B+/PI2/
PI3/ZERO/ZERO W |
user:pi
password:raspberry |
(addr1)Baidu Pan: | MPI3508-Raspbian-20180629.7z |
| (addr2)Mega: | MPI3508-Raspbian-20180629.7z | ||||
| Raspbian(800X480) | 2018-04-18 | PI3B+/A/A+/B/B+/PI2/
PI3/ZERO/ZERO W |
user:pi
password:raspberry |
(addr1)Baidu Pan: | raspbian_180418_MPI3508_800480.7z |
| (addr2)Mega: | raspbian_180418_MPI3508_800480.7z | ||||
| Ubuntu | Mate:16.04 | PI3,PI2 | user:pi
password:raspberry |
(addr1)Baidu Pan: | UbuntuMate_16.04Beta2_MPI3508_600400.7z |
| (addr2)Mega: | UbuntuMate_16.04Beta2_MPI3508_600400.7z | ||||
| Kali-linux | 2017.2 | PI3,PI2 | user:root
password:toor |
(addr1)Baidu Pan: | Kali_17.02_MPI3508_480320.7z |
| (addr2)Mega: | Kali_17.02_MPI3508_480320.7z | ||||
| Kali-linux | 2018.2 | PI3B+,PI3,PI2 | user:root
password:toor |
(addr1)Baidu Pan: | MPI3508-Kali-Lunux-2018.2-RPi-nexmon.7z |
| (addr2)Mega: | MPI3508-Kali-Lunux-2018.2-RPi-nexmon.7z | ||||
- Software


