More actions
No edit summary |
|||
| Line 16: | Line 16: | ||
== <font color="blue">Product description</font>== | == <font color="blue">Product description</font>== | ||
* | *7" standard display, 800 × 480 Hardware resolution, Up to 1920x1080 software configuration resolution. | ||
* | *Capacitive touch screen, maximum support 5 point touch | ||
* | *Support backlight control alone, the backlight can be turned off to save power | ||
* | *Support Raspberry Pi, BB Black, Banana Pi and other mainstream mini PC | ||
* | *Can be used as general-purpose-use HDMI monitor, for example: connect with a computer HDMI as the sub-display | ||
* | *Used as a raspberry pi display that supports Raspbian, Ubuntu, Kali-Linux, Kodi, win10 IOT, single-touch, free drive | ||
* | *Work as a PC monitor, support win7, win8, win10 system 5 point touch (XP and older version system: single-point touch), free drive | ||
* | *'''CE, RoHS '''certification | ||
== <font color="blue">Product Parameters</font> == | == <font color="blue">Product Parameters</font> == | ||
* | *Size: 7.0 (inch) | ||
* | *SKU: MPI7001 | ||
* | *Resolution: 800 × 480 (dots) | ||
* | *Touch: five-point capacitive touch | ||
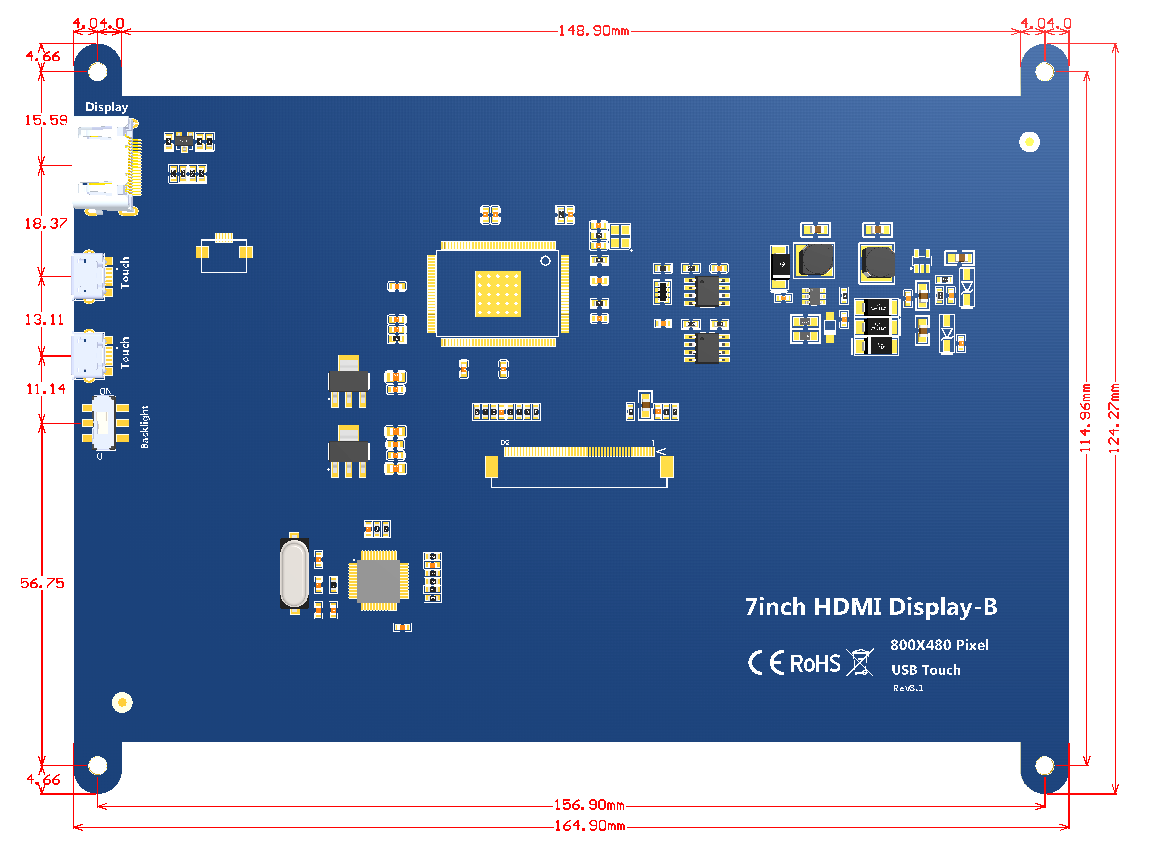
* | *Dimensions: 164.9 * 124.27 (mm) | ||
* | *Weight: 380 (g) | ||
| Line 102: | Line 102: | ||
:Just need download and write the image into the TF card. DO NOT need any driver installation steps. | :Just need download and write the image into the TF card. DO NOT need any driver installation steps. | ||
{| class="wikitable" border="1" style="width: | {| class="wikitable" border="1" style="width: 70%; margin-left:1.5%;background-color: white;" | ||
!Image Name | !Image Name | ||
!Version | !Version | ||
! | ! colspan="2" |Download | ||
!Support | !Support | ||
!Password | |||
|- | |- | ||
| rowspan="2" |Raspbian | | rowspan="2" |Raspbian | ||
|2018-06-29 | |2018-06-29 | ||
| | |addr1: Baidu Pan | ||
|[https://pan.baidu.com/s/1oZS8VnroEvk2LpG1hcdVqQ MPI7001-800x480-Raspbian-20180629.7z] | |[https://pan.baidu.com/s/1oZS8VnroEvk2LpG1hcdVqQ MPI7001-800x480-Raspbian-20180629.7z] | ||
| rowspan="2" |PI3B+/A/A+/B/B+/PI2/PI3/ZERO/ZERO W | | rowspan="2" |PI3B+/A/A+/B/B+/PI2/PI3/ZERO/ZERO W | ||
| Line 149: | Line 118: | ||
|- | |- | ||
|2018-04-18 | |2018-04-18 | ||
| | |addr2: Mega | ||
|[https://mega.nz/#!7WBCVaZL!c_nZLnGLwTyyc5s0G5RZP_Z_wAI1rsKdYGgUQlHr8QE 7inch-800x480-20180418-raspbian.7z] | |[https://mega.nz/#!7WBCVaZL!c_nZLnGLwTyyc5s0G5RZP_Z_wAI1rsKdYGgUQlHr8QE 7inch-800x480-20180418-raspbian.7z] | ||
|- | |- | ||
| rowspan="2" |Ubuntu | | rowspan="2" |Ubuntu | ||
| rowspan="2" |Mate:16.04 | | rowspan="2" |Mate:16.04 | ||
| | |addr1: Baidu Pan | ||
|[https://pan.baidu.com/s/1mWEibR-MR4uaYfTpSlg9gQ 7inch-800X480-RPI3-RPI2-ubuntu-mate-16.04-beta2.7z] | |[https://pan.baidu.com/s/1mWEibR-MR4uaYfTpSlg9gQ 7inch-800X480-RPI3-RPI2-ubuntu-mate-16.04-beta2.7z] | ||
| rowspan="2" |PI3,PI2 | | rowspan="2" |PI3,PI2 | ||
| Line 160: | Line 129: | ||
password:raspberry | password:raspberry | ||
|- | |- | ||
| | |addr2: Mega | ||
|[https://mega.nz/#!qbRkAKaI!TUsIeBl5mfYgyF_9fQri3EwTkWk6eOmHRZyyU7TF6lg 7inch-800X480-RPI3-RPI2-ubuntu-mate-16.04-beta2.7z] | |[https://mega.nz/#!qbRkAKaI!TUsIeBl5mfYgyF_9fQri3EwTkWk6eOmHRZyyU7TF6lg 7inch-800X480-RPI3-RPI2-ubuntu-mate-16.04-beta2.7z] | ||
|- | |- | ||
| rowspan="2" |Kali-linux | | rowspan="2" |Kali-linux | ||
|2018.2 | |2018.2 | ||
| | |addr1: Baidu Pan | ||
|[https://pan.baidu.com/s/1kDNuPco6deQiMCukYg0TcA MPI7001-800X480-kali-linux-2018.2-rpi3-nexmon.7z] | |[https://pan.baidu.com/s/1kDNuPco6deQiMCukYg0TcA MPI7001-800X480-kali-linux-2018.2-rpi3-nexmon.7z] | ||
| rowspan="2" |PI3B+,PI3,PI2 | | rowspan="2" |PI3B+,PI3,PI2 | ||
| Line 172: | Line 141: | ||
|- | |- | ||
|2017.2 | |2017.2 | ||
| | |addr2: Mega | ||
|[https://mega.nz/#!DGxGHQZR!UXwuawdt8myB7rpxYgQkAYKtGh1OeWAURo3r60fDl30 7inch-800X480_kali-2.1.2_rpi2-rpi3.7z] | |[https://mega.nz/#!DGxGHQZR!UXwuawdt8myB7rpxYgQkAYKtGh1OeWAURo3r60fDl30 7inch-800X480_kali-2.1.2_rpi2-rpi3.7z] | ||
|} | |} | ||
*'''Software''' | *'''Software''' | ||
Revision as of 19:05, 4 July 2018
<//tabber>
Description=
Product pictures


Product description
- 7" standard display, 800 × 480 Hardware resolution, Up to 1920x1080 software configuration resolution.
- Capacitive touch screen, maximum support 5 point touch
- Support backlight control alone, the backlight can be turned off to save power
- Support Raspberry Pi, BB Black, Banana Pi and other mainstream mini PC
- Can be used as general-purpose-use HDMI monitor, for example: connect with a computer HDMI as the sub-display
- Used as a raspberry pi display that supports Raspbian, Ubuntu, Kali-Linux, Kodi, win10 IOT, single-touch, free drive
- Work as a PC monitor, support win7, win8, win10 system 5 point touch (XP and older version system: single-point touch), free drive
- CE, RoHS certification
Product Parameters
- Size: 7.0 (inch)
- SKU: MPI7001
- Resolution: 800 × 480 (dots)
- Touch: five-point capacitive touch
- Dimensions: 164.9 * 124.27 (mm)
- Weight: 380 (g)
Hardware Description

- ① Backlight Power switch: Controls the backlight turned on and off to save power.
- ②&③ USB Touch / power supply connector: For power supply and touch output, the functions of the both are the same, can just use one of them.
- ④ HDMI interface: For connecting motherboard and LCD monitor to HDMI transmission.
How to use with Raspbian/Ubuntu Mate/Win10 IoT Core System
Step 1, Install Raspbian official image
- Download the latest image from the official download.
- Install the system according to the official tutorial steps.
Step 2, modify the “config.txt”
After the programming of Step1 is completed, open the config.txt file of TF card root directory and
add the following code at the end of the file, save and eject Micro SD Card safely:
max_usb_current=1
hdmi_force_hotplug=1
config_hdmi_boost=7
hdmi_group=2
hdmi_mode=1
hdmi_mode=87
hdmi_drive=1
hdmi_cvt 800 480 60 6 0 0 0
Step 3, Drive the 5inch HDMI Display-B with the Raspberry Pi
Insert the TF Card to Raspberry Pi, connect the Raspberry Pi and LCD by HDMI cable; connect USB cable to one of the four USB ports of Raspberry Pi, and connect the other end of the USB cable to the USB port of the LCD; then supply power to Raspberry Pi; after that if the display and touch both are OK, it means drive successfully (please use the full 2A for power supply).
How to use as PC monitor
- Connect the computer HDMI output signal to the LCD HDMI interface by using the HDMI cable
- Connect the LCD's USB Touch interface (Either of the two MicroUSB) to the USB port of the device
- If there are several monitors, please unplug other monitor connectors first, and use LCD as the only monitor for testing.
Product Dimensions
How to modify the display orientation
Resource
- Document
- 7inch_HDMI_Display-B_User_Manual(En)
- How_to_install_the_LCD_driver_V1.2
- How_to_install_matchbox-keyboard
- Product Dimensions:MPI7001_Product_Dimensions
- Driver download
- Local download: LCD-show.tar.gz
- Images download
- If you have difficulty installing the driver, or if you still can't use the display properly after installing the driver,
- Please Try our Configned images for tested.
- Just need download and write the image into the TF card. DO NOT need any driver installation steps.
| Image Name | Version | Download | Support | Password | |
|---|---|---|---|---|---|
| Raspbian | 2018-06-29 | addr1: Baidu Pan | MPI7001-800x480-Raspbian-20180629.7z | PI3B+/A/A+/B/B+/PI2/PI3/ZERO/ZERO W | user:pi
password:raspberry |
| 2018-04-18 | addr2: Mega | 7inch-800x480-20180418-raspbian.7z | |||
| Ubuntu | Mate:16.04 | addr1: Baidu Pan | 7inch-800X480-RPI3-RPI2-ubuntu-mate-16.04-beta2.7z | PI3,PI2 | user:pi
password:raspberry |
| addr2: Mega | 7inch-800X480-RPI3-RPI2-ubuntu-mate-16.04-beta2.7z | ||||
| Kali-linux | 2018.2 | addr1: Baidu Pan | MPI7001-800X480-kali-linux-2018.2-rpi3-nexmon.7z | PI3B+,PI3,PI2 | user:root
password:toor |
| 2017.2 | addr2: Mega | 7inch-800X480_kali-2.1.2_rpi2-rpi3.7z | |||
- Software
BACK TO TOP |-| FAQ=
|
|
|
|
|
|
|
|
|
|
|
|
|
|
|
|
|-|
after-sales=
Contact us:
Tech Support:
| Email: | Lcdwiki@163.com |
|---|
Dear Customers:
There might be a delay of several hours in handling your question, depending on the time difference between your location and ours.
Sincerely hoping your understanding!
Our working time:
08:00-18:00 (Monday to Saturday) </tabber>