More actions
No edit summary |
No edit summary |
||
| Line 9: | Line 9: | ||
== <font color="blue">'''How to rotate display direction''':</font> == | == <font color="blue">'''How to rotate display direction''':</font> == | ||
1. Open the “'''config.txt'''” file (the''' “config.txt” '''file is located in /boot): | 1. Open the “'''config.txt'''” file (the''' “config.txt” '''file is located in /boot): | ||
<pre style="border: 1px dashed | <pre style="border: 1px dashed black;color:black;width: 50%"> | ||
sudo nano /boot/config.txt | sudo nano /boot/config.txt | ||
</pre> | </pre> | ||
| Line 15: | Line 15: | ||
2.Add the statement in the “'''config.txt'''” file, press <font color="purple">'''Ctrl+X''' </font>to exit, press <font color="purple">'''Y''' </font>to save. | 2.Add the statement in the “'''config.txt'''” file, press <font color="purple">'''Ctrl+X''' </font>to exit, press <font color="purple">'''Y''' </font>to save. | ||
<pre style="border: 1px dashed | <pre style="border: 1px dashed black;color:black;width: 50%">display_rotate=1 #0: 0; 1: 90; 2: 180; 3: 270</pre> | ||
3. Restart the '''Raspberry Pi''' after saving. | 3. Restart the '''Raspberry Pi''' after saving. | ||
<pre style="border: 1px dashed | <pre style="border: 1px dashed black;color:black;width: 50%">sudo reboot</pre> | ||
== <font color="blue">'''How to rotate Touch direction:'''</font> == | == <font color="blue">'''How to rotate Touch direction:'''</font> == | ||
After the display is rotated, the touch needs to be modified. | After the display is rotated, the touch needs to be modified. | ||
1. Install '''libinput'''<pre style="border: 1px dashed | 1. Install '''libinput'''<pre style="border: 1px dashed black;color:black;width: 50%"> | ||
sudo apt-get install xserver-xorg-input-libinput | sudo apt-get install xserver-xorg-input-libinput | ||
</pre> | </pre> | ||
2. Create the''' xorg.conf. D '''directory in /etc/x11 / below (if the directory already exists, this will proceed directly to step 3) | 2. Create the''' xorg.conf. D '''directory in /etc/x11 / below (if the directory already exists, this will proceed directly to step 3) | ||
<pre style="border: 1px dashed | <pre style="border: 1px dashed black;color:black;width: 50%"> | ||
sudo mkdir /etc/X11/xorg.conf.d | sudo mkdir /etc/X11/xorg.conf.d | ||
</pre> | </pre> | ||
3. Copy the file '''“40-libinput.conf”''' to the directory you just created. | 3. Copy the file '''“40-libinput.conf”''' to the directory you just created. | ||
<pre style="border: 1px dashed | <pre style="border: 1px dashed black;color:black;width: 50%"> | ||
sudo cp /usr/share/X11/xorg.conf.d/40-libinput.conf /etc/X11/xorg.conf.d/ | sudo cp /usr/share/X11/xorg.conf.d/40-libinput.conf /etc/X11/xorg.conf.d/ | ||
</pre> | </pre> | ||
4. Edit “/etc/X11/xorg.conf.d/40-libinput.conf” | 4. Edit “/etc/X11/xorg.conf.d/40-libinput.conf” | ||
<pre style="border: 1px dashed | <pre style="border: 1px dashed black;color:black;width: 50%">sudo nano /etc/X11/xorg.conf.d/40-libinput.conf </pre> | ||
Find a part of the '''touchscreen''', add the following statement inside, press <font color="purple">'''Ctrl+X''' </font>to exit, press <font color="purple">'''Y''' </font>to save. | Find a part of the <font color="purple">'''touchscreen''' </font>, add the following statement inside, press <font color="purple">'''Ctrl+X''' </font>to exit, press <font color="purple">'''Y''' </font>to save. | ||
<pre style="border: 1px dashed | <pre style="border: 1px dashed black;color:black;width: 50%"> | ||
Option "CalibrationMatrix" "0 1 0 -1 0 1 0 0 1" | Option "CalibrationMatrix" "0 1 0 -1 0 1 0 0 1" | ||
</pre> | </pre> | ||
| Line 48: | Line 45: | ||
5. Restar your '''Raspberry Pi''' | 5. Restar your '''Raspberry Pi''' | ||
<pre style="border: 1px dashed | <pre style="border: 1px dashed black;color:black;width: 50%"> | ||
sudo reboot | sudo reboot | ||
</pre> | </pre> | ||
| Line 60: | Line 57: | ||
90 degrees of rotation parameters: Option "CalibrationMatrix" "0 1 0 0 -1 1 0 0 1" | 90 degrees of rotation parameters: Option "CalibrationMatrix" "0 1 0 0 -1 1 0 0 1" | ||
180 degrees of rotation parameters: Option "CalibrationMatrix" "1 0 0-1 1 0 0 1" | 180 degrees of rotation parameters: Option "CalibrationMatrix" "-1 0 1 0 -1 1 0 0 1" | ||
270 degrees of rotation parameters: Option "CalibrationMatrix" "0-1 1 1 0 0 0 0 1" | 270 degrees of rotation parameters: Option "CalibrationMatrix" "0-1 1 1 0 0 0 0 1" | ||
Revision as of 09:20, 18 May 2018
| 语言选择(Language): | 中文 | EN |
This method is only suitable for HDMI capacitive screen, not suitable for GPIO resistive screen
How to rotate display direction:
1. Open the “config.txt” file (the “config.txt” file is located in /boot):
sudo nano /boot/config.txt
2.Add the statement in the “config.txt” file, press Ctrl+X to exit, press Y to save.
display_rotate=1 #0: 0; 1: 90; 2: 180; 3: 270
3. Restart the Raspberry Pi after saving.
sudo reboot
How to rotate Touch direction:
After the display is rotated, the touch needs to be modified.
1. Install libinput
sudo apt-get install xserver-xorg-input-libinput
2. Create the xorg.conf. D directory in /etc/x11 / below (if the directory already exists, this will proceed directly to step 3)
sudo mkdir /etc/X11/xorg.conf.d
3. Copy the file “40-libinput.conf” to the directory you just created.
sudo cp /usr/share/X11/xorg.conf.d/40-libinput.conf /etc/X11/xorg.conf.d/
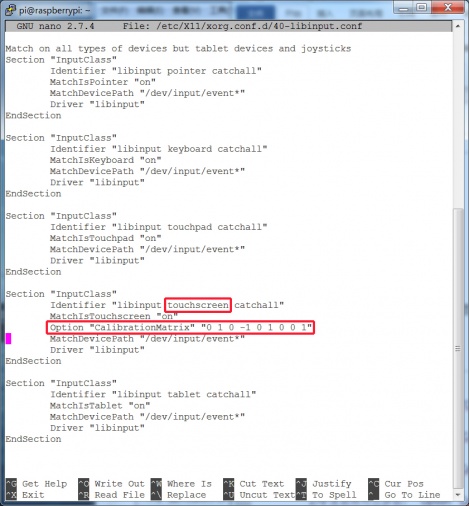
4. Edit “/etc/X11/xorg.conf.d/40-libinput.conf”
sudo nano /etc/X11/xorg.conf.d/40-libinput.conf
Find a part of the touchscreen , add the following statement inside, press Ctrl+X to exit, press Y to save.
Option "CalibrationMatrix" "0 1 0 -1 0 1 0 0 1"
5. Restar your Raspberry Pi
sudo reboot
Complete the above steps for a 90 degree rotation.
Note:
0 degrees of rotation parameters: Option "CalibrationMatrix" "1 0 0 0 1 0 0 0 1"
90 degrees of rotation parameters: Option "CalibrationMatrix" "0 1 0 0 -1 1 0 0 1"
180 degrees of rotation parameters: Option "CalibrationMatrix" "-1 0 1 0 -1 1 0 0 1"
270 degrees of rotation parameters: Option "CalibrationMatrix" "0-1 1 1 0 0 0 0 1"

