More actions
No edit summary |
No edit summary |
||
| Line 13: | Line 13: | ||
</pre> | </pre> | ||
2.Add the statement in the “'''config.txt'''” file | 2.Add the statement in the “'''config.txt'''” file, press '''Ctrl+X''' to exit, press '''Y''' to save. | ||
<pre style="border: 1px dashed red;color:red">display_rotate=1 #0: 0; 1: 90; 2: 180; 3: 270</pre> | <pre style="border: 1px dashed red;color:red">display_rotate=1 #0: 0; 1: 90; 2: 180; 3: 270</pre> | ||
3. | 3. Restart the '''Raspberry Pi''' after saving. | ||
<pre style="border: 1px dashed red;color:red">sudo reboot</pre> | <pre style="border: 1px dashed red;color:red">sudo reboot</pre> | ||
== | == How to rotate Touch direction: == | ||
在进行显示旋转后,需要对触摸做出修改,否则不能与显示对应。 | 在进行显示旋转后,需要对触摸做出修改,否则不能与显示对应。 | ||
Revision as of 13:57, 16 May 2018
| 语言选择(Language): | 中文 | EN |
This method is only suitable for HDMI capacitive screen, not suitable for GPIO resistive screen
How to rotate display direction:
1. Open the “config.txt” file (the “config.txt” file is located in /boot):
sudo nano /boot/config.txt
2.Add the statement in the “config.txt” file, press Ctrl+X to exit, press Y to save.
display_rotate=1 #0: 0; 1: 90; 2: 180; 3: 270
3. Restart the Raspberry Pi after saving.
sudo reboot
How to rotate Touch direction:
在进行显示旋转后,需要对触摸做出修改,否则不能与显示对应。
1. 安装libinput
sudo apt-get install xserver-xorg-input-libinput
2. 在/etc/X11/下创建xorg.conf.d目录 (如果该目录已存在,则直接进行第3步)
sudo mkdir /etc/X11/xorg.conf.d
3. 复制40-libinput-conf 文件到刚刚创建的目录下
sudo cp /usr/share/X11/xorg.conf.d/40-libinput.conf /etc/X11/xorg.conf.d/
4. 编辑/etc/X11/xorg.conf.d/40-libinput.conf
sudo nano /etc/X11/xorg.conf.d/40-libinput.conf
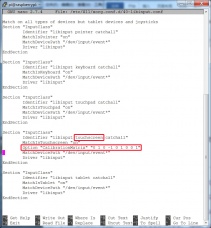
找到 touchscreen的部分,在里面添加以下语句,然后按Ctrl+X键退出, 按Y键确定保存即可
Option "CalibrationMatrix" "0 1 0 -1 0 1 0 0 1"
例如:
5. 重启树莓派
sudo reboot
完成以上步骤即可进行90度旋转。
注:
0 度旋转对应参数: Option "CalibrationMatrix" "1 0 0 0 1 0 0 0 1"
90 度旋转对应参数: Option "CalibrationMatrix" "0 1 0 -1 0 1 0 0 1"
180度旋转对应参数: Option "CalibrationMatrix" "-1 0 1 0 -1 1 0 0 1"
270度旋转对应参数: Option "CalibrationMatrix" "0 -1 1 1 0 0 0 0 1"

