Product video
Pictures


Description
- 3.5inch standard display, support HDMI input, refresh rate above 60FPS
- Physical resolution 480x320, configurable software resolution up to 1920x1080
- It is compatible with mainstream mini PC such as Raspberry Pi, BB Black, Banana Pi
- It can also be used as a general-purpose HDMI display, connecting computers, TV boxes, Microsoft Xbox360, SONY PS4, Nintendo Switch and so on
- Used as a Raspberry Pi display that supports Raspbian, Ubuntu, Kodi, Win10 IOT, single-touch, free drive
- Work as a PC monitor, support Win7, Win8, Win10 system (No touch Function)
- Support HDMI audio output,Backlight brightness can be adjusted
- CE, RoHS certification
Parameters
- Size:3.5(inch)
- SKU: MPI3508
- Physical resolution:480×320(dots)
- Software adjustable resolution:480×320~1920×1080(dots)
- Touch: resistance touch
- USB input power:DC5V 1A
- Power consumption:940mW (brightness @80%)
- 510mW (Backlight close)
- Dimensions:85.5*60.6(mm)
- Weight: 145(g)
Hardware Description
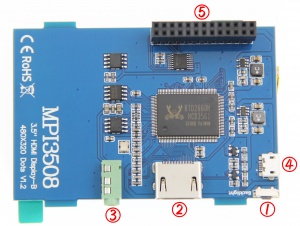
①Backlight button: backlight brightness adjustment button, short press backlight changes by 10%, long press 3 seconds to close backlight
②HDMI interface: HDMI signal input interface
③Amplifier interface: HDMI audio output interface
④USB power supply interface: provide power for ordinary display (5V 1A)
⑤Transaction raspberry pie 26PIN base: gets power and return touch from this area when used as a raspberry pie monitor
How to use with Raspbian/Ubuntu Mate System
Method 1: quick install (raspberry pi needs Internet connection)
- Step 1, Install Raspbian official image
- Download the latest image from the official download.
- Install the system according to the official tutorial steps.
1) log in the raspberry pie system with Putty connection to the user command line (initial username: PI password :raspberry)
2) execute the following command (Mouse Right-click can paste the code in Putty):
git clone https://github.com/goodtft/LCD-show.git
chmod -R 755 LCD-show
cd LCD-show/
sudo ./MPI3508-show
- After executing the above command, the system will restart automatically, and display and touch will be OK.
Method 2: offline installation
- Step 1: install the official image of Raspbian/Ubuntu
- 1)Download the latest Raspbian or Ubuntu image from the official website https://www.raspberrypi.org/downloads/
- 2)Format the TF card with SDFormatter,
- 3)Use Win32DiskImager to burn the official image to the TF card.
- Step 2, modify the "config.txt"
- After the step 1 completion of burning in the CD Driver in the folder "- show LCD. Tar. Gz" copy to TF-card root directory,
- Open the config.txt file in TF-card root directory and add the following code to the end of the file. Save and colse TF card:
hdmi_force_hotplug=1
config_hdmi_boost=7
hdmi_drive=2
hdmi_force_hotplug=1
hdmi_group=2
hdmi_mode=87
hdmi_cvt 480 320 60 6 0 0 0
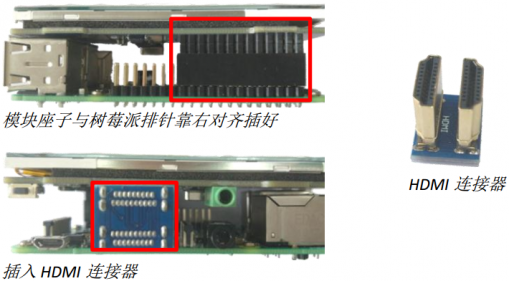
- Step 3: insert the SD card into the raspberry pie and connect the hardware as shown in the picture:
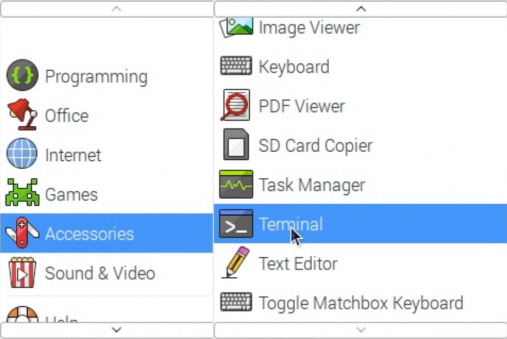
- Step 4: power the raspberry, connect the mouse keyboard, and open the terminal terminal terminal on the raspberry pie:
- Step 5. Enter the following instructions in the terminal terminal:
cd /boot
cp LCD-show.tar.gz ~
cd ~
sudo tar zxvf LCD-show.tar.gz
cd LCD-show/
sudo ./MPI3508-show
How to use as PC monitor
- Connect the computer HDMI output signal to the LCD HDMI interface by using the HDMI cable
- Connect the LCD's USB Power interface to the USB port of the device
- If there are several monitors, please unplug other monitor connectors first, and use LCD as the only monitor for testing.
- Note: touch function can only be used for raspberry pi.
Resource
- How_to_install_the_LCD_driver_V1.2
- How_to_install_matchbox-keyboard
- How to calibrate the resistance touch screen
- Product size:File:MPI3508-07.PNG
- download:LCD-show.tar.gz
- If you have difficulty installing the driver, or if you still can't use the display properly after installing the driver,
- Please Try our Configned images for tested.
- Just need download and write the image into the TF card. DO NOT need any driver installation steps.
- Panasonic SDFormatter
- Win32DiskImager
- PuTTY
BACK TO TOP
Contact us:
Tech Support:
Dear Customers:
There might be a delay of several hours in handling your question, depending on the time difference between your location and ours.
Sincerely hoping your understanding!
Our working time:
08:00-18:00 (Monday to Saturday)


