Difference between revisions of "4inch HDMI Display-C"
(→Download Resources) |
|||
| (98 intermediate revisions by 2 users not shown) | |||
| Line 37: | Line 37: | ||
|Resolution | |Resolution | ||
|800*480 (Pixel) | |800*480 (Pixel) | ||
| + | |- | ||
| + | |Active Area | ||
| + | |51.84x86.40(mm) | ||
|- | |- | ||
|Touch Screen Controller | |Touch Screen Controller | ||
| Line 51: | Line 54: | ||
|- | |- | ||
|Working temperature(℃) | |Working temperature(℃) | ||
| − | | -20~ | + | | -20~60 |
|- | |- | ||
|Module PCB Size | |Module PCB Size | ||
| Line 59: | Line 62: | ||
|143*134*51 (mm) | |143*134*51 (mm) | ||
|- | |- | ||
| − | | | + | |Rough Weight(Package containing) (g) |
| − | | | + | |126 (g) |
|} | |} | ||
| + | |||
== <font color="blue">Hardware Description</font> == | == <font color="blue">Hardware Description</font> == | ||
[[File:4.0-HDMI-0009-5.jpg|400px]] | [[File:4.0-HDMI-0009-5.jpg|400px]] | ||
| Line 120: | Line 124: | ||
[[File:4.0-HDMI-size.jpg|400px]] | [[File:4.0-HDMI-size.jpg|400px]] | ||
| − | ==<font color="blue"> | + | ==<font color="blue"> How to use Raspbian/Ubuntu Mate/Kali/Retropie system </font>== |
| − | ''' | + | |
| + | |||
| + | <font color="red"> '''Method 1'''</font> | ||
| + | |||
| + | *Use the image of the driver preinstalled | ||
| − | < | + | 1) Download the driver image file from the website: [http://www.lcdwiki.com/4inch_HDMI_Display-C#Download_Resources Image_Download] <br> |
| + | 2) Format Micro SD card by SDFormatter <br> | ||
| + | 3) Burn the official image into Micro SD card by using Win32DiskImager. <br> | ||
| + | 4) Insert Micro SD card, connect LCD, start Raspberry Pi, and it will work normally. <br> | ||
| − | |||
| − | |||
| − | <font color=" | + | <font color="red"> '''Method 2'''</font> |
| − | :''' | + | :'''Step 1, install the latest official images of various systems''' [http://www.lcdwiki.com/res/PublicFile/%E6%A0%91%E8%8E%93%E6%B4%BE%E5%85%A5%E9%97%A8%E6%95%99%E7%A8%8B(%E4%B8%8B%E8%BD%BD%EF%BC%8C%E6%A0%BC%E5%BC%8F%E5%8C%96%EF%BC%8C%E7%83%A7%E5%BD%95%EF%BC%8CSSH%EF%BC%8CPuTTy)-V1.0.pdf <font color="red"> '''(Q:Don‘t know how to install?)'''</font>] |
| − | ::(1) | + | ::(1)Download from the official website |
:::*[https://www.raspberrypi.org/downloads/ '''Raspbian'''] | :::*[https://www.raspberrypi.org/downloads/ '''Raspbian'''] | ||
:::*[https://ubuntu-mate.org/download/ '''Ubuntu'''] | :::*[https://ubuntu-mate.org/download/ '''Ubuntu'''] | ||
:::*[https://www.offensive-security.com/kali-linux-arm-images/ '''Kali'''] | :::*[https://www.offensive-security.com/kali-linux-arm-images/ '''Kali'''] | ||
:::*[https://retropie.org.uk/download/ '''RetroPie'''] | :::*[https://retropie.org.uk/download/ '''RetroPie'''] | ||
| − | ::(2) | + | ::(2)Format Micro SD card by SDFormatter |
| − | ::(3) | + | ::(3)Burn the official image into Micro SD card by using Win32DiskImager |
| − | :''' | + | :''' Step 2,Connect to Raspberry Pi''' |
| − | ::[[ | + | ::[[File:4.0-HDMI-005.jpg|300px]] [[File:4.0-HDMI-0013.jpg|400px]] <br> |
| − | ::: | + | :::As shown in the figure, connect the LCD module to the Raspberry Pi |
| + | :'''Step 3, Install the LCD driver''' | ||
| + | ::'''A. Install drivers in the <font color="blue"> Raspbian </font>system'''(Raspberry Pi requires Internet connection) | ||
| − | : | + | :::(1)Log on to the Raspberry Pi terminal(User: pi; Password: raspberry) [http://www.lcdwiki.com/res/PublicFile/How_to_use_Raspberry_Pi(Download,Format,Burn,SSH,PuTTy)-V1.0.pdf <font color="red">(Q:SSH cannot connect?)</font>] |
| − | :: | + | :::(2)Execute the following command (copy and paste it by right-clicking on the Putty window): |
| − | |||
| − | |||
{| style="width: 100%; margin-left:3.2%;background-color: white;" " | {| style="width: 100%; margin-left:3.2%;background-color: white;" " | ||
|{{code|1= | |{{code|1= | ||
| Line 162: | Line 171: | ||
|} | |} | ||
| − | ::''' | + | ::'''B. Install drivers in the <font color="blue"> Ubuntu / Kali / RetroPie </font>system''' |
| − | :::(1) | + | :::(1)Download local drivers '''"LCD-show.tar.gz"''' |
| − | :::: | + | :::: [http://www.lcdwiki.com/res/RaspDriver/LCD-show.tar.gz Raspberry Pi OS-Driver] |
| − | :::: | + | :::: [http://www.lcdwiki.com/res/MPI4008/Local-driver/Ubuntu/LCD-show.tar.gz Ubuntu-18.04-Drivers] |
| − | :::: | + | ::::[http://www.lcdwiki.com/res/MPI4008/Local-driver/Kali/LCD-show.tar.gz Kali-2019.1-Drivers] |
| − | :::: | + | ::::[http://www.lcdwiki.com/res/MPI4008/Local-driver/RetroPie_2_3/LCD-show.tar.gz RetroPie-Pi2-Pi3-Drivers] |
| − | :::(2) | + | ::::[http://www.lcdwiki.com/res/MPI4008/Local-driver/RetroPie_0_1/LCD-show.tar.gz RetroPie-Pi1-ZERO-Drivers] |
| − | :::(3) | + | :::(2)Copy '''"LCD-show.tar.gz" '''to the Raspberry Pi system |
| + | :::(3)Log on to the Raspberry Pi terminal, Execute the following command ( [http://www.lcdwiki.com/4inch_HDMI_Display-C#Download_Resources Username Password]) | ||
| + | |||
{| style="width: 100%; margin-left:3.2%;background-color: white;" " | {| style="width: 100%; margin-left:3.2%;background-color: white;" " | ||
|{{code|1= | |{{code|1= | ||
| − | |||
tar -xvzf LCD-show.tar.gz | tar -xvzf LCD-show.tar.gz | ||
chmod -R 755 LCD-show | chmod -R 755 LCD-show | ||
| Line 179: | Line 189: | ||
|} | |} | ||
| − | :''' | + | :'''Step 4, Check whether the driver is installed successfully''' |
| − | ::: | + | :::After the installation of the LCD driver is completed, the system will restart automatically. If the LCD can be normally displayed and touched, the installation of the driver is successful |
| − | |||
| − | |||
| − | + | '''Note:''' | |
| − | : | ||
| − | |||
| − | |||
| − | + | :A. Ubuntu system default SSH is not enabled, the specific method of opening see[http://www.lcdwiki.com/res/PublicFile/RaspberryPi_Ubuntu-mate_Open_SSH_Instructions_EN.pdf '''RaspberryPi Ubuntu-mate open ssh instructions'''] | |
| + | :B. Ubuntu-18.04 system ssh connection may fail, the specific solution is shown in [http://www.lcdwiki.com/res/PublicFile/RaspberryPi_Ubuntu-mate-18.04_SSH_Connect_EN.pdf '''RaspberryPi Ubuntu-mate-18.04 ssh connection failure solution description'''] | ||
| + | :C. The retropie-rpi1_zero system cannot log in via SSH (no network port and wifi module). You need to copy the driver through the serial port. For details, see [http://www.lcdwiki.com/res/PublicFile/RaspberryPi_Zero_Open_Serial_Instructions_EN.pdf '''RaspberryPi Zero open serial instructions'''] | ||
| + | :D. Retropie system game installation and setup instructions see [http://www.lcdwiki.com/res/PublicFile/RaspberryPi_Retropie_Using_Instructions_EN.pdf '''RaspberryPi Retropie using instructions'''] | ||
| − | + | == <font color="blue">How to use as PC Monitor</font> == | |
| − | |||
| − | |||
| − | |||
| − | + | *Connected the computer HDMI output to the LCD HDMI interface by HDMI cable. | |
| + | *Power to Micro USB interface | ||
| + | *If you have multiple monitors, please pull the other displayer, and make this LCD as the only displayer for testing. | ||
| + | *As computer monitors, the touch function will not be available. | ||
| + | {{rotate}} | ||
| − | + | ==<font color="blue"> Download Resources</font>== | |
| − | + | *''' Documents''' | |
| − | + | # [http://www.lcdwiki.com/res/MPI4008/MPI4008-4inch-HDMI-Display-C-User-Manual-V1.0.pdf MPI4008-4inch-HDMI-Display-C-User-Manual-V1.0.pdf] | |
| + | # [http://www.lcdwiki.com/res/PublicFile/How_to_install_the_LCD_driver_V1.2.pdf How_to_install_the_LCD_driver_V1.2] | ||
| + | # [http://www.lcdwiki.com/res/PublicFile/How_to_install_matchbox-keyboard(En).pdf How_to_install_matchbox-keyboard] | ||
| + | # [http://www.lcdwiki.com/res/Show_Direction_and_Touch/How_to_calibrate_the_resistance_touch_screen-V1.2.pdf How_to_calibrate_the_resistance_touch_screen-V1.2] | ||
| + | # [http://www.lcdwiki.com/res/PublicFile/How_to_use_Raspberry_Pi(Download,Format,Burn,SSH,PuTTy)-V1.0.pdf How_to_use_Raspberry_Pi(Download,Format,Burn,SSH,PuTTy)-V1.0.pdf] | ||
| + | # [http://www.lcdwiki.com/res/Show_Direction_and_Touch/How_to_change_display_direction-GPIO-Resistive_Touch-V1.2.pdf How_to_change_display_direction-GPIO-Resistive_Touch-V1.2] | ||
| + | # [http://www.lcdwiki.com/res/PublicFile/RaspberryPi_Ubuntu-mate_Open_SSH_Instructions_EN.pdf '''RaspberryPi Ubuntu-mate open ssh instructions'''] | ||
| + | # [http://www.lcdwiki.com/res/PublicFile/RaspberryPi_Ubuntu-mate-18.04_SSH_Connect_EN.pdf '''RaspberryPi Ubuntu-mate-18.04 ssh connection failure solution description'''] | ||
| + | # [http://www.lcdwiki.com/res/PublicFile/RaspberryPi_Zero_Open_Serial_Instructions_EN.pdf '''RaspberryPi Zero open serial instructions'''] | ||
| + | # [http://www.lcdwiki.com/res/PublicFile/RaspberryPi_Retropie_Using_Instructions_EN.pdf '''RaspberryPi Retropie using instructions'''] | ||
| − | # [http://www.lcdwiki.com/res/ | + | *'''Driver Download''' |
| − | # [http://www.lcdwiki.com/res/ | + | # [http://www.lcdwiki.com/res/RaspDriver/LCD-show.tar.gz Raspberry Pi OS-Driver] |
| − | + | # [http://www.lcdwiki.com/res/MPI4008/Local-driver/Ubuntu/LCD-show.tar.gz Ubuntu-Driver] | |
| − | + | # [http://www.lcdwiki.com/res/MPI4008/Local-driver/Kali/LCD-show.tar.gz Kali-2019.1-Driver] | |
| − | # [http://www.lcdwiki.com/res/ | + | # [http://www.lcdwiki.com/res/MPI4008/Local-driver/RetroPie_0_1/LCD-show.tar.gz RetroPie-Pi1-ZERO-Driver] |
| − | + | # [http://www.lcdwiki.com/res/MPI4008/Local-driver/RetroPie_2_3/LCD-show.tar.gz RetroPie-Pi2-Pi3-Driver] | |
| − | # [http://www.lcdwiki.com/res/ | ||
| − | |||
| − | # [http://www.lcdwiki.com/res/ | ||
| − | |||
| + | *'''Image Download''' | ||
| − | + | :If you have difficulty installing the driver, or if you still can't use the display properly after installing the driver, | |
| + | :Please Try our Configned images for tested. | ||
| + | :Just need download and write the image into the Micro SD card. DO NOT need any driver installation steps. | ||
| − | + | {| class="wikitable" border="1" style="width: 98%; margin-left:1.5%;background-color: white;" | |
| − | |||
| − | |||
| − | |||
| − | |||
| − | |||
| − | |||
| − | |||
| − | |||
| − | |||
| − | {| class="wikitable" border="1" style="width: | ||
!Image Name | !Image Name | ||
!Version | !Version | ||
| Line 236: | Line 243: | ||
|- | |- | ||
| rowspan="2" |Raspbian | | rowspan="2" |Raspbian | ||
| − | | rowspan="2" | | + | | rowspan="2" |2023-02-21 |
| − | | rowspan="2" |PI3B+/ | + | | rowspan="2" |PI4/PI3B+/PI3/PI2/ |
| − | + | PI1/ZERO/ZERO W | |
| rowspan="2" |user:pi | | rowspan="2" |user:pi | ||
password:raspberry | password:raspberry | ||
| − | |[[File: | + | |[[File:Baiduyun.jpg|24px]]BaiduYun: |
| − | |[https:// | + | |[https://pan.baidu.com/s/1Tl7q10kLuLBnzOJF_Ulyug MPI4008-4inch-2023-02-21-raspios-buster-armhf.7z] Fetch Code:8elb |
|- | |- | ||
|[[File:Mega-1.jpg|24px]]Mega: | |[[File:Mega-1.jpg|24px]]Mega: | ||
| − | |[https://mega.nz/# | + | |[https://mega.nz/folder/xqAgCBSS#P_s5Ej0_OIXBcysLrwLjNA MPI4008-4inch-2022-04-04-raspios-buster-armhf.7z] |
|- | |- | ||
| − | | rowspan="2" |Ubuntu | + | | rowspan="2" |Ubuntu MATE |
| − | | rowspan="2" | | + | | rowspan="2" |22.04 |
| − | | rowspan="2" | | + | | rowspan="2" |PI4,PI3B+,PI3B |
| rowspan="2" |user:pi | | rowspan="2" |user:pi | ||
password:raspberry | password:raspberry | ||
| − | |[[File: | + | |[[File:Baiduyun.jpg|24px]]BaiduYun: |
| − | |[https:// | + | |[https://pan.baidu.com/s/1LVWw4aV4cCijfJtI43jQWQ MPI4008-4inch-ubuntu-mate-22.04-desktop-armhf+raspi.7z] Fetch Code:f7pm |
|- | |- | ||
|[[File:Mega-1.jpg|24px]]Mega: | |[[File:Mega-1.jpg|24px]]Mega: | ||
| − | |[https://mega.nz/# | + | |[https://mega.nz/folder/9igHySwK#bG-yTBv1C-7Fq-yl7-wq5g MPI4008-4inch-ubuntu-mate-22.04-desktop-armhf+raspi.7z] |
|- | |- | ||
| − | | rowspan="2" |Kali | + | | rowspan="2" |Kali Linux RaspberryPi 2, 3 and 4 |
| − | | rowspan="2" | | + | | rowspan="2" |2023.1 |
| − | | rowspan="2" |PI3B+,PI3,PI2 | + | | rowspan="2" |PI4B,PI3B+,PI3,PI2 |
| − | | rowspan="2" |user: | + | | rowspan="2" |user:kali |
| − | password: | + | password:kali |
| − | |[[File: | + | |[[File:Baiduyun.jpg|24px]]BaiduYun: |
| − | |[https:// | + | | |
| + | [https://pan.baidu.com/s/1yk7VahBFqkzNTydVEWkqXw MPI4008-4inch-kali-linux-2023.1] Fetch Code:3ril | ||
|- | |- | ||
|[[File:Mega-1.jpg|24px]]Mega: | |[[File:Mega-1.jpg|24px]]Mega: | ||
| − | |[https://mega.nz/# | + | |[https://mega.nz/folder/EywAQRCZ#ZDCDHu-xfW_A6JRguo9_bg MPI4008-4inch-kali-linux-2021.3] |
|- | |- | ||
| rowspan="2" |RetroPie | | rowspan="2" |RetroPie | ||
| Line 274: | Line 282: | ||
| rowspan="2" |user:pi | | rowspan="2" |user:pi | ||
password:raspberry | password:raspberry | ||
| − | |[[File: | + | |[[File:Baiduyun.jpg|24px]]BaiduYun: |
| − | |[https:// | + | |[https://pan.baidu.com/s/1cHcM-TR8bK_B3tIq2L-jJw MPI4008-4inch-HDMI-C-retropie-4.4-rpi1-zero.7z] Fetch Code:fgfw |
|- | |- | ||
|[[File:Mega-1.jpg|24px]]Mega: | |[[File:Mega-1.jpg|24px]]Mega: | ||
| − | |[https://mega.nz/# | + | |[https://mega.nz/folder/DbJGiQBA#6rnkKpIEzqdJ45RC2sO1Vw MPI4008-4inch-HDMI-C-retropie-4.4-rpi1-zero.7z] |
|- | |- | ||
| rowspan="2" |RetroPie | | rowspan="2" |RetroPie | ||
| Line 285: | Line 293: | ||
| rowspan="2" |user:pi | | rowspan="2" |user:pi | ||
password:raspberry | password:raspberry | ||
| − | |[[File: | + | |[[File:Baiduyun.jpg|24px]]BaiduYun: |
| − | |[https:// | + | |[https://pan.baidu.com/s/1qOQ8iote9ViaknSJss2hkg MPI4008-4inch-HDMI-C-retropie-4.4-rpi2-rpi3.7z] Fetch Code:jrkv |
| + | |- | ||
| + | |[[File:Mega-1.jpg|24px]]Mega: | ||
| + | |[https://mega.nz/folder/HXYiSKQR#yLw44LZTCjz23cos-4Ubqw MPI4008-4inch-HDMI-C-retropie-4.4-rpi2-rpi3.7z] | ||
| + | |- | ||
| + | | rowspan="2" |OctoPi | ||
| + | | rowspan="2" |1.0.0 | ||
| + | | rowspan="2" |Pi4,Pi3B+,Pi3,Pi2 | ||
| + | | rowspan="2" |user:pi | ||
| + | password:raspberry | ||
| + | |[[File:Baiduyun.jpg|24px]]BaiduYun: | ||
| + | |[https://pan.baidu.com/s/1NPAZfQwtCqLXgYLZ9NIK0g 4inch-MPI4008-2022-08-03_2022-04-04-octopi-bullseye-armhf-lite-1.0.0] Fetch Code:me3s | ||
|- | |- | ||
|[[File:Mega-1.jpg|24px]]Mega: | |[[File:Mega-1.jpg|24px]]Mega: | ||
| − | |[https://mega.nz/# | + | |[https://mega.nz/folder/SWYRDKTK#OVyI1h0F59a4B2o4EcSfWg 4inch-MPI4008-octopi-buster-armhf-lite-0.18.0] |
|} | |} | ||
| − | + | * '''Common Software ''' | |
| − | * ''' | ||
# [http://www.lcdwiki.com/res/software/Panasonic_SDFormatter.zip Panasonic SDFormatter] | # [http://www.lcdwiki.com/res/software/Panasonic_SDFormatter.zip Panasonic SDFormatter] | ||
Revision as of 16:24, 2 March 2024
Contents
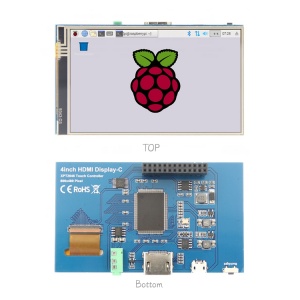
Product Pictures
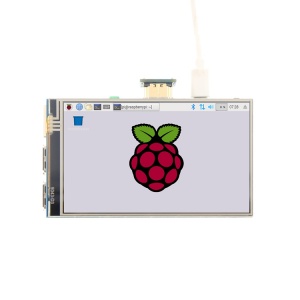
Product Description
- 4.0-inch IPS full-angle display, support HDMI input, refresh rate up to 60FPS
- The physical resolution is 800x480
- Raspberry Pi monitor with touch control (need to install touch driver)
- It can be used as standard HDMI output device for computer display(no touch function)
- Compatible with and can be directly inserted into all versions of raspberry PI motherboards (raspberry PI 1 generation B and Zero need additional HDMI cable)
- Support HDMI audio output, backlight brightness adjustable
Product Parameters
| SKU | MPI4008 |
| Screen Size | 4.0inch |
| LCD Type | TFT |
| Module Interface | HDMI |
| Resolution | 800*480 (Pixel) |
| Active Area | 51.84x86.40(mm) |
| Touch Screen Controller | XPT2046 |
| LCD Driver IC | NT35510 |
| Backlight | LED |
| power consumption | 0.16A*5V |
| Working temperature(℃) | -20~60 |
| Module PCB Size | 98.60*58.05 (mm) |
| Package Size | 143*134*51 (mm) |
| Rough Weight(Package containing) (g) | 126 (g) |
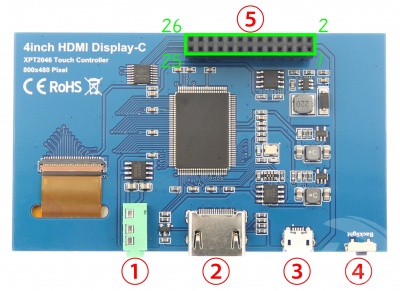
Hardware Description
- ① 3.5mm Headphone Jack: Output audio signal
- ② HDMI:Used to connect the main board and LCD display for HDMI transmission
- ③ Micro USB:Get 5V Power from USB, If ⑤-13*2 Pin Socket has been connected, that this USB interface can be No Connect.
- ④ Backlight adjustment button: Short press backlight change 10%, long press a few seconds to close backlight; short press to open backlight
- ⑤ 13*2 Pin Socket:Get +5V Power from raspberry Pi to LCD, at the same time transfer touch signal back to Raspberry Pi.
- 13*2 Pin Socket interface definition:
| Pin | Name | Description |
| 1、17 | 3.3V | Power supply +3.3V |
| 2、4 | 5V | Power supply +5V |
| 3、5、7、8、10、11、12、13、15、16、18、24 | NC | NC |
| 6、9、14、20、25 | GND | GND |
| 19 | TP_SI | SPI data input of touch panel |
| 21 | TP_SO | SPI data output of touch panel |
| 22 | TP_IRQ | The touch panel is interrupted and the low level is detected when the touch panel is pressed down |
| 23 | TP_SCK | Touch the SPI clock signal of the panel |
| 26 | TP_CS | Touch panel select signal, low level select touch panel |
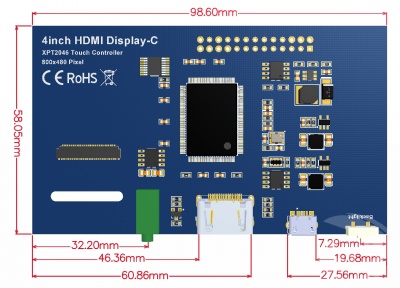
- Dimension drawing
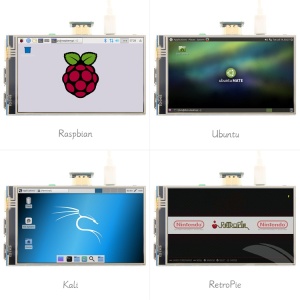
How to use Raspbian/Ubuntu Mate/Kali/Retropie system
Method 1
- Use the image of the driver preinstalled
1) Download the driver image file from the website: Image_Download
2) Format Micro SD card by SDFormatter
3) Burn the official image into Micro SD card by using Win32DiskImager.
4) Insert Micro SD card, connect LCD, start Raspberry Pi, and it will work normally.
Method 2
- Step 1, install the latest official images of various systems (Q:Don‘t know how to install?)
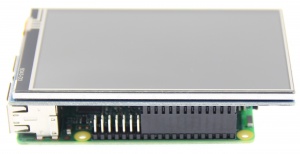
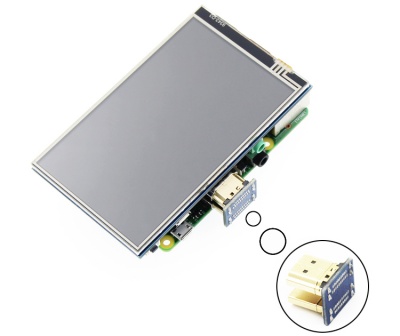
- Step 2,Connect to Raspberry Pi
- As shown in the figure, connect the LCD module to the Raspberry Pi
- Step 3, Install the LCD driver
- A. Install drivers in the Raspbian system(Raspberry Pi requires Internet connection)
- (1)Log on to the Raspberry Pi terminal(User: pi; Password: raspberry) (Q:SSH cannot connect?)
- (2)Execute the following command (copy and paste it by right-clicking on the Putty window):
sudo rm -rf LCD-show git clone https://github.com/goodtft/LCD-show.git chmod -R 755 LCD-show cd LCD-show/ sudo ./MPI4008-show |
- B. Install drivers in the Ubuntu / Kali / RetroPie system
- (1)Download local drivers "LCD-show.tar.gz"
- (2)Copy "LCD-show.tar.gz" to the Raspberry Pi system
- (3)Log on to the Raspberry Pi terminal, Execute the following command ( Username Password)
- B. Install drivers in the Ubuntu / Kali / RetroPie system
tar -xvzf LCD-show.tar.gz chmod -R 755 LCD-show cd LCD-show/ sudo ./MPI4008-show |
- Step 4, Check whether the driver is installed successfully
- After the installation of the LCD driver is completed, the system will restart automatically. If the LCD can be normally displayed and touched, the installation of the driver is successful
Note:
- A. Ubuntu system default SSH is not enabled, the specific method of opening seeRaspberryPi Ubuntu-mate open ssh instructions
- B. Ubuntu-18.04 system ssh connection may fail, the specific solution is shown in RaspberryPi Ubuntu-mate-18.04 ssh connection failure solution description
- C. The retropie-rpi1_zero system cannot log in via SSH (no network port and wifi module). You need to copy the driver through the serial port. For details, see RaspberryPi Zero open serial instructions
- D. Retropie system game installation and setup instructions see RaspberryPi Retropie using instructions
How to use as PC Monitor
- Connected the computer HDMI output to the LCD HDMI interface by HDMI cable.
- Power to Micro USB interface
- If you have multiple monitors, please pull the other displayer, and make this LCD as the only displayer for testing.
- As computer monitors, the touch function will not be available.
How to rotate the display direction
This method only applies to the Raspberry Pi series of display screens, other display screens do not apply.
- Method 1,If the driver is not installed, execute the following command (Raspberry Pi needs to connected to the Internet):
sudo rm -rf LCD-show
git clone https://github.com/goodtft/LCD-show.git
chmod -R 755 LCD-show
cd LCD-show/
sudo ./XXX-show 90
After execution, the driver will be installed. The system will automatically restart, and the display screen will rotate 90 degrees to display and touch normally.
( ' XXX-show ' can be changed to the corresponding driver, and ' 90 ' can be changed to 0, 90, 180 and 270, respectively representing rotation angles of 0 degrees, 90 degrees, 180 degrees, 270 degrees)
- Method 2,If the driver is already installed, execute the following command:
cd LCD-show/
sudo ./rotate.sh 90
After execution, the system will automatically restart, and the display screen will rotate 90 degrees to display and touch normally.
( ' 90 ' can be changed to 0, 90, 180 and 270, respectively representing rotation angles of 0 degrees, 90 degrees, 180 degrees, 270 degrees)
If the rotate.sh prompt cannot be found, use Method 1 to install the latest drivers
Download Resources
- Documents
- MPI4008-4inch-HDMI-Display-C-User-Manual-V1.0.pdf
- How_to_install_the_LCD_driver_V1.2
- How_to_install_matchbox-keyboard
- How_to_calibrate_the_resistance_touch_screen-V1.2
- How_to_use_Raspberry_Pi(Download,Format,Burn,SSH,PuTTy)-V1.0.pdf
- How_to_change_display_direction-GPIO-Resistive_Touch-V1.2
- RaspberryPi Ubuntu-mate open ssh instructions
- RaspberryPi Ubuntu-mate-18.04 ssh connection failure solution description
- RaspberryPi Zero open serial instructions
- RaspberryPi Retropie using instructions
- Driver Download
- Raspberry Pi OS-Driver
- Ubuntu-Driver
- Kali-2019.1-Driver
- RetroPie-Pi1-ZERO-Driver
- RetroPie-Pi2-Pi3-Driver
- Image Download
- If you have difficulty installing the driver, or if you still can't use the display properly after installing the driver,
- Please Try our Configned images for tested.
- Just need download and write the image into the Micro SD card. DO NOT need any driver installation steps.
| Image Name | Version | Support | Password | Download | |
|---|---|---|---|---|---|
| Raspbian | 2023-02-21 | PI4/PI3B+/PI3/PI2/
PI1/ZERO/ZERO W |
user:pi
password:raspberry |
MPI4008-4inch-2023-02-21-raspios-buster-armhf.7z Fetch Code:8elb | |
| MPI4008-4inch-2022-04-04-raspios-buster-armhf.7z | |||||
| Ubuntu MATE | 22.04 | PI4,PI3B+,PI3B | user:pi
password:raspberry |
MPI4008-4inch-ubuntu-mate-22.04-desktop-armhf+raspi.7z Fetch Code:f7pm | |
| MPI4008-4inch-ubuntu-mate-22.04-desktop-armhf+raspi.7z | |||||
| Kali Linux RaspberryPi 2, 3 and 4 | 2023.1 | PI4B,PI3B+,PI3,PI2 | user:kali
password:kali |
MPI4008-4inch-kali-linux-2023.1 Fetch Code:3ril | |
| MPI4008-4inch-kali-linux-2021.3 | |||||
| RetroPie | 4.4 | Pi1,Pi-ZERO | user:pi
password:raspberry |
MPI4008-4inch-HDMI-C-retropie-4.4-rpi1-zero.7z Fetch Code:fgfw | |
| MPI4008-4inch-HDMI-C-retropie-4.4-rpi1-zero.7z | |||||
| RetroPie | 4.4 | Pi3B+,Pi3,Pi2 | user:pi
password:raspberry |
MPI4008-4inch-HDMI-C-retropie-4.4-rpi2-rpi3.7z Fetch Code:jrkv | |
| MPI4008-4inch-HDMI-C-retropie-4.4-rpi2-rpi3.7z | |||||
| OctoPi | 1.0.0 | Pi4,Pi3B+,Pi3,Pi2 | user:pi
password:raspberry |
4inch-MPI4008-2022-08-03_2022-04-04-octopi-bullseye-armhf-lite-1.0.0 Fetch Code:me3s | |
| 4inch-MPI4008-octopi-buster-armhf-lite-0.18.0 | |||||
- Common Software
