更多操作
无编辑摘要 |
|||
| (未显示2个用户的70个中间版本) | |||
| 第1行: | 第1行: | ||
<div class="panel panel-default"> | |||
<div style="border: #737373 1px ;background:white; padding: 10px 2em 2em 1em;"> | |||
{{lan | {{lan | ||
| | | | ||
| 第6行: | 第8行: | ||
}} | }} | ||
== <font color="blue">产品视频</font> == | == <font color="blue">产品视频</font> == | ||
{{#ev:youku|XMzc0OTA5NjAyNA}} | {{#ev:youku|XMzc0OTA5NjAyNA}} | ||
*[http://www.lcdwiki.com/zh/演示视频 相关视频] | |||
== <font color="blue">产品图片</font>== | == <font color="blue">产品图片</font>== | ||
[[File:MPI7001-001.jpg| | [[File:MPI7001-001.jpg|500px]][[File:7-B-2pin.jpg|500px]]<br /> | ||
== <font color="blue">产品介绍</font>== | == <font color="blue">产品介绍</font>== | ||
| 第28行: | 第30行: | ||
== <font color="blue">产品参数</font> == | == <font color="blue">产品参数</font> == | ||
* 尺寸:7.0(inch) | * 尺寸: 7.0(inch) | ||
* SKU:MPI7001 | * SKU: MPI7001 | ||
* 分辨率:800×480(dots) | * 分辨率: 800×480(dots) | ||
* 触摸:5点电容触摸 | * 触摸: 5点电容触摸 | ||
* 外形尺寸:164.9*124.27(mm) | * 显示区域: 153.84*85.63(mm) | ||
* | * 外形尺寸: 164.9*124.27(mm) | ||
* 包装尺寸: 211*150*53 (mm) | |||
* 重量(含包装): 405(g) | |||
* 功耗: 0.74A*5V | |||
== <font color="blue">硬件说明</font> == | == <font color="blue">硬件说明</font> == | ||
[[file: MPI7002-Hardware.jpg| | [[file: MPI7002-Hardware.jpg|px25]] <br> | ||
* <font color="blue"> '''①'''</font> Backlight: 背光电源开关, 控制背光打开和关闭,可节省功耗。 <br /> | * <font color="blue"> '''①'''</font> Backlight: 背光电源开关, 控制背光打开和关闭,可节省功耗。 <br /> | ||
| 第51行: | 第56行: | ||
* '''步骤2,修改config.txt配置文件''' | * '''步骤2,修改config.txt配置文件''' | ||
:步骤'''1'''烧写完成后,打开Micro SD卡根目录的config.txt文件并在文件末端加入以下代码,保存并安全弹出Micro SD卡: | |||
{{code|1= | |||
max_usb_current=1 | max_usb_current=1 | ||
hdmi_force_hotplug=1 | hdmi_force_hotplug=1 | ||
config_hdmi_boost=7 | config_hdmi_boost=7 | ||
hdmi_group=2 | hdmi_group=2 | ||
hdmi_mode=87 | hdmi_mode=87 | ||
hdmi_drive=1 | hdmi_drive=1 | ||
hdmi_cvt 800 480 60 6 0 0 0 | hdmi_cvt 800 480 60 6 0 0 0 | ||
}} | }} | ||
:注意:树莓派官方2021-10-30系统,还要注释掉 dtoverlay=vc4-kms-v3d (修改为 #dtoverlay=vc4-kms-v3d) | |||
* '''步骤3,''' | * '''步骤3,''' | ||
将Micro SD卡插入树莓派,将HDMI线连接树莓派和LCD,将USB线连接树莓派的4个USB口任意一个,USB线另一端连接到LCD的USB口,然后给树莓派上电,如显示和触摸均正常则驱动成功(请使用足2A电源供电)。 | 将Micro SD卡插入树莓派,将HDMI线连接树莓派和LCD,将USB线连接树莓派的4个USB口任意一个,USB线另一端连接到LCD的USB口,然后给树莓派上电,如显示和触摸均正常则驱动成功(请使用足2A电源供电)。 | ||
== <font color="blue">如何作为电脑显示器使用</font> == | == <font color="blue">如何作为电脑显示器使用</font> == | ||
| 第71行: | 第79行: | ||
* 如有多个显示器,请先拔掉其他显示器接口,将本LCD作为唯一显示器进行测试。 | * 如有多个显示器,请先拔掉其他显示器接口,将本LCD作为唯一显示器进行测试。 | ||
==<font color="blue">如何旋转显示和触摸 </font>== | == <font color="blue">如何旋转显示方向</font> == | ||
<div class="caution">注:此方法只针对树莓派系列的显示屏,其它显示屏并不适用</div> | |||
*'''第一步''',如果还没有安装驱动,请执行下面的命令(树莓派需要联网): | |||
{{code| | |||
sudo rm -rf LCD-show | |||
git clone https://github.com/goodtft/LCD-show.git | |||
chmod -R 755 LCD-show | |||
cd LCD-show/ | |||
sudo ./LCD7B-show }} | |||
执行完毕之后,驱动会安装好,系统会自动重启,然后显示屏就正常显示和触摸 <br/> | |||
*'''第二步''',如果已经安装好驱动,请执行下面的命令: | |||
{{code| | |||
cd LCD-show/ | |||
sudo ./rotate.sh 90 }} | |||
执行完毕之后,系统会自动重启,然后显示屏就可以旋转90度正常显示和触摸 <br/> | |||
('<font color="blue"> 90 </font>'也可以改为0,90,180,270等数值,分别代表旋转角度0度,90度,180度,270度) <br/> | |||
<div class="caution">如果提示 rotate.sh 找不到,请回到 '''第一步''',安装最新的驱动<br/> | |||
如果是HDMI接口显示屏使用Raspberry Pi 4,需要先把config.txt文件中的 dtoverlay=vc4-fkms-V3D 注释掉<br/> | |||
(config.txt文件位于Micro SD卡根目录,即/boot中)</div> | |||
== <font color="blue">常见问题 </font>== | |||
* [http://www.lcdwiki.com/zh/常见问题 '''树莓派常见问题'''] | |||
* [http://www.lcdwiki.com/zh/RaspberryPi_Ubuntu-mate-18.04系统中,使用电容触摸局部菜单无法使用 Ubuntu-mate-18.04系统中,使用电容触摸局部菜单无法使用] | |||
* [http://www.lcdwiki.com/zh/如何在树莓派4中使用双屏显示 如何在树莓派4中使用双屏显示] | |||
* [http://www.lcdwiki.com/zh/7寸B和7寸C如何PWM控制背光亮度 7寸B和7寸C如何PWM控制背光亮度] | |||
* [http://www.lcdwiki.com/zh/Ubuntu_20.04_LTS_安装桌面之后,系统卡死 Ubuntu 20.04 LTS 安装桌面之后,系统卡死] | |||
* [http://www.lcdwiki.com/zh/树莓派官方64位系统2021-05-07-raspios-buster-arm64.img无法设置分辨率 树莓派官方64位系统2021-05-07-raspios-buster-arm64.img无法设置分辨率] | |||
== <font color="blue">资源下载</font> == | == <font color="blue">资源下载</font> == | ||
| 第86行: | 第122行: | ||
# [http://www.lcdwiki.com/res/PublicFile/树莓派入门教程(下载,格式化,烧录,SSH,PuTTy)-V1.0.pdf 树莓派入门教程(下载,格式化,烧录,SSH,PuTTy)-V1.0] | # [http://www.lcdwiki.com/res/PublicFile/树莓派入门教程(下载,格式化,烧录,SSH,PuTTy)-V1.0.pdf 树莓派入门教程(下载,格式化,烧录,SSH,PuTTy)-V1.0] | ||
#[http://www.lcdwiki.com/res/MPI7001/MPI7001_Product_Dimensions.png 产品尺寸图] | #[http://www.lcdwiki.com/res/MPI7001/MPI7001_Product_Dimensions.png 产品尺寸图] | ||
# [http://www.lcdwiki.com/res/PublicFile/HDMI模块如何设置双屏显示-V1.0.pdf HDMI模块如何设置双屏显示-V1.0] | |||
*'''驱动下载''' | *'''驱动下载''' | ||
| 第95行: | 第132行: | ||
:如果你觉得前面步骤的修改配置、安装驱动都比较困难或者仍然显示异常, | :如果你觉得前面步骤的修改配置、安装驱动都比较困难或者仍然显示异常, | ||
:请先使用我们预装好驱动的镜像,下载后解压并把镜像写入到TF卡中。然后把卡插入树莓派就可以使用了。 | :请先使用我们预装好驱动的镜像,下载后解压并把镜像写入到TF卡中。然后把卡插入树莓派就可以使用了。 | ||
{{Note image}} | |||
{| class="wikitable" border="1" style="width: | {| class="wikitable" border="1" style="width: 99%; margin-left:1.5%;background-color: white;" | ||
! | !Image Name | ||
! | !Version | ||
! colspan="2" | | ! colspan="2" |Download | ||
|- | |- | ||
| rowspan="2" |Raspbian | | rowspan="2" |Raspbian | ||
| rowspan="2"| | | rowspan="2" |2024-03-15 | ||
|[[File: | |[[File:Baiduyun.jpg|24px]]BaiduYun: | ||
|[https:// | |[https://pan.baidu.com/s/1XP6dr0DuAz_dqSVVg5NFOg MPI7001-7inch-B-2024-03-15-raspios-bookworm-armhf(Pi4-Pi5)] 提取码:zgts | ||
|- | |- | ||
|[[File:Mega-1.jpg|24px]]Mega: | |[[File:Mega-1.jpg|24px]]Mega: | ||
|[https://mega.nz/# | |[https://mega.nz/folder/LLxkBC6a#ZLxsCbLzHX-1Ghepxi-rjA MPI7001-7inch-B-2022-04-04-raspios-buster-armhf.7z] | ||
|- | |- | ||
| rowspan="2" |Ubuntu | | rowspan="2" |Ubuntu MATE | ||
| rowspan="2" | | | rowspan="2" |22.04 | ||
|[[File: | |[[File:Baiduyun.jpg|24px]]BaiduYun: | ||
|[https:// | |[https://pan.baidu.com/s/1zni1hnXTXvkdAcT47bl1VQ MPI7001-7inch-B-ubuntu-mate-22.04-desktop-armhf+raspi.7z] 提取码:11xx | ||
|- | |- | ||
|[[File:Mega-1.jpg|24px]]Mega: | |[[File:Mega-1.jpg|24px]]Mega: | ||
|[https://mega.nz/# | |[https://mega.nz/folder/rPgzRCwT#dqQdp_UuW-kNXjl71nb4qA MPI7001-7inch-B-ubuntu-mate-22.04-desktop-armhf+raspi.7z] | ||
|- | |- | ||
| rowspan="2" |Kali | | rowspan="2" |Kali Linux RaspberryPi | ||
| rowspan="2"| | | rowspan="2" |2023.1 | ||
|[[File: | |[[File:Baiduyun.jpg|24px]]BaiduYun: | ||
|[https:// | |[https://pan.baidu.com/s/1oMcBaW1j0dOi1aMxdrD2bg MPI7001-7inch-B-kali-linux-2023.1-rpi4-nexmon.7z] 提取码:qcks | ||
|- | |- | ||
|[[File:Mega-1.jpg|24px]]Mega: | |[[File:Mega-1.jpg|24px]]Mega: | ||
|[https://mega.nz/# | |[https://mega.nz/folder/bb4DWC4a#NJLM8pUJxenRuxi5I-ZyAQ MPI7001-7inch-B-kali-linux-2022.1-rpi4-nexmon.7z] | ||
|} | |} | ||
*[http://www.lcdwiki.com/zh/MD5 镜像文件MD5校验] | *[http://www.lcdwiki.com/zh/MD5 镜像文件MD5校验] | ||
* '''常用软件''' | * '''常用软件''' | ||
| 第144行: | 第171行: | ||
[[#top|BACK TO TOP]] | [[#top|BACK TO TOP]] | ||
2024年4月26日 (五) 18:41的最新版本
产品视频
产品图片


产品介绍
- 7inch标准显示器,硬件分辨率800×480,可通过软件配置分辨率(最高支持1920X1080)
- 带电容触摸屏,支持5点触摸控制,USB触摸,免驱
- 支持背光单独控制,可关闭背光节省功耗
- 兼容Raspberry Pi、BB Black、Banana Pi等主流mini PC
- 作为Raspberry Pi显示器使用时,支持Raspbian、Ubuntu、WIN10 IOT等系统,单点触控,免驱
- 作为计算机显示器使用时,支持Windows 7/ 8/ 8 .1/ 10,五点触控,免驱
- 支持微软索尼PS4、XBOX360和任天堂等常用游戏主机
- 本产品通过CE、RoHS认证
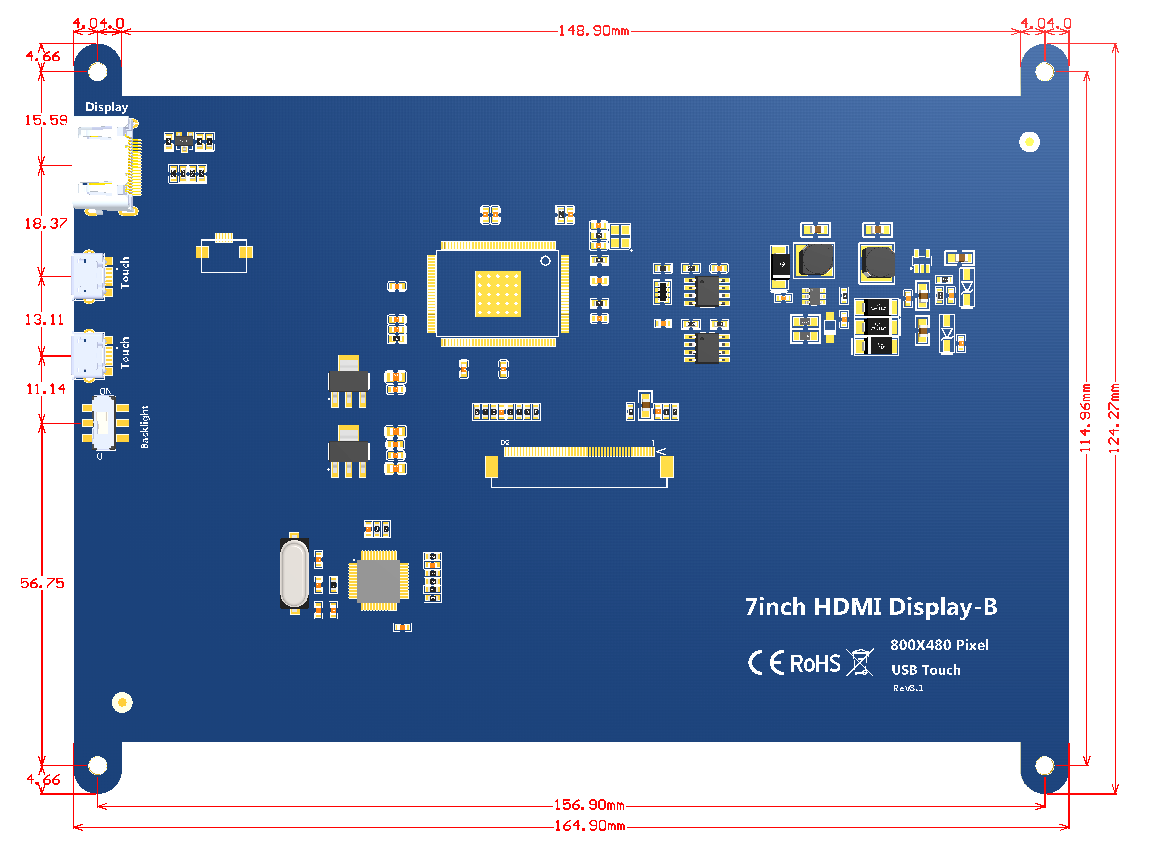
产品参数
- 尺寸: 7.0(inch)
- SKU: MPI7001
- 分辨率: 800×480(dots)
- 触摸: 5点电容触摸
- 显示区域: 153.84*85.63(mm)
- 外形尺寸: 164.9*124.27(mm)
- 包装尺寸: 211*150*53 (mm)
- 重量(含包装): 405(g)
- 功耗: 0.74A*5V
硬件说明

- ① Backlight: 背光电源开关, 控制背光打开和关闭,可节省功耗。
- ②&③ Touch: USB 触摸/供电接口, 用于供电和触摸输出,两者功能一致,只接任意一个即可
- ④ Display: HDMI 接口, 用于连接主板和 LCD 显示屏进行HDMI传输
在树莓派Raspbian/Ubuntu Mate/Win10 IoT Core系统中使用
- 步骤1,安装官方镜像
- 从官方下载最新镜像
- 按官方教程步骤安装好系统
- 步骤2,修改config.txt配置文件
- 步骤1烧写完成后,打开Micro SD卡根目录的config.txt文件并在文件末端加入以下代码,保存并安全弹出Micro SD卡:
max_usb_current=1
hdmi_force_hotplug=1
config_hdmi_boost=7
hdmi_group=2
hdmi_mode=87
hdmi_drive=1
hdmi_cvt 800 480 60 6 0 0 0
- 注意:树莓派官方2021-10-30系统,还要注释掉 dtoverlay=vc4-kms-v3d (修改为 #dtoverlay=vc4-kms-v3d)
- 步骤3,
将Micro SD卡插入树莓派,将HDMI线连接树莓派和LCD,将USB线连接树莓派的4个USB口任意一个,USB线另一端连接到LCD的USB口,然后给树莓派上电,如显示和触摸均正常则驱动成功(请使用足2A电源供电)。
如何作为电脑显示器使用
- 使用HDMI连接线将电脑HDMI输出信号连接至LCD的HDMI接口;
- 将MicroUSB连接线一端连接LCD的USB Touch接口(两个MicroUSB任意一个均可),另一端连接至电脑的USB端口。
- 如有多个显示器,请先拔掉其他显示器接口,将本LCD作为唯一显示器进行测试。
如何旋转显示方向
注:此方法只针对树莓派系列的显示屏,其它显示屏并不适用
- 第一步,如果还没有安装驱动,请执行下面的命令(树莓派需要联网):
sudo rm -rf LCD-show
git clone -{R|https://github.com/goodtft/LCD-show.git}-
chmod -R 755 LCD-show
cd LCD-show/
sudo ./LCD7B-show
执行完毕之后,驱动会安装好,系统会自动重启,然后显示屏就正常显示和触摸
- 第二步,如果已经安装好驱动,请执行下面的命令:
cd LCD-show/
sudo ./rotate.sh 90
执行完毕之后,系统会自动重启,然后显示屏就可以旋转90度正常显示和触摸
(' 90 '也可以改为0,90,180,270等数值,分别代表旋转角度0度,90度,180度,270度)
如果提示 rotate.sh 找不到,请回到 第一步,安装最新的驱动
如果是HDMI接口显示屏使用Raspberry Pi 4,需要先把config.txt文件中的 dtoverlay=vc4-fkms-V3D 注释掉
常见问题
- 树莓派常见问题
- Ubuntu-mate-18.04系统中,使用电容触摸局部菜单无法使用
- 如何在树莓派4中使用双屏显示
- 7寸B和7寸C如何PWM控制背光亮度
- Ubuntu 20.04 LTS 安装桌面之后,系统卡死
- 树莓派官方64位系统2021-05-07-raspios-buster-arm64.img无法设置分辨率
资源下载
- 文档
- 7inch_HDMI_Display-B_用户手册(CN)
- 如何安装LCD驱动-V1.2
- 如何修改显示方向和触摸-HDMI-电容触摸-V1.2
- 如何安装虚拟键盘
- 如何校准电容触摸屏-V1.0
- 树莓派入门教程(下载,格式化,烧录,SSH,PuTTy)-V1.0
- 产品尺寸图
- HDMI模块如何设置双屏显示-V1.0
- 驱动下载
- Driver:LCD-show.tar.gz
- 镜像下载
- 如果你觉得前面步骤的修改配置、安装驱动都比较困难或者仍然显示异常,
- 请先使用我们预装好驱动的镜像,下载后解压并把镜像写入到TF卡中。然后把卡插入树莓派就可以使用了。
镜像:Raspbian, 支持的树莓派版本:Pi4B,Pi3B+/Pi3B,Pi2B,PiB+/PiB,Pi3A+,PiA+,Pi Zero W,Pi Zero,默认用户名:pi密码:raspberry
镜像:Ubuntu-MATE-32bit, 支持的树莓派版本:Pi4B,Pi3B+/Pi3B,Pi2B,PiB+/PiB,Pi3A+,PiA+,默认用户名:pi密码:raspberry
镜像:Kali Linux RaspberryPi-32bit,支持的树莓派版本:Pi4B,Pi3B+/Pi3B,Pi2B,PiB+/PiB,Pi3A+,PiA+,默认用户名:kali密码: kali
| Image Name | Version | Download | |
|---|---|---|---|
| Raspbian | 2024-03-15 | MPI7001-7inch-B-2024-03-15-raspios-bookworm-armhf(Pi4-Pi5) 提取码:zgts | |
| MPI7001-7inch-B-2022-04-04-raspios-buster-armhf.7z | |||
| Ubuntu MATE | 22.04 | MPI7001-7inch-B-ubuntu-mate-22.04-desktop-armhf+raspi.7z 提取码:11xx | |
| MPI7001-7inch-B-ubuntu-mate-22.04-desktop-armhf+raspi.7z | |||
| Kali Linux RaspberryPi | 2023.1 | MPI7001-7inch-B-kali-linux-2023.1-rpi4-nexmon.7z 提取码:qcks | |
| MPI7001-7inch-B-kali-linux-2022.1-rpi4-nexmon.7z | |||
- 镜像文件MD5校验
- 常用软件