|
|
| 第6行: |
第6行: |
| }} | | }} |
|
| |
|
| <tabber>
| |
| 产品说明=
| |
| == <font color="blue">产品图片</font>== | | == <font color="blue">产品图片</font>== |
| [[File:MPI5008-66.png|300px]] | | [[File:MPI5008-66.png|300px]] |
| 第161行: |
第159行: |
|
| |
|
| [[#top|BACK TO TOP]] | | [[#top|BACK TO TOP]] |
|
| |
| |-|
| |
| 常见问答=<table class="a-r at-c roundy bgd-blue bl-white" style="margin-left: 5px; margin-bottom: 5px;"> <table style="margin-top: 10px; border-right: 20px solid transparent; border-top: 20px solid #008DE6;"><table style="margin-top: 10px; border-right: 20px solid transparent; border-top: 20px solid #008DE6;">
| |
| <tr>
| |
| <td>
| |
| <table class="roundy" style="margin-top: -30px; margin-left: -5px; margin-right: -5px; background: #008DE6;">
| |
| <tr>
| |
| <td><font color="#FFF"> <big><big>
| |
| 问题:使用光盘/网盘提供的树莓派镜像,无法正常使用LCD,怎么处理?
| |
| </big></big></font>
| |
| </td></tr></table>
| |
| </td></tr></table>
| |
| <table style="margin-top: 10px; border-left: 20px solid transparent; border-top: 20px solid #DDD;">
| |
| <tr>
| |
| <td>
| |
| <table class="roundy mw-collapsible" style="margin-top: -30px; margin-left: -5px; margin-right: -5px; background: #DDD;">
| |
| <tr>
| |
| <td><font color="#008DE6"> <b><big>答复:</big></b></font><br />
| |
| </td></tr>
| |
| <tr>
| |
| <td>
| |
| <ul><li>确定硬件连接无误且接触良好
| |
| </li><li>确定Micro SD卡烧写正常,系统启动是否正常。
| |
| </li><li>树莓派正常启动时PWR灯常亮,ACT灯闪烁。
| |
| </li><li>如果发现两灯都常亮则可能是Micro SD卡烧写镜像不成功或Micro SD卡与树莓派接触不良。
| |
| </li><li>推荐使用5V 2A电源适配器对树莓派进行供电。 如使用电脑USB接口供电,可能由于供电不足导致树莓派无法正常启动。
| |
| </li>
| |
| </ul>
| |
| </td></tr></table>
| |
| </td></tr></table>
| |
| <br />
| |
|
| |
| <table style="margin-top: 10px; border-right: 20px solid transparent; border-top: 20px solid #008DE6;">
| |
| <tr>
| |
| <td>
| |
| <table class="roundy" style="margin-top: -30px; margin-left: -5px; margin-right: -5px; background: #008DE6;">
| |
| <tr>
| |
| <td><font color="#FFF"> <b><big><big>问题:</big></big></b></font><font color="#EEE"><big>使用树莓派官方提供的镜像, LCD无显示是什么原因?
| |
| </big></font>
| |
| </td></tr></table>
| |
| </td></tr></table>
| |
| <table style="margin-top: 10px; border-left: 20px solid transparent; border-top: 20px solid #DDD;">
| |
| <tr>
| |
| <td>
| |
| <table class="roundy mw-collapsible" style="margin-top: -30px; margin-left: -5px; margin-right: -5px; background: #DDD;">
| |
| <tr>
| |
| <td><font color="#008DE6"> <b><big>答复:</big></b></font><br />
| |
| </td></tr>
| |
| <tr>
| |
| <td>
| |
| <ul><li>LCD需要安装驱动才能正确显示,具体请参考”如何安装LCD驱动”相关说明文档,
| |
| </li><li>建议先使用我们提供的镜像,测试通过后,再自行安装驱动程序。
| |
| </li></ul>
| |
| </td></tr></table>
| |
| </td></tr></table>
| |
| <br />
| |
|
| |
| <table style="margin-top: 10px; border-right: 20px solid transparent; border-top: 20px solid #008DE6;">
| |
| <tr>
| |
| <td>
| |
| <table class="roundy" style="margin-top: -30px; margin-left: -5px; margin-right: -5px; background: #008DE6;">
| |
| <tr>
| |
| <td><font color="#FFF"> <b><big><big>问题:</big></big></b></font><font color="#EEE"><big>装好驱动后如想切换回传统显示器进行显示,如何操作?
| |
| </big></font>
| |
| </td></tr></table>
| |
| </td></tr></table>
| |
| <table style="margin-top: 10px; border-left: 20px solid transparent; border-top: 20px solid #DDD;">
| |
| <tr>
| |
| <td>
| |
| <table class="roundy mw-collapsible" style="margin-top: -30px; margin-left: -5px; margin-right: -5px; background: #DDD;">
| |
| <tr>
| |
| <td><font color="#008DE6"> <b><big>答复:</big></b></font><br />
| |
| </td></tr>
| |
| <tr>
| |
| <td>
| |
| <ul><li>请参考”如何安装LCD驱动”相关说明文档,使用以下命令切换:
| |
| {{code|1=
| |
| sudo ./LCD-hdmi
| |
| }}
| |
| </li></ul>
| |
| </td></tr></table>
| |
| </td></tr></table>
| |
| <br />
| |
|
| |
| <table style="margin-top: 10px; border-right: 20px solid transparent; border-top: 20px solid #008DE6;">
| |
| <tr>
| |
| <td>
| |
| <table class="roundy" style="margin-top: -30px; margin-left: -5px; margin-right: -5px; background: #008DE6;">
| |
| <tr>
| |
| <td><font color="#FFF"> <b><big><big>问题:</big></big></b></font><font color="#EEE"><big>使用7寸HDMI屏时显示正常但无触摸功能,如何处理?
| |
| </big></font>
| |
| </td></tr></table>
| |
| </td></tr></table>
| |
| <table style="margin-top: 10px; border-left: 20px solid transparent; border-top: 20px solid #DDD;">
| |
| <tr>
| |
| <td>
| |
| <table class="roundy mw-collapsible" style="margin-top: -30px; margin-left: -5px; margin-right: -5px; background: #DDD;">
| |
| <tr>
| |
| <td><font color="#008DE6"> <b><big>答复:</big></b></font><br />
| |
| </td></tr>
| |
| <tr>
| |
| <td>
| |
| <ul><li>检查触摸排线接插处是否运输松动
| |
| </li><li>检查USB一端是否连接树莓派4个USB口中任意一个,另一端连接到液晶屏的USB Touch接口.
| |
| </li><li>可先将USB触摸连接到电脑USB口,观察是否能正常被电脑识别并正常触摸,以此可以判断触摸功能好坏,
| |
| </li></ul>
| |
| </td></tr></table>
| |
| </td></tr></table>
| |
| <br />
| |
|
| |
| <table style="margin-top: 10px; border-right: 20px solid transparent; border-top: 20px solid #008DE6;">
| |
| <tr>
| |
| <td>
| |
| <table class="roundy" style="margin-top: -30px; margin-left: -5px; margin-right: -5px; background: #008DE6;">
| |
| <tr>
| |
| <td><font color="#FFF"> <b><big><big>问题:</big></big></b></font><font color="#EEE"><big>问题:更新升级镜像之后无法使用?
| |
| </big></font>
| |
| </td></tr></table>
| |
| </td></tr></table>
| |
| <table style="margin-top: 10px; border-left: 20px solid transparent; border-top: 20px solid #DDD;">
| |
| <tr>
| |
| <td>
| |
| <table class="roundy mw-collapsible" style="margin-top: -30px; margin-left: -5px; margin-right: -5px; background: #DDD;">
| |
| <tr>
| |
| <td><font color="#008DE6"> <b><big>答复:</big></b></font><br />
| |
| </td></tr>
| |
| <tr>
| |
| <td>
| |
| <ul><li>更新需按照以下方式进行,否则可能导致镜像无法运行:
| |
| <pre style="border: 1px dashed black;color:black">
| |
| sudo apt-mark hold raspberrypi-bootloader
| |
| sudo apt-get update
| |
| sudo apt-get upgrade
| |
| </pre>
| |
| </li></ul>
| |
| </td></tr></table>
| |
| </td></tr></table>
| |
| <br />
| |
|
| |
| <table style="margin-top: 10px; border-right: 20px solid transparent; border-top: 20px solid #008DE6;">
| |
| <tr>
| |
| <td>
| |
| <table class="roundy" style="margin-top: -30px; margin-left: -5px; margin-right: -5px; background: #008DE6;">
| |
| <tr>
| |
| <td><font color="#FFF"> <b><big><big>问题:</big></big></b></font><font color="#EEE"><big>5寸和7寸屏连接到电脑HDMI,无法正常显示,怎么解决?
| |
| </big></font>
| |
| </td></tr></table>
| |
| </td></tr></table>
| |
| <table style="margin-top: 10px; border-left: 20px solid transparent; border-top: 20px solid #DDD;">
| |
| <tr>
| |
| <td>
| |
| <table class="roundy mw-collapsible" style="margin-top: -30px; margin-left: -5px; margin-right: -5px; background: #DDD;">
| |
| <tr>
| |
| <td><font color="#008DE6"> <b><big>答复:</big></b></font><br />
| |
| </td></tr>
| |
| <tr>
| |
| <td>
| |
| <ul><li>确定电脑的HDMI接口可以正常输出
| |
| </li><li>电脑只连接LCD作为显示设备,不连接其它的显示器(拔掉其他显示器)。
| |
| </li><li>先接USB供电线再接HDMI线。
| |
| </li><li>尝试重启电脑。
| |
| </li><li>必须使用windows操作系统。
| |
| </li></ul>
| |
| </td></tr></table>
| |
| </td></tr></table>
| |
| <br />
| |
|
| |
| <table style="margin-top: 10px; border-right: 20px solid transparent; border-top: 20px solid #008DE6;">
| |
| <tr>
| |
| <td>
| |
| <table class="roundy" style="margin-top: -30px; margin-left: -5px; margin-right: -5px; background: #008DE6;">
| |
| <tr>
| |
| <td><font color="#FFF"> <b><big><big>问题:</big></big></b></font><font color="#EEE"><big>在树莓派3代上,怎么打开蓝牙功能?
| |
| </big></font>
| |
| </td></tr></table>
| |
| </td></tr></table>
| |
| <table style="margin-top: 10px; border-left: 20px solid transparent; border-top: 20px solid #DDD;">
| |
| <tr>
| |
| <td>
| |
| <table class="roundy mw-collapsible" style="margin-top: -30px; margin-left: -5px; margin-right: -5px; background: #DDD;">
| |
| <tr>
| |
| <td><font color="#008DE6"> <b><big>答复:</big></b></font><br />
| |
| </td></tr>
| |
| <tr>
| |
| <td>
| |
| <ul><li>方法1:升级到树莓派官方最新镜像(2016-05-27-jessie之后版本已经默认打开蓝牙功能);
| |
| </li><li>方法2:手动打开蓝牙功能<br />
| |
| {{code|1=
| |
| sudo apt-get install pi-bluetooth
| |
| sudo apt-get install bluetooth bluez blueman
| |
| systemctl status bluetooth
| |
| sudo systemctl start bluetooth
| |
| sudo reboot
| |
| }}
| |
| </li></ul>
| |
| </td></tr></table>
| |
| </td></tr></table>
| |
| <br />
| |
|
| |
| <table style="margin-top: 10px; border-right: 20px solid transparent; border-top: 20px solid #008DE6;">
| |
| <tr>
| |
| <td>
| |
| <table class="roundy" style="margin-top: -30px; margin-left: -5px; margin-right: -5px; background: #008DE6;">
| |
| <tr>
| |
| <td><font color="#FFF"> <b><big><big>问题:</big></big></b></font><font color="#EEE"><big>使用5寸7寸HDMI屏时无法全屏或显示残缺,如何处理?
| |
| </big></font>
| |
| </td></tr></table>
| |
| </td></tr></table>
| |
| <table style="margin-top: 10px; border-left: 20px solid transparent; border-top: 20px solid #DDD;">
| |
| <tr>
| |
| <td>
| |
| <table class="roundy mw-collapsible" style="margin-top: -30px; margin-left: -5px; margin-right: -5px; background: #DDD;">
| |
| <tr>
| |
| <td><font color="#008DE6"> <b><big>答复:</big></b></font><br />
| |
| </td></tr>
| |
| <tr>
| |
| <td>
| |
| <ul><li>检查HDMI是否已经插好并且输出正常
| |
| </li><li>打开SD卡根目录下config.txt文件,检查HDMI配置是否正确
| |
| </li><li>5寸和7寸800*480应配置为如下参数:<br />
| |
| <pre style="border: 1px dashed black;color:black;width:80%">
| |
| hdmi_group=2
| |
| hdmi_mode=1
| |
| hdmi_mode=87
| |
| hdmi_cvt 800 480 60 6 0 0 0
| |
| </pre>
| |
| </li><li>7寸1024*600高清应配置为:<br />
| |
| <pre style="border: 1px dashed black;color:black;width:80%">
| |
| hdmi_group=2
| |
| hdmi_mode=1
| |
| hdmi_mode=87
| |
| hdmi_cvt 1024 600 60 6 0 0 0
| |
| </pre>
| |
| </li></ul>
| |
| </td></tr></table>
| |
| </td></tr></table>
| |
| <br />
| |
|
| |
| |-|
| |
| 售后=
| |
| {{contact_us}}
| |
| </tabber>
| |
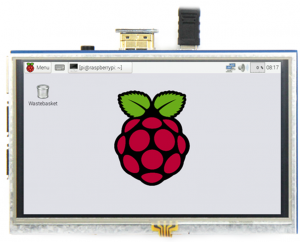
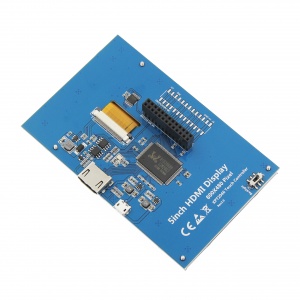
产品图片
产品介绍
- 5inch标准显示器,硬件分辨率800×480
- 带电阻触摸屏,支持触摸控制
- 支持背光单独控制,可关闭背光节省功耗
- 支持标准HDMI接口输入,兼容并可直接插入树莓派(3代2代1代)
- 可作为通用HDMI显示器使用,如接电脑HDMI作为副显示器(分辨率输出要能调整为800X480)
- 如仅用作显示则无需占用IO资源(树莓派使用触摸功能时需占用IO资源)
- 本产品通过CE、RoHS认证
产品参数
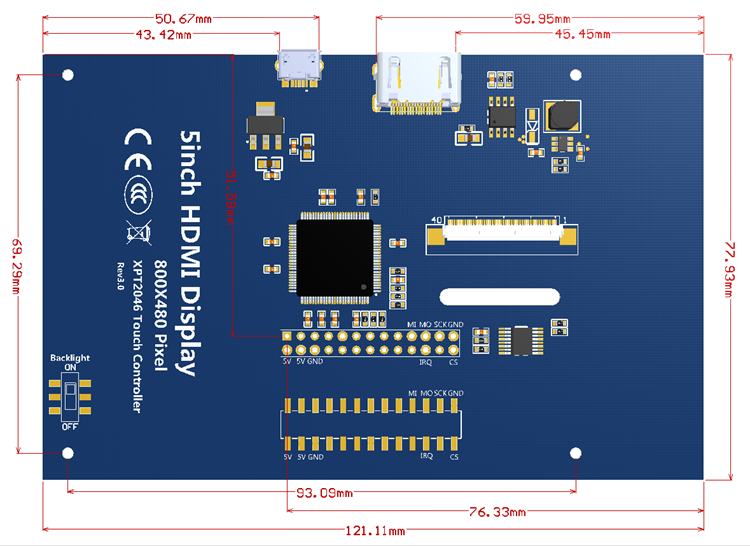
- 尺寸: 5.0(inch)
- SKU: MPI5008
- 分辨率: 800×480(dots)
- 触摸: 4线电阻触摸
- 外形尺寸: 121.11*77.93(mm)
- 产品重量: 175(g)
硬件说明
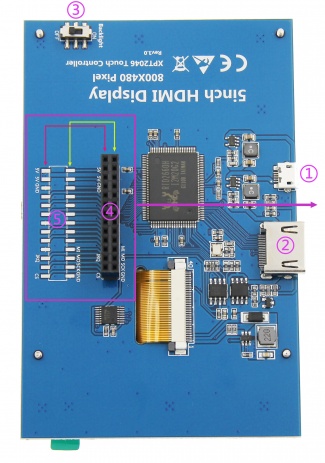
① USB 供电接口:USB供电输入(5V),如图④母座已连接树莓派取电,则此USB可不接
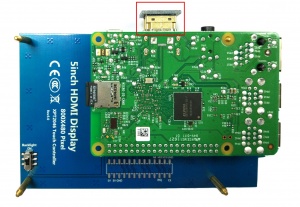
② HDMI 接口:用于连接主板和 LCD 显示屏进行HDMI传输
③ 背光开关:控制背光打开和关闭,可节省功耗
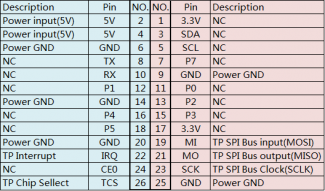
④ 电源和触摸接口:从树莓派取电给液晶屏,同时将触摸信号通过GPIO回传至树莓派
⑤ 扩展接口:将图④母座占用的GPIO口PIN对PIN引出,方便扩展使用
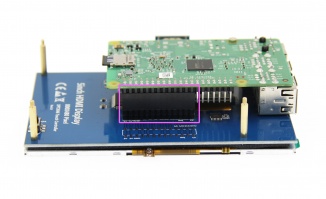
与树莓派连接
|
|
| ①将LCD 13*2Pin母座按上图与树莓派连接
|
②将配套的HDMI转接头与树莓派连接
|
在树莓派Raspbian/Ubuntu Mate/Win10 IoT Core系统中使用
- 从官方下载最新镜像
- 按官方教程步骤安装好系统
- 方法一:在线安装(树莓派需连接互联网)
- 1)用Putty连接登陆树莓派系统到用户命令行(初始用户名:pi 密码:raspberry)
- 2)执行以下命令(复制后在Putty窗口中单击鼠标右键即可粘贴):
sudo rm -rf LCD-show
git clone https://github.com/goodtft/LCD-show.git
chmod -R 755 LCD-show
cd LCD-show/
sudo ./LCD5-show
- 方法二:离线安装
- 1)从光盘中拷贝“LCD-show.tar.gz”驱动到树莓派系统卡根目录下;
- (推荐步骤1烧录完成后将驱动直接拷贝到Micro SD卡,或使用SFTP等办法远程拷贝)
- 2)执行以下操作命令解压安装驱动:
cd /boot
sudo tar zxvf LCD-show.tar.gz
cd LCD-show/
sudo ./LCD5-show
- 执行完上述步骤后,树莓派将自动重启,即可正常触摸和显示。
如何作为电脑显示器使用
- 使用HDMI连接线将电脑HDMI输出信号连接至LCD的HDMI接口;
- 将MicroUSB连接线一端连接LCD的USB Touch接口(两个MicroUSB任意一个均可),另一端连接至电脑的USB端口。
- 如有多个显示器,请先拔掉其他显示器接口,将本LCD作为唯一显示器进行测试。
- 作为电脑显示器用,触摸功能将不可用。
如何旋转显示和触摸
Wait to Upload
资源下载
- 如何安装LCD驱动(CN)
- 如何安装虚拟键盘(CN)
- 产品尺寸图:MPI5008_Product_Dimensions.png
- 本地下载:LCD-show.tar.gz
- 如果你觉得前面步骤的修改配置、安装驱动都比较困难或者仍然显示异常,请先使用我们预装好驱动的镜像,
- 下载后解压并把镜像写入到Micro SD卡中。然后把卡插入树莓派就可以使用了。
- Panasonic SDFormatter
- Win32DiskImager
- PuTTY
BACK TO TOP


